Tuesday, February 28, 2023

She Is Clothed in Strength and Dignity

This afternoon I'm posting with the Classic Design Team as the April edition of the Classic Design Challenge is now open.

Our wonderful sponsor for the month is Sheepski Designs and I've selected 'Blossom-Image 214' for today project card. 


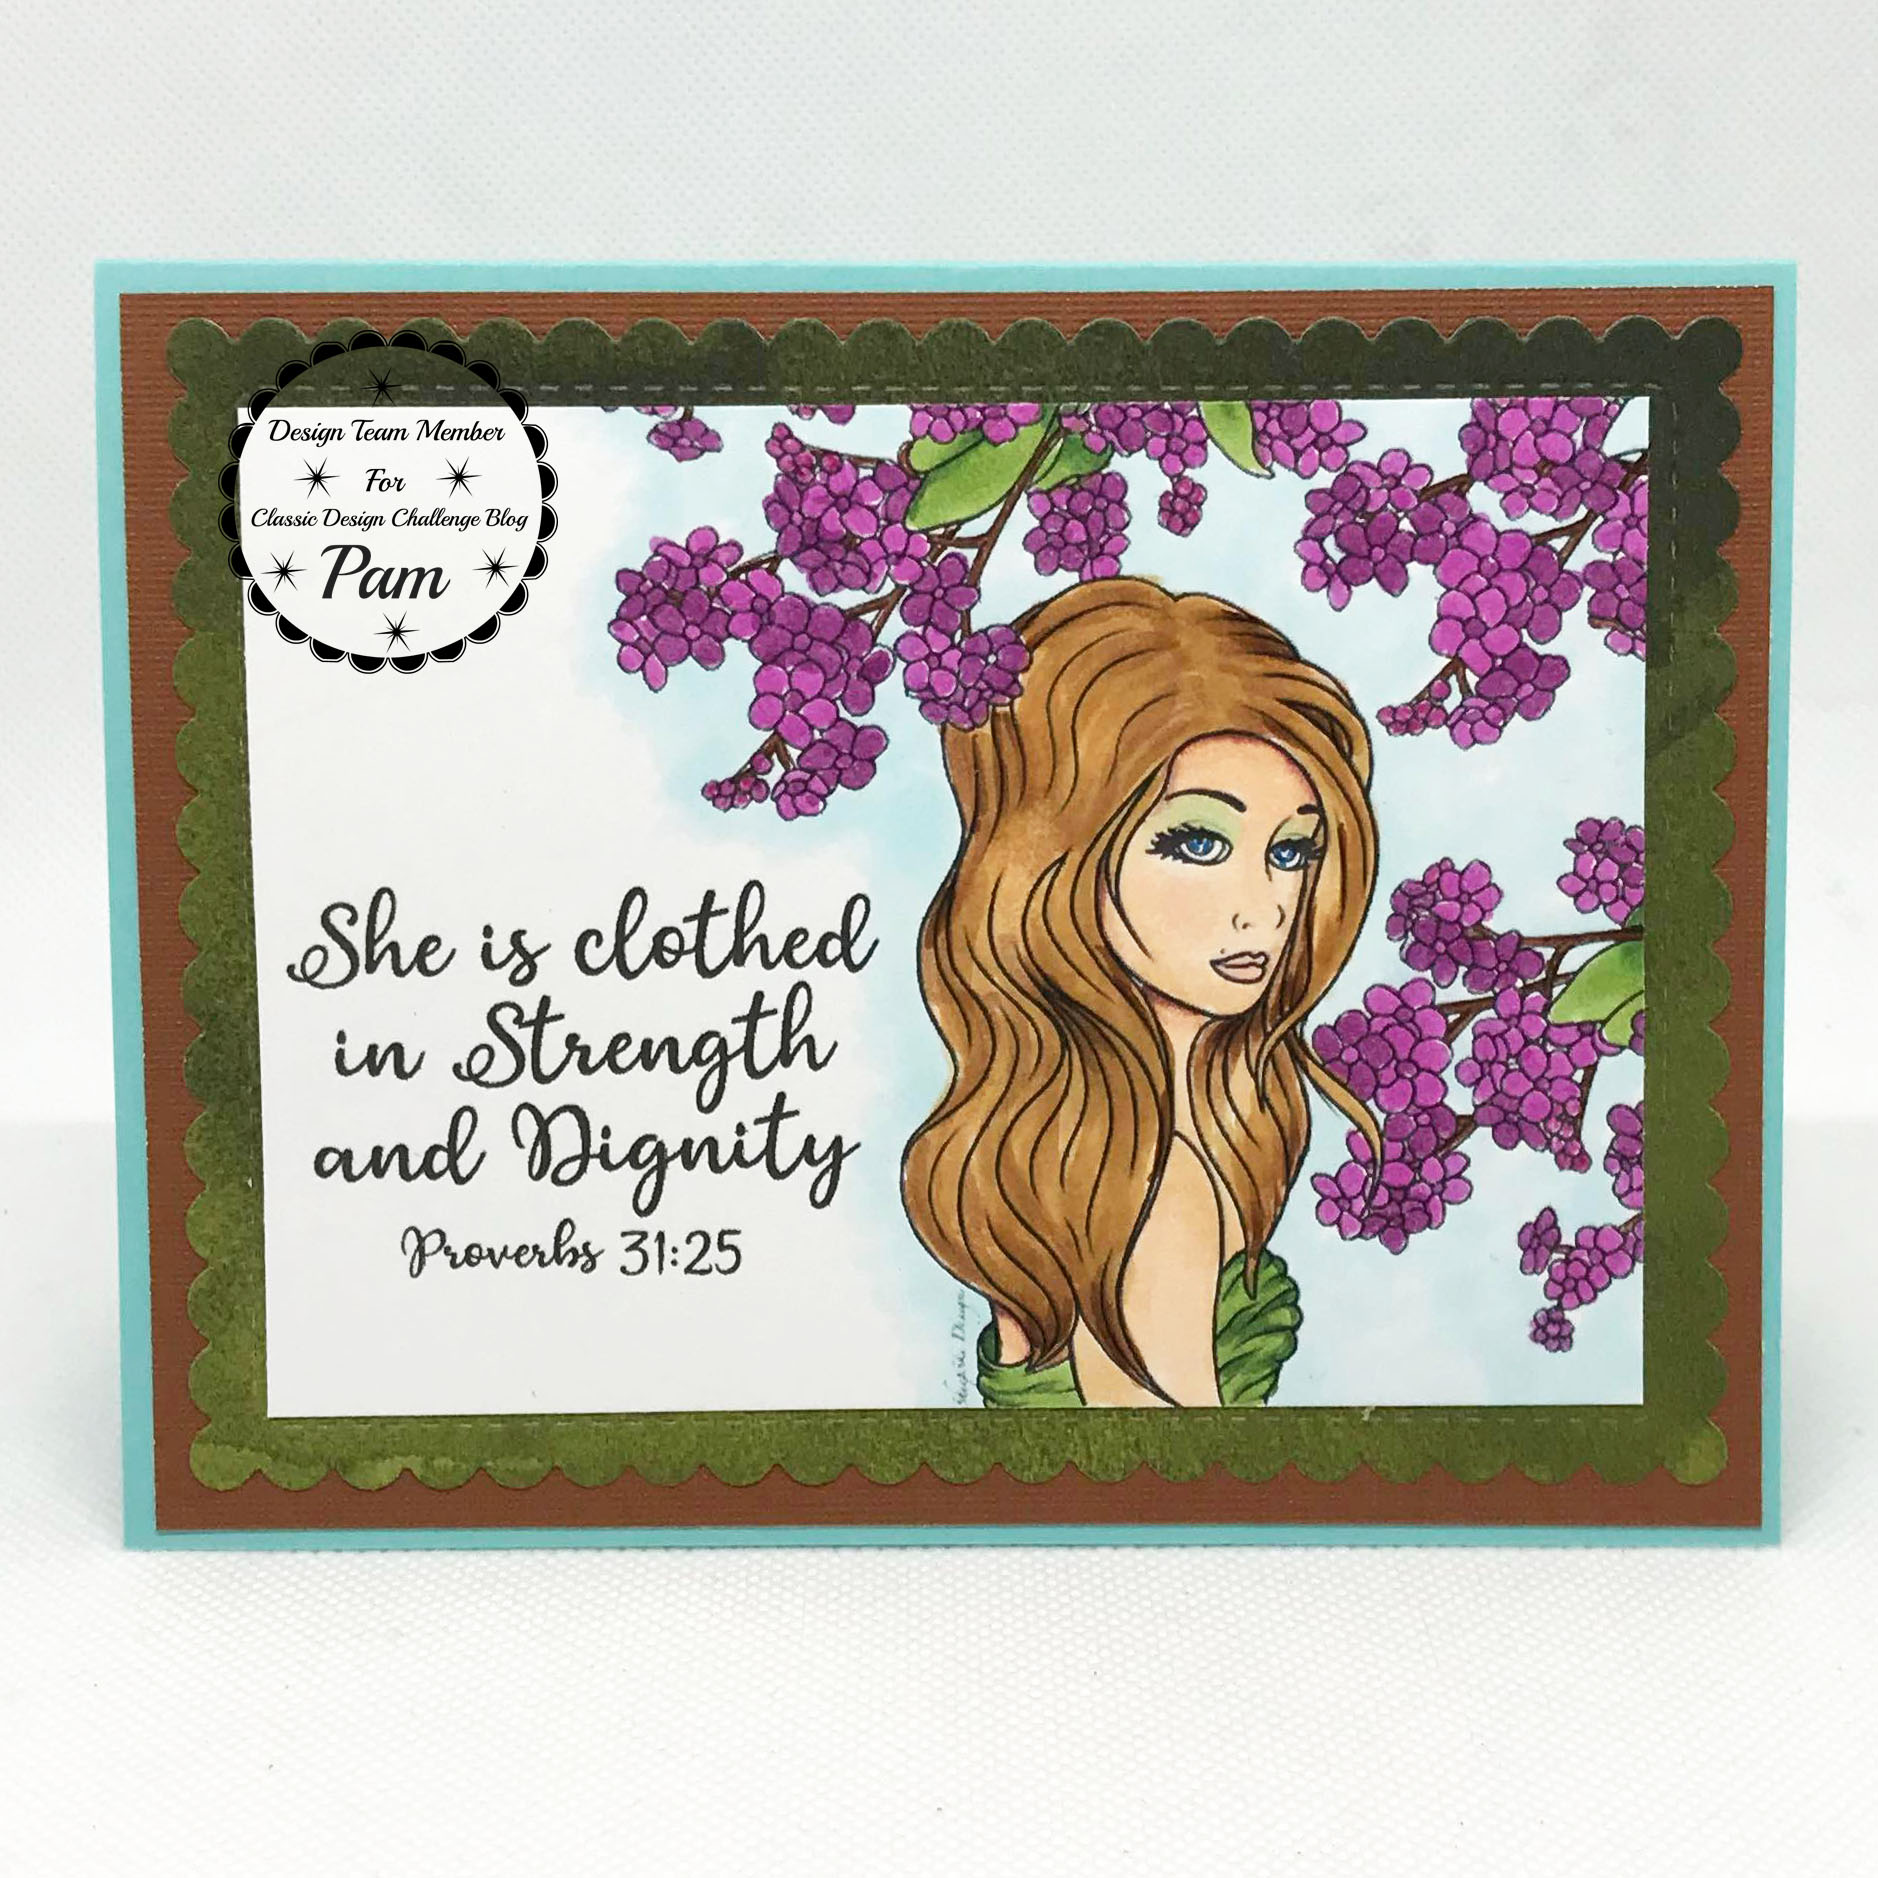
 To make this card, I started by enlarging the image to just under 4" and placed it to the right edge of my card front template.  Then I added the scripture from Proverbs 31:25, centered to the left behind the girl's image and under the branch of flowers. 

After printing on Neenah 110# cardstock, I used my Copic markers for coloring and then trimmed the edges close to the completed image.  I selected an aqua A2 card base, an olive mat that coordinated with her dress and a brown mat for extra contrast.  I used a scalloped edge rectangle border die to cut the olive piece.   Then simply secured the layers to the card base to complete this design.

Be sure to check out all the Design Team projects on the Classic Design Challenge Blog and enter yours also! 

Thank you for stopping by today to view my blog. I enjoy sharing my work with you and invite you to 'Follow' my blog and to visit my site - "Not Just Scraps' on Facebook - where you can purchase my cards. 

I will be entering this card in the following challenges: 

Sheepski Designs ~ Challenge 81  (Winner - 3 images)

Lil Patch of Crafty Friends, Challenge 200

The Corrosive Challenge  ~ February 

Allsorts ~ Week 717 

Creative Fingers ~ Challenge 249


Pam's Pearls


Copics 

Hair: E21, E23, E55, E57, Dress: G46, G43, Leaves: G40, G43, G46, Stems: Sepia Multi-liner, Blossoms: V05, V06, Eyes: Blue Spectrum Noir Art Liner, Around: B000


Products 


Monday, February 27, 2023

Big and Bold Birthday Wishes


No matter how harsh your winter is in the north or how gentle it is in the south, don't we all just love to see the first sign of spring when the daffodils start popping up! 

Today's card is a special birthday card I made for one of my church ladies.  I've selected Sweet n' Sassy's Spring Blossoms set, and used the single daffodil and the sentiment. 


I stamped the large flower across my card front paper and then added the 'Happy Birthday' under it.  I used Momento, Tuxedo Black for the image and Versa Clair ,Nocturne for the sentiment.  

I used Copic markers for the coloring and then die cut the edge of the completed image and the stripped matting with Tattered Lace, Pearl Circles die set. 

I wanted the card base to continue the bright yellow warm spring color, so I made the 6" square base using half of a 12" x 12" coordinating cardstock piece. 

I secured the matting and the colored image in the center of the card.  I really like the wider mat for this one, both to break up the continues yellow and to allow the image to be grounded.  Since this one was going in the mail the same day as I made it, I elected to skip the bow ~ but could have easily added one.  

Thank you for stopping by today to view my blog. I enjoy sharing my work with you and invite you to 'Follow' my blog and to visit my site - "Not Just Scraps' on Facebook - where you can purchase my cards. 

I will be entering this card in the following challenges:  

AAA Cards ~ Challenge 240 ~ Circles 

Just Us Girls ~ Challenge 668 ~ CAS + Coloring  

Time Out Challenge ~ Challenge 232 ~ Happy 9th Birthday


Pam's Pearls


Products


https://www.sweetnsassystamps.com/spring-blossoms-clear-stamp-set/

Saturday, February 25, 2023

Happy Mother's Day ~

Happy Saturday from the Polkadoodles Design Team.  Today on the Polkadoodles Challenge Blog, we are sharing Mother's Day cards for your inspiration.  I hope you'll check out that link and enter your cards also.

But first I'll share my DT card and a few details. 

I selected Polkadoodles, Blossoming Winnie because I loved her sweet face and the full bouquet.  Any Mom would like this image. 


I started by sizing Winnie to about 3" tall and printed her on 110# Neenah card stock.  I've used Copic markers for my coloring and listed the pens I used in the 'Products' section.

When I went to the die cutting area in my craft room, I realized that I wasn't going to be able to use the oval shape I'd decided on ~ I had the image too close to the edge of the paper.  So I went with an altered design and was able to still use Gina Marie Designs, Pleated Oval.  I positioned the plates to start cutting just below her feet, then I trimmed after that to get the straight edge.  Next I secured the colored piece to a piece of red cardstock and trimmed around the edge to give it a little contrast.

I selected the floral patterned paper from Polkadoodles, Serenity Spring Surprise Craft Papers (PD8125).  As you can see in the design, I added a strip of the red cardstock and an additional smaller strip of the floral pattern. Then I secured the image and the sentiment to this and secured the layered piece on to a 6" card base.  For the final touch I added the lavender organza bow at the top fold. 

Thank you for stopping by today to view my blog. I enjoy sharing my work with you and invite you to 'Follow' my blog and to visit my site - "Not Just Scraps' on Facebook - where you can purchase my cards. 

I will be entering this card in the following challenges: 

Alphabet Challenge ~ XOXO 

Krafty Chicks ~ Challenge 652 ~ Love/Valentine  

Elliebelle's Corner ~ February ~ Anything Goes  

Simon Says Stamps ~ Wednesday Challenge ~ #103  

Cutie Pie ~ Challenge 179 ~ Hearts/Flowers ~ Valentine/Mother's Day  

World Wide Crafters and Colorist Challenge ~ February


Pam's Pearls

 Copics: 

Hair: E41, E42, E43, Flowers: BV02/BV13, Y15/Y06, R46/R24/R21, Leaves: G43, G82, G46, Ribbon: BV21, BV34, Dress: R46, R24, R21, Shoes, R21


Products:


Friday, February 24, 2023

Owl Always Be Here for You

On Thursdays, I try to send out a Thinking of You card to someone I know needs a little cheering up or a get well wish.  Today I'm sharing one of those  'Thinking of You' cards.  I used Power Poppy Stamps, Forest Fellas, Odell Owl.


After sizing the image to fit an A2 card front, I added the sentiment on the next layer, placed close to the owl.

I used my Copic markers for coloring which are referenced below.  The coordinating paper I selected had images on the back that resembled small lace circles.  I hand cut one of them out and securted it to the top right of the image. Then used Gina Marie Designs Nested Scalloped Stitched Rectangle and cut the decorative edge and also on the coordinating patterned paper.  

After securing the patterned paper to the card front, I added the deep green solid mat behind the image, then secured this layer in the center of the card.  For the final touch I added the deep aqua flat back to the center of the embellishment. 
As a card maker I enjoy sharing my cards, especially with those who are dear to me.  How about you?

Thank you for stopping by today to view my blog. I enjoy sharing my work with you and invite you to 'Follow' my blog and to visit my site - "Not Just Scraps' on Facebook - where you can purchase my cards. 

I will be entering this card in the following challenges:

DL Art ~ Thankful Thursday ~ Challenge 318  

Krafty Chicks ~ Challenge 662  

Through the Purple Haze ~ Challenge 201  

Word Art Wednesday ~ Week 583 - 584  

Double Dare ~ February ~ Birds 

Make Mine Monday  ~ Challenge 194 ~ All Creatures Great and Small  (Top Pick)


Pam's Pearls

Copics: 

Owl: E57, E55, E53, E51, E50, YR23, YR27, E74, Branch: E74, G28, YG45, Scarf: BG49, BG57, BG000

Products:


Wednesday, February 22, 2023

Christmas Joy from Molly

Today I'm sharing my second posting as a Guest Designer with Conie Fong Designs.  I've made a Christmas card with a small shaker and used Molly's Pawfect Christmas.

All of the 'Molly' images in Conie's collection are my favorites.  Love the big innocent eyes and sweet expressions she has captured. 


This particular package comes with two separate images of Molly - one with the dog (which I have used) and one with a wagon full of presents and a Christmas tree.  

For my card, I sized Molly to just over 3" and used my Copic markers for the coloring.  The lovely edge is from the Penny Black Elegant Stitching die set.  Then I added the deep red coordinating mat and selected the blue patterned paper for the background.  

The die cut Christmas tree is cut out of a metallic paper which coordinated well with the background matting.  I used the same red cardstock for the background and made the mini shaker with the tree and snowflake confetti.  Once completed then I added the background paper to a 6" card base.  I layered the colored image and then the shaker securing each one.  Lastly I added the small tag, 'Wishing you Joy' to complete the card design.

Thank you for stopping by today to view my blog. I enjoy sharing my work with you and invite you to 'Follow' my blog and to visit my site - "Not Just Scraps' on Facebook - where you can purchase my cards. 

I will be entering this card in the following challenges: 

Avenue 613 ~ February ~ Red -anything but a heart (flower & tree) 

Peace on Earth ~ Christmas ~ Challenge 34 

My Time to Craft ~ Christmas ~ Challenge 54 ~ Snowflakes 

Most Magical Time of the Year ~ Challenge 5 ~ Christmas or Halloween 

Build Your Holiday Stash


Pam's Pearls


Copics:

Hair: YR21, YR24, YR27, E39, E59, Headband: BV04, W2, W3, Dog: E17, E15, E13, E39, Poinsettia: R29, R46, Pot: YR23, YR24, YR27, Scarf & Dress: BV01, BV02, BV04, BV13, R46, Pants: BV20, BV22, BV25, Shoes: W2, W3, W4, BV25, Snow B60 B63

Products:  

Conie Fong Molly's Perfect Christmas  

Penny Black, Elegant Stitching


Tuesday, February 21, 2023

His Treasured Possession

Today I'm sharing a beautiful image from Julia Spiri called Winter Queen paired with the scripture from Deuteronomy 14:2.


I made this for my Bible Journaling project which gives me a scripture to make into an art piece.  I love the softness of this image and she seemed to be the perfect match.

After sizing her I added the scripture to the right of the image and used Copic markers for the coloring.  I used the Spellbinder die, Labels 37, which fit snuggly around the image.  The shiny copper matting behind her coordinated well with her crown and completed my piece.  

Thank you for stopping by today to view my blog. I enjoy sharing my work with you and invite you to 'Follow' my blog and to visit my site - "Not Just Scraps' on Facebook - where you can purchase my cards. 

I will be entering this card in the following challenges: 

My Time to Craft ~ Challenge 501 ~ Vintage 

Pattie's Creations ~ Challenge 203  

2 Sisters on the Blog ~ Challenge 71 - Three Colors (brown, purple, gold)  

Perfect Time to Craft ~ February  

Bizzy Becs Store Challenge ~ February   

Word Art Wednesday ~ Week 583-584  

Worldwide Crafters & Colorist Challenge ~ February (winner)


Pam's Pearls


Copics

Dress: BV17, BV39, Hair: E21, E23, E5, Crown: Y26, Around image BV000


Products


Monday, February 20, 2023

To an Amazing Friend

Today I'm posting with my Design Team gals from Jan's Digi Stamp Shop with our mid month inspirational cards.

If you get Jan's newsletter, you've already had a peek at her new Easter cutie ~ 'Lil Chick-A-Dee' but if not, here she is with her big bonnet and bow, ready to step out for any Easter event or just for a note to a friend.


There are two dressy little chicks in this package along with eggs and lots of sentiments.  For my card, I selected the chick facing left and sized her to about 3" for my card front.   I layered the sentiment close to the center of the image and then printed it on 110# Neenah card stock.  

I used my Copic markers for the coloring and have listed below for your reference.  Next I selected Gina Marie's Venetian Labels die set for the edge of the image and for the purple matting.

I used a 4" x 6" card base and covered the front in the bright multi colored patterned paper.  Then I secured the matting and image in the center and finished the card with a soft yellow organza bow at the top fold.

Don't forget to visit Jan's Challenge Blog to see the other Design Team cards and to enter yours in the monthly challenge!

Thank you for stopping by today to view my blog. I enjoy sharing my work with you and invite you to 'Follow' my blog and to visit my site - "Not Just Scraps' on Facebook - where you can purchase my cards. 

I will be entering this card in the following challenges: 

Crafty Calendar ~ February ~ Add a Ribbon 

Ally's Angels ~ Challenge 67 

Crafters Cafe ~ February ~ Challenge 294 

Crafty Animals ~ Challenge 69 

CD Sunday ~ Challenge 104 

The Corrosive Challenge ~ February


Pam's Pearls


Copics 

 Y00, Y15, Y18, Y19, YR23, YR27, V12, V15, V17, V28, BV0000, BV00, BV01, BV02, BV11, BV13, BV34, W3


Products


Sunday, February 19, 2023

You Know You're Old When...

Happy birthday to my sweet husband today! 

Since I'm a bit older than he is, I can enjoy teasing him about getting old.  His salt and pepper hair and mostly white beard are sure to get him the Senior Discount anywhere we go.

For his special birthday card, I have selected Bugaboo Stamps, Gus Birthday Rocking Chair. 


 If you've been using digital files for card making for a while, I'm sure you are also missing Bugaboo Stamps. Another small business that has closed and greatly missed by many! 

Ole Gus and his funny sentiments are great for so many occasions.  Of course with the birthday guy being a huge Clemson fan, it was easy to select shades of purple and orange for the Copic coloring.  

I used Memory Makers,  Matinee Rectangles for the stitched die cut edge on the image and the sentiment.  The 6" card base is covered with celebration ribbon paper and a solid lavender strip across the center.  After securing the image and sentiment on top, I added the dark orange twine and the clock charm at the bow. Lastly I added glossy accents to his eyes to give him a little more wide eyed look. 

Thank you for stopping by today to view my blog. I enjoy sharing my work with you and invite you to 'Follow' my blog and to visit my site - "Not Just Scraps' on Facebook - where you can purchase my cards. 

I will be entering this card in the following challenges: 

Time Out Challenge ~ Challenge 232 ~ Happy 9th Birthday 

Creative Knockouts ~ Challenge 488 ~ Birthdays 

Sparkles Form Challenge ~ Challenge 161 ~ For Men Only  

QKR Stampede ~ Challenge 461 

Bizzy Bec's Store ~ February Challenge


Pam's Pearls


Copics 

Balloon: BV08, BV04, BV02, Hat: YR07, BV08, Hair: N5, N4, N2, Shirt: N0, N1, Shorts: YR07, YR18, Socks: N4, BV04, Chair: E17, E19, Packages: YR04, YR07, BV08, BV04, Shadow: W3


Friday, February 17, 2023

Get Well Kisses!

Today I'm sharing a card I made for a weekend challenge using Penny Black's 'XOXO'.  The challenge was to have a stamped background.


 After selecting this adorable little girl blowing kisses, I began by stamping her on 110# Neenah cardstock.  I used Copic markers for coloring and then fussy cut around her as close to the lines as I could. 

For the background I selected the Love Script heart from Unity Stamps Kit of the Month, January 2018.  Using white cardstock 1/4" smaller than the A2 card front, I stamped the heart using red Versa Clair Ink and my Misti.   Then I secured the colored image in the center of the heart, and added the shadow below her feet. 

I actually left the card at that point for the challenge, then added the 'Feel Better Soon' sentiment once I had a need to send the card.  She turned out super cute and I know made the recipient feel much better. 

Thank you for stopping by today to view my blog. I enjoy sharing my work with you and invite you to 'Follow' my blog and to visit my site - "Not Just Scraps' on Facebook - where you can purchase my cards. 

I will be entering this card in the following challenges: 

Crafty Gals Corner ~ Challenge 240 ~ Add a Heart 

Sisterhood of Crafters ~ February ~ Hearts 

Word Art Wednesday ~ Week 583-584 

Passion for Markers ~ Week 677 ~ Add Some Flowers 

Stamping Sensation ~ February ~ Anything Goes -Optional Sketch 

Penny Black ~ February ~ Optional Add Hearts and Flowers 


Pam's Pearls


Copics 

Hair: E21, E23, E25, Dress: V27, Y18, Y06, Shoes: V22, Tights: V2, Flowers: G43, Y18, E04, V25, V24


Products


Wednesday, February 15, 2023

Thank You My Friend

If you know me or have followed me for a while, you've heard me speak of my life long friend Cindy.  Who would have imagined over 60 years ago when her family moved next to our house, that she and I would remain friends from that day forward!  When God has a plan you better be on board.  

Today I'm sharing the Friendship Valentine card I sent to her.  I've used Gina K Designs, Thank You Friend stamp set.


While I love the magenta lilies, the sentiment just says it all.  Inside the rest of the thought from the front.....


Yes, this is our friendship. Blessed in so many ways over the years.  Rare and treasured by both of us.

My wish for you is to find your forever friend and may that relationship be blessed each day! 

Thank you for stopping by today to view my blog. I enjoy sharing my work with you and invite you to 'Follow' my blog and to visit my site - "Not Just Scraps' on Facebook - where you can purchase my cards. 


Tuesday, February 14, 2023

Kisses!

Happy Valentine's Day to each of you!

For today I've saved this Stamping Bella til last as I think this little Squidgy is the cutest. 

This Stamping Bella image is named Kissing Booth Squidgy (EB465).


After stamping the image, I used my Copic markers for coloring.  I selected the solid pink and coordinating plaid papers before coloring this one.  

As you can see, I used the plaid for the background mat on the A2 sized card base.  The image and the pink matting are die cut using Pink & Main's Stitched Rounded Rectangles. When securing to the card base, I tilted the solid mat to show more of the color rather than straight behind the colored image.

Thank you for stopping by today to view my blog. I enjoy sharing my work with you and invite you to 'Follow' my blog and to visit my site - "Not Just Scraps' on Facebook - where you can purchase my cards. 

I will be entering this card in the following challenges: 

Crafting Happiness ~ Challenge 139 ~ Love 

Dragonfly Dreams ~ February Challenge ~ Love 

Stamping Sensation ~ February Challenge  

Sweet Stamping  ~ Love 

Craft Rocket ~ Challenge 100 ~ Love/Valentine 

Stamping Bella Sisterhood ~ Jan/Feb Challenge ~ Love & New Beginings


Pam's Pearls


Copics 

Flower: Y11, Y15, Y19, Dress: B02, B01, Hair: E39, YR27, YR24, YR21, Jar: C3, B00, B000, Hearts: RV09, RV17, RV52, Sign: E41, E42, E43, Booth: E70, E71, E74, Banner: BG05, Grass: G24, G26

Products  


Pink & Main, Stitched Rounded Rectangles


Monday, February 13, 2023

My Heart Belongs To You

Valentine's Day is almost here!  

Today I'm happily posting as one of the Guest Designers for Conie Fong Art.  I've selected 'I Love You Benny' for my first posting.


Isn't he just perfect for a special Valentine's Day card!

To make this card, I sized Benny to just under 3" and printed him on Neenah 110# card stock.  I used my Copic markers for coloring and have referenced them below.  

Separately I sized a sign post to fit beside Benny, and layered the sentiment 'My Heart Belongs to You' on the sign.  After printing and coloring, I carefully hand cut the sign out.   

I used a stitched circle die for the image and a simple circle die for the deep red matting. I secured the image to the background, then added a few strokes of grass, and secured the sign close to the little boy.   Next I carefully cut the right side of the circle off as close to the sign as possible. 

After grabbing a 6" square card base, I added the coordinating blue background cardstock.  Instead of using ribbon for the horizonal strip I found a scrap of the heart patterned paper.  I matted it on the same red cardstock as the circle, then secured it across the center of the card.  Next I added the top image layer being sure I had it aligned with the right edge of the blue background paper.  Then for the final step, I added the red organza bow to complete my design. 

Thank you for stopping by today to view my blog. I enjoy sharing my work with you and invite you to 'Follow' my blog and to visit my site - "Not Just Scraps' on Facebook - where you can purchase my cards. 

I will be entering this card in the following challenges: 

Allsorts  ~ Week 715 ~ All About Hearts

Craft Rockets ~ Challenge  100 ~ Love/Valentines 

Crafty Gals Corner ~ Challenge 240 ~ Add a Heart 

Passion for Promarkers ~ Week 676 ~ Add a Heart


Pam's Pearls

Copics: 

Hair: E21, E23, E25, Shirt: N0, Sweater Vest: BG49, BG57, Jeans: B91, B93, B95, B97, Shoes: N2, N3, N4, N5, Heart: R29, R46, RV10, RV11, Shadow: W3, W2


Products: