Friday, March 31, 2023

Spread Your Wings

The month of April is a 'Happy Birthday' month for the Classic Design Challenge Blog.  This year we are celebrating our 7th birthday!

Here's our six great sponsors for the month:  All Dressed Up, Di's Digital Stamps, Goha Digital Stamps, Keen Crafter Designs, Paper Nest Dolls, and The Paper Shelter.

Although all six of my project cards are appearing on the Classic Design Challenge Blog, I'll be presenting them to you one by one over the next several weeks. 

First up today will be Little Flower Fairy by All Dressed Up


I always enjoy working with All Dressed Up designs.  This 'Little Flower Fairy' looks a bit tired  as she is resting on the beautiful pink dogwood flower. 

I sized the image to just under 3" and printed her on Neenah 110# card stock.  I used Gina Marie Designs, Pierced Nesting Label die for the stitched look oval design.  The background paper is from our sponsor Keen Crafter (and I'll have other cards using her papers).  I added the deep purple vertical strip on the left side then secured the image to the center of the card.   

I added the typed sentiment over the right corner after die cutting it to get the decorative edges on each end of the tag. Such a sweet card - ready to send to someone who needs a little encouragement. 

Thank you for stopping by today to view my blog. I enjoy sharing my work with you and invite you to 'Follow' my blog and to visit my site - "Not Just Scraps' on Facebook - where you can purchase my cards. 

I will be entering this card in the following challenges: 

CD Sunday ~ Challenge 106 

Lil Patch of Crafty Friends ~ Challenge 202 

All Dressed Up ~ March ~ Challenge 138 

World Wide Crafters & Colorist ~ Challenge 3 

Pam's Pearls


Copics  

Hair: E21, E23, E25, Dress, R29, R39, Shoes: R39, Wings: BG10, RV000, BV000, Flowers: RV10, RV52, Leaves & Stems:  YG61, YG63,  Shadow: W2, W3 


Products


Wednesday, March 29, 2023

Fiesta ~ Let's Party!

This past weekend I attended a local scrapbooking/crafting retreat about 20 miles from my home.  This was the retreat that I have hosted for the last 20 years (Oh my!) and the first time since I 'retired' and handed it all over to several ladies. Although some times it felt a little weird not having to get everyone on to the next craft, headed to a meal, or handle the emergencies, it was a very enjoyable and relaxing time.  I am grateful for the three ladies that put on the event.  Thank you Jennie, Kelly and Julie!

I thought I would share a few photos of the weekend as I know many of you love to travel to retreats as much as I do. 

The theme was 'Mexican' and our cute t-shirts were waiting at our work tables on Friday morning.


The coordinators worked long into the night Thursday night preparing for the photo booth and other prizes.  The cactus were huge and so cute filled with all the balloons! 


Friday's them was Mexican Foods and our little gift bags were filled with candy most of us couldn't pronounce.  As we crafted into the night we had several courageous ladies who tried the candy mix.  Things that went from sweet to sour to very hot brought lots of 'tart' faces and loads of laughter from the ones watching!  

The project for the day was a scrapbook page with die cuts for the word 'Fiesta', a strip of brightly colored paper, and a bowl of guacamole with tiny chips.  Since I'm not a scrapbooker, I took my supplies and made this card.     


Saturday's day theme was Cactus and these tiny cactus candles were the big hit!


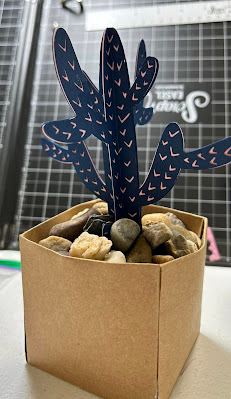
For our project, we made boxed cactus with different colored cactus 3D cut outs and tumbled rocks. 


We also played a Cactus Ring Toss game - that was not as easy as you thought it would be.  


Once the raining finally stopped, we went outside and had a few minutes of fun and laughs with a  piƱata full of scrapbooking stickers and candy.  We had some amazing bat swingers! 

Sunday arrived way too soon!  Our theme for the last day was Other ~ Llamas, Serape, and Sombreros. 

Our table deco for the day.... Mexican bottled drinks with a Sombrero over it and a tiny straw hat. 


The ladies from Virginia, North Carolina and Georgia started the dreaded packing and loading in yet, more rain!  It always seems to take more time and effort to try to get everything repacked on Sundays without taking up any extra space!  

Here's our group photo for the event.  These are some sweet and thoughtful ladies.  Everyone seemed to be pleased with the retreat - I know I was! 


Thank you for stopping by today to view my blog. I enjoy sharing my work with you and invite you to 'Follow' my blog and to visit my site - "Not Just Scraps' on Facebook - where you can purchase my cards. 

I will be entering this card in the following challenges: 

AAA Birthday  ~ Game 47 ~ Stripes/Dots  

My Time to Craft ~ #504 ~ Springtime 

Krafty Chicks ~ Challenge 656  

Pam's Pearls


Tuesday, March 28, 2023

Have a Beautiful Day

The March Challenge  from Beccy's Place is this lovely image of Strawberries.  It's available to her newsletter subscribers until 3/31 as this month's 'freebie'.  


 It's really nice to get the free image each month and even better to use it during the challenge period. 

I've sized it to about 3" tall and layered the sentiment to the left of the image.  After printing, I used my Copic markers for the coloring.  

I used largest die in the set from Gina Marie Designs, 'Pierced, Nested Labels' die set.  I covered the card base front with a lighter shade of red paper then added the completed image in the center.  To complete the design, I randomly placed three small yellow enamel dots. 

Thank you for stopping by today to view my blog. I enjoy sharing my work with you and invite you to 'Follow' my blog and to visit my site - "Not Just Scraps' on Facebook - where you can purchase my cards. 

I will be entering this card in the following challenges: 

 Beccy's Place ~ March Challenge

Use Your Stuff - Challenge 480 ~ Animals 

Lit Patch of Crafty Friends ~ Challenge 202 

Creative Fingers ~ Challenge 251 

C.R. A. F. T Challenge ~ Challenge 672 

Krafty Chicks ~ March Challenge 


Pam's Pearls


Copics  

Berries: R24, R27, R29, R37, Leaves: YG91, YG93, YG95, Small flowers: E40, Shadow: W3


Products


Monday, March 27, 2023

Quick Robin ~ To the Bat Cave!

It's always fun to get a card order for a younger child.  For someone to recognize even 'the littles' like special cards and also for the customer to know the child's currently character phase, just warms my heart.

For this card order, it's all about our super hero Batman! 


 I kept the card design simple and colorful.  The hardest part was deciding on a sentiment. But I have a husband that jumped right in and started me off with Quick Robin, to the Bat Cave...'   Perfect! 

I sized the image to just under 3" tall and added the text below him before printing.  I used my Copic markers to do all the coloring, then die cut the edge with a standard X-stitched rectangle die.   I added a single line of washi tape to ground Batman away from the sentiment. 

The card base is covered in large confetti balloon paper and the image was then secured in the center.  Since it was for a boy, I didn't want to add a bow, but felt like it needed something else.  I added the three balloon brads and drew in the strings. 

My customer wanted the boy's name on the card also.  I elected to use the Batman symbol and place it inside with his birthday greeting. 


What a fun card! 

Thank you for stopping by today to view my blog. I enjoy sharing my work with you and invite you to 'Follow' my blog and to visit my site - "Not Just Scraps' on Facebook - where you can purchase my cards. 

I will be entering this card in the following challenges: 

The Paper FunDay ~ Challenge 51 

Cardz4Guyz ~ Challenge 318 

Passion for Promarker ~ Week 682 

A Place to Start ~ March Challenge 

Cutie Pie ~ Challenge 180 ~ Beginning with a B


Pam's Pearls


Copics

Batman: C1, C3, C4, C6, BV23, BV25, Bat & Belt: Y18, Cape: B04, E00


Saturday, March 25, 2023

You're My Superhero

For our Design Team Challenge this week at Polkadoodles Crafting, we were asked to make a card for boys or men.  

I've selected 'Superhero' from the Little Dudes Collection for my project card.


 After sizing the adorable little fellow to about 3 1/2", I printed him and used my Copic markers for coloring.  I also printed a 6" square of the star paper that is part of this set.

The next step was hand cutting him out, as close to the lines as possible and inking the cut edge for crispness.  I ran into a wall so to speak as to what to put him standing on.  Finally I came across these steps in the Magic Garden Soup set and knew they would work great!  

After sizing and printing them, I again used Copic markers for my coloring.  I also cut away the paper on the left of the steps.  The sentiment is a  preprinted sentiment from Polkadoodles which I then die cut and added a coordinating mat behind it and the step image.  

For the card base, I pulled the light green color from the star patterned paper and made a 6" square base.  The next layer is the star patterned paper, then the sentiment and steps layer.  I also added a metallic gold mini washi tape strip at the top of this layer to close the raw end of the tag placement.  Lastly, I added the Superhero by gluing him securely at his feet and adding a foam square behind his head for added dimension on the card.  

I hope you'll check out the other Design Team cards on the Polkadoodles Challenge blog and enter your cards too! 

Thank you for stopping by today to view my blog. I enjoy sharing my work with you and invite you to 'Follow' my blog and to visit my site - "Not Just Scraps' on Facebook - where you can purchase my cards. 

I will be entering this card in the following challenges: 

AAA Birthday ~ Game 47 ~ Stripes and/or Dots 

Cutie Pie Challenge ~ Challenge 180 ~ Begins with a 'B' - Boy 

Simon Says ~ Monday Challenge ~ Spring 

CD Sunday Plus ~ Challenge 160 

My Time to Craft ~ Challenge 503 ~ Birthday Occasions 


Pam's Pearls


Copics  

Hair: YR21, YR24, YR27, E39, E59, Cape: R27, R35, Sword: Y26, Y28, E35, Shield: Y28, B91, Outfit: B05, BG05, G16, YG13, Y35, Y28, B91, Boots: B91, B45, B34, E35


Products


Friday, March 24, 2023

Z Fold in Pastels

Today I'm sharing a card I made for a recent swap challenge.  The challenge was for a Z-fold card which I rarely do the fancy fold cards. 

I selected my papers from Bo Bunny, Harmony 6" x 8" paper package.


 I followed a tutorial on Pinterest to get the dimensions and fold lines for the Z fold template.  No need recreating the wheel, right?    Once I had the base pieces cut, I selected the patterned and solid papers and added to each panel.    I used double sided tape to secure the top z fold to the base. 

Having the coordinating paper available really made this an easier card than I anticipated.  The results were great and I was happy with the project.   This one left SC headed to Washington state to my swap partner. 

Thank you for stopping by today to view my blog. I enjoy sharing my work with you and invite you to 'Follow' my blog and to visit my site - "Not Just Scraps' on Facebook - where you can purchase my cards. 

I will be entering this card in the following challenges: 

Try it on Tuesday ~ March ~ Oh So Sweet 

Make Mine Monday ~ Challenge 196 ~ Spring Colors 

Lil Patch of Crafty Friends ~ Challenge 202 

The Corrosive Challenge ~ March 

Creative Creases ~ Challenge 53 ~ Fun Fold 


Pam's Pearls


Wednesday, March 22, 2023

May God Comfort You

Today I'm sharing Conie Fong's Art Design Team as one of their Guest Designers.  I've selected Twinkle Angel Nellie for today's inspirational card. 


 This is another sweet image of her little girls with those big dark eyes.  After sizing to about 3" tall, I printed her on 110# Neenah card stock.  I've used Copic markers for coloring and then the Nesting Labels Duo Dies for the decorative edges on the image and the sentiment.  I used Copic B24 to add the dark line around each die cut piece.  

The card base is a 5" square Kraft card stock.  I've covered the front with the yellow dotted Swiss paper then secured the completed image and the sentiment.  For the finishing touch I added the blue dotted organza ribbon and bow at the top fold. 

Be sure to check out Conie Fong's other images at her Etsy store. 

Thank you for stopping by today to view my blog. I enjoy sharing my work with you and invite you to 'Follow' my blog and to visit my site - "Not Just Scraps' on Facebook - where you can purchase my cards. 

I will be entering this card in the following challenges: 

Try it on Tuesday ~ March ~ Oh so Sweet!  

Unicorn Challenge ~ Challenge 85 ~ Dots and/or Stripes  

Make Mine Monday ~ Challenge 196 ~ Spring Colors 

Just Us Girls ~ Challenge 671 ~ Moodboard  

Daring Cardmakers ~ March ~ Little Ones 

Word Art Wednesday ~ Week 587-588


Pam's Pearls


Copics 

Hair: E21, E23, E25, E27, Dress: BV02, RV000, Clouds: B60, B0000, RV000, Stars: Y18, Birds: B24, R21, YR24, Wings: BG11, RV000, Around: BG0000

Products


Tuesday, March 21, 2023

A Little Cuddlebug Love

Today I'm sharing an adorable 'Cuddlebug' image from Beccy's Place made into a Get Well card. 


I sized the image on this one to about 4" tall and printed on 110# Neenah card stock.  I've used my Copic markers for the coloring and then die cut with the Momenta Nested Slim Rectangles.

I covered the front of a 5" x 6" card base with the multi colored patterned paper and added the dark blue/green strip across the center.   Then I secured the image and overlapped the sentiment, securing it also.   This one is sure to bring a smile to the receiver!

Thank you for stopping by today to view my blog. I enjoy sharing my work with you and invite you to 'Follow' my blog and to visit my site - "Not Just Scraps' on Facebook - where you can purchase my cards. 

I will be entering this card in the following challenges: 

A Place to Start ~ March Challenge  

Cutie Pie Challenge  ~ #180 ~ Begins with a 'B' - BUG 

Corrosive Challenge ~ March 

Craft Rocket ~ Challenge 101 ~ For the Girls 

Beccy's Place ~ March Challenge

Pam's Pearls


Copics  

Cuddlebug: V01, V12, V15, V17, Wings: BV00, RV00, BG10, Shoes: W3, W4,W5, Dandelion: YG07, E40, E41  


Monday, March 20, 2023

Dogwood Blossom Heartfelt Card

Here we are at mid-month and time for another card of inspiration from Jan's Digital Stamps.

Today I'm using Dogwood Blooms, another new release. 


 For this card, I selected the wreath of beautiful dogwood blooms.  I started by sizing the image to just over 3" square and layered in the sentiment to the right. 

After printing, I used my Copic markers for coloring and then the Gina Marie Designs, Stitched Scalloped Rectangle for the decorative edge.  

I selected a craft card base, and covered it with the brown patterned paper.   Then I added the completed image in the center and added the strip of green washi tape down the right side for grounding.   

I think this sentiment is a great one for a sympathy card or card of encouragement. 

Thank you for stopping by today to view my blog. I enjoy sharing my work with you and invite you to 'Follow' my blog and to visit my site - "Not Just Scraps' on Facebook - where you can purchase my cards. 

I will be entering this card in the following challenges: 

Creative Fingers ~ Challenge 250 

Creative Knockouts ~ Challenge 490 ~ Add a Sentiment 

2 Sisters on the Blog ~ Challenge 72 

Crafter's Cafe ~ March 15th ~ Circles 

Daisy Chain ~ Challenge 72 ~ Flowers 

CD Sunday Plus ~ Challenge 106 

Lil Patch of Crafty Friends ~ Challenge 202

Pam's Pearls


Copics 

Flowers: E40, E41, E42, E43, Leaves: YG95, YG93, YG91, YG97, Around BG0000


Products


Sunday, March 19, 2023

Be Kind

I'm back today posting again with another Guest Designer card using Conie Fong Art's, Fairytale Cottage background and Winter Sweethearts.


When I noticed the sweetheart couple were sitting on the rocks I remembered seeing the Fairytale Cottage image that also had several spots of rocks.  I decided to try to merge the two into one card.  

After sizing the images,  I printed them both on Neenah 110# cardstock and began coloring with my Copic markers.  For the sweetheart image, I cut it out by hand, and set it aside.  I used the Tattered Lace 'Pearl Circle' die to cut out the completed cottage. 

I covered the 6" square card base with the bright polka dot paper, then I placed the cottage on the teal green paper and decided about where the couple were going to fit.  After trimming, I secured this solid piece to the center of the card base design.   I added the cottage piece next and finally the little couple cut out.  I placed three small foam dots behind their heads and secured them at base of the image.  

Next I added the preprinted sentiment and attached it to the top right corner of the card.  Lastly I added the white organza bow at the fold to complete this card image. 

Thank you for stopping by today to view my blog. I enjoy sharing my work with you and invite you to 'Follow' my blog and to visit my site - "Not Just Scraps' on Facebook - where you can purchase my cards. 

I will be entering this card in the following challenges: 

Crafty Catz ~ Challenge 629 ~ Go For the Green 

Creative Fingers ~ Challenge 250  

Creative Knockouts ~ Challenge 490 ~ Add a Sentiment 

Through the Purple Haze ~ Challenge 202 

A Perfect To Craft ~ March 

Ally's Angels ~ Challenge 68 

QKR Stampede ~ Challenge 463 

World Wide Crafters and Colorist - March


Pam's Pearls


Copics  

Fairy Tale Cottage Background: B00, B000, Water: B91, B93, B01, BG15, BG11, BG13, BG0000, B63, Trees: YG61, YG63, YG67, E70, E71, E74, Bushes: YG91, YG93, YG95, YG97, Cottage: E07, E08, E11, E13, E15, E19, Grass: G12, G20, G21, Rock: W1, W4, N2, N3 

Winter Sweethearts: Girl: N0, N1, R81, R83, R85, B91, B93, B95, Hair: E21, E23, E25,  Boy: W1, W2, W3, W4, W5, B93, B95, B97, Rock: N0, N2, N3, N4


Products

Conie Fong, Fairytale Cottage Background


Conie Fong, Winter Sweethearts.