Sunday, December 29, 2019

A Time to Celebrate

Today's card and blog will be the last one for 2019.  I've saved it till last so we can celebrate several things together.  This year I've posted more cards than any previous year!  I've had so much fun with my crafting friend Jennie this year traveling to Florida to the Whimsy Retreat, to Arizona to the Copic Boot Camp and several  other great adventures.  

If I had colored this Stamping Bella image this time last year,  it would not have the rolling hills behind her (thank you Faye Winn-Jones), it wouldn't have the texture grass or the tiny trees on the hill top (thank you Jennifer Dove) and the graduation gown would be two or three shades of gray to black, not the five to seven shades that are in this image (thank you Crissy Armstrong).  So many have influenced my love of Copic coloring. I have met and become friends with more wonderful Copic Colorist.  Additionally in 2019, so many of you prayed me through my major back surgery and through the long recovery.  I am so very blessed!!!


As we move into 2020, I want to thank you for following my blog and my other social media postings.  I appreciate your encouragement and want you to know 
YOU Are  Awesome! 

Serving a Risen Savior, 
Pam 

Products Used:


Friday, December 27, 2019

The Ornaments of 2019


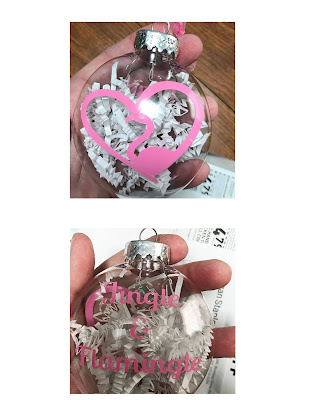
Lots of crafters have been putting vinyl on ornaments by using the Cricut machines or the Cameo Silhouette machines for some time now.   My machine has been covered for several years, within arms reach, with me thinking I would be ready to make any project I wanted to by simply uncovering the machine and Wa-La ~ cutting out any thing I wanted.

However, I quickly found out there is a bit of a learning curve and so many tips and short cuts that one must certainly keep a journal of your notes, cheat sheets and spare parts!

After making several charger plates, decorative Christmas plates and other miscellaneous items for a craft show back in November, I turned my efforts toward making my 2019 traditional Christmas ornaments using my new found craft of adding "Vinyl" to anything that didn't move.

Since I usually make about 35-40 ornaments, I knew I needed something fairly generic and something easy enough for me as a beginner.  I ended up making a couple of groups of ornaments and then several singles this year; so I'll quickly show you a peek at all of them.

I picked up a sticker sheet of reindeer with a tiny red pom-pom nose from Hobby Lobby as my inspiration for the largest grouping of ornaments.  I made the 'JOY' ornament, which had red crinkled paper shreds inside the clear bulbs and the "O" was replaced with the tiny reindeer sticker. 


My nephew's last name is Noel (pronounced No-l), which made their family ornament an easy choice to make. 


The other batch of ornaments went for my 'guys' and was a Silhouette Design Store purchase.  It seems most are wood workers, so the 'Sawdust Is Man Glitter' fit them well.  Also I was blessed with a large bag of cedar shavings to fill these ornaments!


Everyone got a good chuckle at our family celebration when I handed out several of these special ones!


Then different special friends were gifted special personalized ornaments.


Thanks for stopping by today to see what I've been working on.  I enjoyed the change from my cards to working on the vinyl... but not enough to switch for sure.  My Copics are my comfort.  I believe I'll stick with them for quite a while. 

Serving a Risen Savior, 
Pam 


Thursday, December 26, 2019

Adding Colored Images to Composition Journals


Back in the fall I shared with you a group project that was taught during the Fall For Keeps Sake Retreat by Stacey.  She showed us how to Modge Podge over Composition Books and add embellishments to the front to make nice journals for our personal use or gifts.  

Today I'd like to share with you the four that I made for Christmas gifts for my nieces and nephews (ages 7-17).  For each one I purchased the standard composition notebooks and then selected one Stamping Bella image that I felt was appropriate for their personality or stage in their life.  

Here's the four completed books, and then the steps on how to make them, as I would love for you to try them out.  


I stamped and Copic colored each image, then die cut and glued the images to a card stock mat.  Following the directions (below for your reference), I cut out the two outside pieces to cover the book and the two smaller inside pieces to cover the raw edges and give a more finished look to the journal book.  I used a foam brush to apply the Modge Podge to the outside cover, front and back, and put the pieces on, folding the corners as directed.  Once those pieces had dried, then I followed the directions and added the smaller cut inside pieces (again using Modge Podge), being sure I covered the edges from the front pieces. Be sure to leave the covers open to dry before closing the journals to avoid the pages sticking together.  Once it
dried completely, then I added Modge Podge to the back of the color/matted images and added one to the front of each of the covered journals.  I applied two coats of Modge Podge to the front of the books to seal the images, allowing drying time in between. 

Thanks for stopping by today to see what's on my desk.

Serving a Risen Savior, 
Pam

Products Used


Wednesday, December 25, 2019

And They Laid Him In a Manager

It's finally here... Not the time to focus on the presents, or what we are going to eat, or what time we have to be somewhere.  
It's time to stop and be thankful, grateful, and fill our hearts with peace.... that the son of our God was born
and they laid him in a manger. 

For today's card I used Unity's Blessed Baby, by designer Angie Blom.  


After stamping on Neenah 110# card stock, I used Copic markers for coloring the image.  I added Quick Quotes Chalking Inks, Pale Pink and Blue Jeans around the image to soften the white space.  Then I die cut the double oval on the image using a Pink & Main Large Stitched Oval die, and an additional oval out of purple.  I used an 8 1/2" x 11 piece of heavy white card stock folded for the card base and mounted the 8 1/2" x 5 1/4" blue mat to the card base.  The largest oval measured about 6" tall, so I was able to adhere the image and ovals about 3/4" from the top of the card and then trim off the bottom of the card to balance out and also reduce the overall size.  While this meant I did have to make an envelope, using my Stamping Up envelope maker made this an easy task.

Thank you so much for following the 25 days of Christmas with me.  Merry CHRISTmas to each of you!  


Next I'll be sharing a few of the gifts I made this year.

Card Challenges:
The Holly and the Ivy, Christmas Challenge #62
Word Art Wednesday #418-419


Serving a Risen Savior,
Pam
Copics Used:
Skin: E51, E53, His Hair: N4, N6, Her Hair: C21, C23, Clothes: BG72, BG57, BG18, BG49,BG09, BG75 (in that order)  Baby: BG11, Manager: E21, E23, E25

Products Used:


Tuesday, December 24, 2019

Here Comes Old Saint Nick

It's finally here! The kids are jumping with joy and Santa's elves are hurrying to assemble all the last minute toys and presents!

Today's card is from Colorado Craft Company (CCC) and it's from the Lovely Legs selection, appropriately named~ Santa is Coming.


Lots and lots of detail coloring in this beautiful image, which of course I used my Copic markers.  I think the hardest thing to remember is not to have too many colors when you are working on a piece this detailed. Try to maintain the color set consistent throughout the image so that the viewer's eyes aren't distracted by too many color families. 

I used a 6" card base and covered it with the small holly print paper first.  Then layered the green holly mat (5 x 6, with the Tattered Lace Nested Beaded Chain Die cut edge) and then the colored image (~4 x 5) placed on the right top corner.  I folded the corner of the green mat up and used a double sided tape to hold it in place.  If you look closely you'll see the 'thread' in the button, isn't thread.  It's a super thin strip of paper ~ that is a scrap of matching paper!  A scrapbooking trick from long ago to make your button thread match your page elements.  For the finishing touch, I added the vellum strip 'Old Saint Nick'.  This one ended up taking quite a while to complete, but it was worth it in the end. I made it for my crafting BFF, someone who definitely knows the hours of work that goes into some of the cards like this one. 

Thanks for stopping by, now get everyone in bed so Old Saint Nick can come down your chimney!
Serving a Risen Savior, 
Pam 
Products Used: 


Monday, December 23, 2019

Fun Surprises!

Not everyone loves a Giraffe like I do ~ but I adore this Inky Antics Giraffe image from their Holiday BaZooples #2 Clear Stamp set.


For this card, I wanted it to be a little bit wild ~ for my 12 year old grandson.  If the giraffe spots weren't enough, the dots on the package add a bite more random wildness...then when the time is right, add a matted paper of green with bright red dots. 

I used the Gina Marie X x Die which gave me the extra height I needed and still use a standard 5 x 7 card.  Turning a smaller die to add the sentiment is a good way to balance the layout of the card.   Since the card is going to a boy, I added the buttons and a snowflake instead of a bow.  
Thanks for stopping by again today.  Christmas is coming soon!

Serving a Risen Savior, 
Pam

Products Used:


Sunday, December 22, 2019

Special Mail Delivery!

Each year I try to find a new image to make a special Christmas card for my mail lady.  She takes such special care of me all year long, carefully bringing my card making supplies straight to my front door many days rather than leaving them propped up against the railing where they could get blown away or damaged by the rain or high winds.

When I ran across Whimsy Stamps Special Delivery Pup (designed by Crissy Armstrong) earlier this week, I was tickled PINK!  This cute little pup is the perfect image for Ms Jeannine's Christmas card.


I stamped her on Neenah 110# card stock and used my Copic markers for coloring.*  I used a new die to me - the Gina Marie Frames Scalloped Squares die  to make the pink border square frame and then mounted the frame and the white interior to the bottom outside of the card base.  I had the sentiment left from a previous background piece of scrapbook paper - just perfect.  For the final touch, I added the white organza double bow.

Thanks for stopping in to see today's somewhat different Christmas card.  See you tomorrow ~ 

Challenges Entered:


Serving a Risen Savior, 
Pam 

Copics Used:
Hat: R83, R85, Envelope: N1 Heart R83, R85; Eyes: E23, Ears & Paw Pads: R30 & BV25, Pup: E21, E23, E25, Shadow: W3, W2

Products Used:


Saturday, December 21, 2019

I'm Dreaming of a White Christmas ~

When you live in the sunny south, having a white Christmas is truly a dream.  But beautiful images like this Whimsy Stamp, Sleigh Ride by Jennifer Dove, are the dreams that we add to our 60 - 70 degree days to make it feel like we might get to see a little white flurry.


After Copic coloring the image, I used the Penny Black Elegant Stitching Die for both the image and the two red matting pieces. You will notice I simply cut the sentiment "Merry Christmas" from the red background paper .  I mounted the pieces on a Kraft card base and added a single twine bow with a snowflake embellishment.

Thanks for stopping by today as we only have a few more cards to go till Christmas day!

Serving a Risen Savior, 
Pam
Products Used:

Friday, December 20, 2019

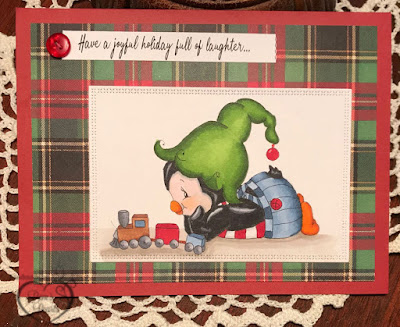
What Every Little Boy Dreams of...

And lots of little girls too... There is just nothing like those trains running around the base of a tree at Christmas time.  Crissy Armstrong penguins continue to capture the hearts of so many of us with their soft smiles and big eyes.  Here I took part of the image (just the boy elf and the train on the right side of the image)  from Whimsy Stamps' Penguin Elves at the Workshop.


After sizing the image to about 4.5" x 3.5" and printing, I used my Copic Markers to color the image and the Gina Marie Designs X-Stitched Rectangle die for cutting this piece.  I trimmed the plaid matting to fit about 1/2" smaller that the red card base, then applied using my book-bonding glue.  The sentiment is also glued on the top left corner along with a coordinating button.

Thanks for popping in to see what I've been working on - Hope you are posting your Christmas cards online somewhere also for others to share and enjoy.    Merry Christmas friends~ 

This card was submitted for the following challenges:


Serving a Risen Savior, 
Pam 

Products Used:  


Thursday, December 19, 2019

Miss Frosty and Her Birds


Today's Christmas card is another adorable Whimsy Stamp image from artist Sylvia Zet, named Miss Frosty.  

I did this card for a card challenge - 'Card with a bird(s)'.... and just couldn't resist such a cute snow 'gal' to show off those two little blue birds bringing you Winter Wishes.


This Whimsy image is available in Red Rubber and the Digital version.  I grabbed it on Cyber Monday when Whimsy had their awesome Digital files for 50% off!  I love using digital images if for no other reason  other than once printed I sure don't have to worry if I've used the right ink to color with my Copic markers.  NO smearing ink from my printer images ever! 

You can see the list of Copic colors I used below if you'd like a reference to color your Miss Frosty.  Once colored, I used Spellbinders Deco Rectangles Die set to cut the image then added a solid purple matting before gluing both down onto a standard A2 lavender and white card base.  I elected not to add the double bow on this card since it was being mailed to my swap partner in Oklahoma.

Thanks for stopping in to see today's Christmas card. 

Serving a Risen Savior,
Pam 
Copics Used: 
Berries: R35 & R46, Leaves:YG03 & G94, Snow: BG000 & B000, Birds: B00, B000, B41, Beak:YR04, Y17, Tree: E70, E71, E74,  Hat: V91, V93, Fur, V91, Scarf, Vest & Button: BV02, Bv01, BV0000.

Product:


Wednesday, December 18, 2019

Memories of Arizona

Boy was I excited to run across this older Whimsy stamp when I wanted to find something special to send to my friend in Arizona. 

Merry Cactus by Krista Heij-Barber is another Whimsy Stamp that is a treasured stamp in anyone's collection.  Here's the card I made with this image.


I used Copic Markers for coloring all but the center of the star ~ I used a yellow metallic gel pen for that part.  I cut the border using  the Whimsy Zig Zag Stitched Rectangle Die.  Then I added a green plaid mat  before mounting on a 4 x 6 red card base. I also added Clear Wink of Stella to the string of lights and the sentiment from the Altenew Blessings set.

I've entered this in the following card challenges also:
The Holly and The Ivy Christmas Challenge #62
Through the Craftroom Door ~ Anything Goes


Thanks for stopping by today ~ Hope you will be back tomorrow also!

Serving a Risen Savior,
Pam 


Products Used:


Tuesday, December 17, 2019

Sending Lots of Warm Thoughts

It's Tag It Tuesday on Polka Dot Orchard and I'm up with a Coffee Gift Card Tag to share with you today.

For this project, I selected Artist Crystal Minkler's digital set, Woodland Cuties (Winter Fox).  I wanted to make the tag to accommodate a 'Starbucks' Gift Card with a separate pocket to hold the card so it could be reused.  Here's the completed Tag, and a few more details so YOU can make one too! 


I colored the Latte cup with Copic markers and then fussy cut the image.  I used Gina Marie Designs Arched Stitched Tag Set dies for the large background die and the sentiment die.  For the card pocket, I also used the same die, but just reversed the die and only cut the top layer with the top of the die (upside down).  For assembly, I glued the gift card pocket down horizontally first, then added decorative washi tape across the top and bottom of the card pocket.  I used a large foam pop square at the top and bottom of the cut out Latte cup and then placed it to the right side of the gift card cover piece.  Then I punched a single hole in the top of  the sentiment and the background tags.  I then made a double bow using Christmas ribbon, and tied the bow and the sentiment tag to the top of the gift tag.  For the final touch, I added Diamond Ice Stickles to the fur brim and ball of the Santa hat and then set the tag aside to dry.  

I hope you like this Gift tag and will follow the link over to Polka Dot Orchard.com to see all of the new items Jessica has just listed. She also has a great sale going on right now! If you aren't a member of the Facebook page, the link there is  ~ Friends of Polka Dot Orchard.

Thanks for stopping by and I hope you will be back tomorrow. 
Serving a Risen Savior, 
Pam 
Copics Used: 
Scarf & Hat, R29, R49, Cup, G7, G17, N1, N3, N4, White Gel Pen, Diamond Stickles

Products Used:


Polka Dot Orchard, Woodland Creatures


Gina Marie Designs, Arched Stitched Tags


Sunday, December 15, 2019

Wishing You a Blessed Season

Here we are down to the 15th of December, only ten more days until Christmas Day!  It's time for a new posting from my other Design Team today ~ Createful Heart Digis and Designs.

For December, I selected Christmas Bells Are Ringing.


I printed the digital image on Neenah 110# Card stock and colored with Copic markers.  After die cutting with Pink & Main's Square Scalloped Edge die, I added the sentiment from  Altenew Blessings Stamps.  The card base is 5 1/2" square with a Black background holly and berries print.  I angled the colored image slightly when I adhered it to the card base and then added three enamel dots for grounding.

This is a nice image for sizing to A2 or larger and colors up easily.  Now don't forget the month long challenge at Createful Heart Card blogspot.  Here's the link to add your Christmas cards to the Anything goes challenge.  

Challenge #15 - https://createfulheartcards.blogspot.com/2019/12/hello-and-welcome-to-challenge-15.html This challenge will begin on December 15th and end on January 14th, just a day later than usual.


To purchase digital images from Createful Heart, please visit the Zibbet shop @: https://marketplace.zibbet.com/createful-heart-design

Once you're ready to post, here is the Createful Hearts 

 Thanks for stopping by to see what I've been working on.   Hope you'll come back tomorrow too.

Serving a Risen Savior, 
Pam 

Products Used:


Dear Santa, I Want It All

Oh... But I look like I've eaten it all already!

The parties are in full swing and the goodies and drinks are flowing! This adorable Stamping Bella bear and mouse pair have certainly found a comfy spot to take that much needed afternoon nap!


This image is 'Polar Bear on a Cupcake' by Stamping Bella.  I stamped it on Neenah 110# card stock and used my Copic* markers for coloring.  I used the Penny Black Elegant Stitching die for the image and the Tattered Lace Nesting Beaded Chain Essentials Rectangle die for the striped mat.  The card is mounted on a 4x6 card base.  I added a sentiment from a piece of Christmas paper and several enamel dots. 

Thanks again for stopping in to see today's Christmas card.
Serving a Risen Savior, 
Pam 
Copics Used:*
Bear & Mouse: N1, Feet & Ears: E21, Nose N6, Candy Cane, R46, R39, Sprinkles, R46, Cup Cake Icing BG0000, Shadows: N00,  Paper, R43, R32.R20  Holly Leaves: YG17, G94, YG63, Berries: R46 , R39

Products Used: