Wednesday, September 30, 2020

Wishing you a Blessed Winter

Yes it's a bit early for Christmas cards and Winter greetings however, when you make lots of Christmas cards like I do, you have to start early. 

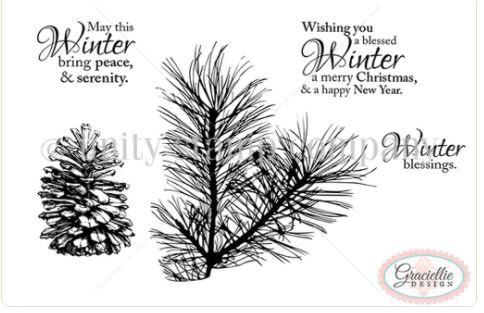
For these cards, I selected Unity Stamps Winter Blessings by Graciellie Design and Gina Marie Designs Ornament and Shadow Die set.  


The beautiful pine boughs in the Winter Blessings set are large.  I stamped them off the card front slightly and used a dark green ink.    I die cut the ornaments out of gold foiled card stock and layered them at the end of each branch.  For the bottom two cards I used Gina Marie Design's Label 3 die set and for the top card I used Whimsy Notched Square Die set,

Next I secured the layers and dies to the card bases.  I returned the cards to my Misti, I stamped the sentiment close to each pair of ornaments.  For the final touch,  I added the red enameled dots to the top of each ornament.

Thank you for stopping by today.  I enjoy sharing my work with you and invite you to “Follow” my blog and to visit my site ~ “Not Just Scraps” on Facebook ~ where you can purchase my cards.


I’ll be entering this card in the following challenges: 

The Ivy and the Holly ~ #80 Anything Goes  

12 Months of Christmas #69 Say it with a Sentiment  

Crazy Hazelnut Christmas #509 


Serving a Risen Savior,

Pam

Products Used:


Unity Stamps, Winter Blessings ~  Graciellie Design


Tuesday, September 29, 2020

The Arrival of Autumn

One of the fun things to do with digital cards is to select images or sentiments for your cards using more than one package.   On today's featured card, I have combined images from two Polka Dot Orchard packages ~ The Arrival of Fall (by Lea Kiesling) and Make Time For Yourself (by Jeanie Hays).

Here's the completed project, then a few details.


 I started by pulling in the birch tree from The Arrival of Fall package.  I duplicated that layer and moved the tree over beside the first one.  Next I pulled in the swing, pillow, blanket and puppy from the  Make Time For Yourself package.  Then I played around with the sizing of each of the images to get the right proportions  to make the trees appear to be in the background and the swing chains reaching the top of the card.  This was important to ground the swing and not allow it to look like it was just in mid-air.  Last I sized the puppy so that he appears to be sitting just in front of the swing.  All of that may sound complicated, but it's really just pushing and pulling on the corners of boxes. 

Once I felt like it looked 'right' then I pulled in a final layer with the sentiment and sized it to fit between the trees and the swing chain.  I printed the image on Neenah 110# card stock and colored it using my Copic markers.  

I used the Tattered Lace Nested Beaded Chain die to give the image a pretty edge.  I found a golden yellow and a fall plaid paper to add to the card base first, then the completed image to the 5 1/2" square card base.  

I finished the card by then adding the twine and the "Love" button charm at the bow. 

Thank you for stopping by today.  I enjoy sharing my work with you and invite you to “Follow” my blog and to visit my site ~ “Not Just Scraps” on Facebook ~ where you can purchase my cards.


I’ll be entering this card in the following challenges:  

613 Avenue Challenge ~ Anything Goes + Add a Charm 

Dream Valley #233 Challenge ~ Make It Digital 

Crafty Catz Challenge #520 Anything Goes 

Your Next Stamps #148 Fall Fun 

Creative Knockouts #369 Thankful Thoughts 

CD Sunday #45 Anything Goes 

Allsorts ~ #591 Autumn Colors


Serving a Risen Savior,

Pam

Products Used:


Monday, September 28, 2020

Have a Sweet Holiday

Happy Monday! 

I'm just returning from a fabulous three day crafting weekend with 19 ladies and have so much to share with you over the next few weeks.

For today, I'd like to share the Weekend Challenge ~ Christmas Cooking Themed card I made.


For this card, I selected Whimsy Stamps' Holiday Treats.  This image was drawn by Jennifer Dove and I used the red rubber stamp.  

I used my Copic markers for coloring.  Since this is a background type stamp, I didn't use any dies for the edge - but just cut near the stamped edge.    I covered a A2 card base with a red dotted swiss card stock, then added the colored image.  I stamp the miscellaneous sentiment using VersaFine ink and die cut it with the smallest die from the Memory Box, Martinee die set.  I added the sentiment to the right bottom  of the card and completed it with a couple of red enameled dots.

Thank you for stopping by today.  I enjoy sharing my work with you and invite you to “Follow” my blog and to visit my site ~ “Not Just Scraps” on Facebook ~ where you can purchase my cards.


Friday, September 25, 2020

Feel Better Soon

Today I'm here with the Colour Crazy Challenge Design Team to share our project cards from this week's sponsor ~ Oddball Art Co.  

I selected their Zeddy the Zebra, Image #212 digi and made a Feel Better Soon card. 


I printed the image on Neenah 110# card stock and used six shades of the N series Copic markers  to color the stripes on Zeddy.  I added E51, E52, E30, YR20 for the nose and feet.  For the die cutting I used the Elegant Rectangle Stack set from My Favorite Things.  

I stamped the Feel Better Soon on a scrap using VersaFine black ink and the die cut with a small fishtail tag die.  I covered the front of an A2 card base with the same red that I used for the die cutting.  Then I layered and glued  the Zebra striped papers and red die cut, finishing with the colored image.  I added the tag with an enamel dot and a black string to complete my project card. 

Thank you for stopping by today.  I enjoy sharing my work with you and invite you to “Follow” my blog and to visit my site ~ “Not Just Scraps” on Facebook ~ where you can purchase my cards.


I’ll be entering this card in the following challenges: 

Ike's Art Challenge #136 ~ Under the Weather  

A Place to Start ~ Sept~ Child's Card 

Get Creative ~#95, Black + One Color   

Classic Design Team Challenge ~ September  

Crafty Animals ~ Challenge #42 

Creative Craft Cottage ~ #133 Include an Animal  


Serving a Risen Savior,

Pam

Products Used:


Thursday, September 24, 2020

You Are Strong

 Today I would like to share another hand drawn image from my friend Jo Ann Stapleton. I made this card of encouragement using her Daffodil image.


I started by sizing the flower to fit the front of an A2 sized card and then printed it on Neenah 110# card stock.  I used my Copic markers for coloring and the Gina Marie Designs Labels #3 nesting die for the edge and the coordinating patterned mat. 

I slipped the colored image into my Misti and  stamped the sentiment with VersaFine black ink on top right corner of the colored image.  

Next, I mounted the mat and image on a Kraft card base.  By adding the shade of brown at the back, this makes the dark brown deep in the flower more visible ~ gives it that 'pop'.

Thank you for stopping by today.  I enjoy sharing my work with you and invite you to “Follow” my blog and to visit my site ~ “Not Just Scraps” on Facebook ~ where you can purchase my cards.


I’ll be entering this card in the following challenges: 

Watercooler Wednesday ~ #290 All About Occasions 

Always Fun Challenge ~ #181 Anything Goes 

Path of Positivity ~ Challenge #83, Family Ties  

A Perfect Time to Craft ~ September 2020  

Crafty Hazelnut ~ September ~ Patterned Paper  

Daisy Chain ~ Challenge 45 ~ CAS


Serving a Risen Savior,

Pam

Products used:


Wednesday, September 23, 2020

Thankful I Have a Cup

 Today's featured card is from Polka Dot Orchard's Thankful I Have a Cup.  This digital stamp set was designed by Crystal O Minkler and has two images and two sentiments.  Be sure to click on the stamp name above to go to the online store for purchasing.

Here's my finished card ~ 


To make this card, I downloaded the digital image after purchase.  I pulled the 'pitcher' into Photoshop Elements and sized it to fit an A2 card.  I used my Copic markers  for coloring and a Book Page die for cutting the edge. The triple stitched black piece I had in my bits and pieces - I just love using up these scraps.  I used a coordinating red and black patterned paper for covering the card base.  Then I added the colored image and the decorative pieces. 

 Be sure to check out all the new images on 

.Polka Dot Orchard website. 

Thank you for stopping by today.  I enjoy sharing my work with you and invite you to “Follow” my blog and to visit my site ~ “Not Just Scraps” on Facebook ~ where you can purchase my cards.


I’ll be entering this card in the following challenges:  

Word Art Wednesday #458-459  

Tuesday Taggers ~ Use Your Scraps  

Dream Valley ~ #233 Make it Digital  

Angie's Digital ~ Challenge #46 Anything Goes 

World Wide Design Team Challenge ~ Sept


Serving a Risen Savior,

Pam


Products Used:


Tuesday, September 22, 2020

When Angels Are Near

Today I'd like to share the card I made using one of Graciellie Digital Designs.  This image is from her Hope & Strength package. 


Isn't that image just stunning!

To make this card, I started by enlarging the dragonfly image and angling it so that it went off the edges of the A2 sized card front.  Then I added the sentiment  on the left side and printed it.  I colored the dragonfly with my Copic markers and used a single stitched die around the edge.  I had the yellow border in my bits and pieces (Don't you have things like that too?) which coordinated well with the shades of blue.  I found a blue patterned paper for the mat and combined the layers to make the card.  Lastly I added three enameled dots randomly around the dragonfly. 

Thank you for stopping by today.  I enjoy sharing my work with you and invite you to “Follow” my blog and to visit my site ~ “Not Just Scraps” on Facebook ~ where you can purchase my cards.


I’ll be entering this card in the following challenges:

 The Crafting Challenge ~ September AG  

Creative Cottage Challenge #133 ~ Add an Animal  

CCC Digi Creations ~ #118 Monochromatic  

Sweet Stampers ~ #48 Things with Wings  

Di's Digi Challenge ~ Winged or Tailed Things  

CD Sunday Challenge ~ #44 Anything Goes


Serving a Risen Savior,

Pam

Products Used:


Monday, September 21, 2020

Birthday Suprises!

 Today I'd like to share with you my Weekend Challenge card on ATCM2.0.  This challenge was to make a card with a stencil, any subject.  This was great timing for me as I've been inventorying my stencils.


For my card I selected Celebrations one of  Roberto's Characters from C. C. Designs.


To make this card, I used my Misti and stamped the two images and the word Surprise!!! on an A2 sized card front.  I colored them with my Copic markers and a yellow sparkle gel pen for the candle he's holding.  I used the Gina Marie Designs Labels #3 die set for both the image edging and the lavender matting.  I added the colorful banner stencil by using Echo Park's Birthday Banner stencil and several shades of Distressed Oxide inks.  

Thank you for stopping by today.  I enjoy sharing my work with you and invite you to “Follow” my blog and to visit my site ~ “Not Just Scraps” on Facebook ~ where you can purchase my cards.


I’ll be entering this card in the following challenges:

 The Paper Shelter ~ Challenge #441 Animals & Pets 

Crafty Creations ~ Sept #413

 Polkadooles ~ Week #38  

C C Designs ~ September Challenge CAS


Serving a Risen Savior,

Pam

 Products Used:


Saturday, September 19, 2020

New Harvest Scarecrow

 Today I'm here with the Design Team ladies from Jan's Digital Stamp Shop 

with our mid-month sharing. 

For my project card, I've selected Harvest Scarecrow, one of the newer images for September.  I love all the details in this package, which you will notice is Jan's specialty.


 I began by sizing the image to fit horizontally on an A2 size card front.  I added a layer over the image and brought in the 'Hello Fall' sentiment.  Next I printed it on Neenah 110 card stock and used Copic markers for my coloring.

I die cut the edges using Gina Marie Designs Wonky Stitched Rectangle die.  Next I matched the image to a reddish orange barn board matting paper and mounted that on a 5 1/2" square golden yellow card base.  The barn board paper was only 4 1/2" high, so I trimmed the card base down to allow 1/8" of the base to show around the matting.  I added the colored image next and finished it off with the pre-colored harvest button in the bottom right corner.

Be sure to check out this new image and others on Jan's Digital Stamp Shop and enter your cards in her monthly challenge blog.

Thank you for stopping by today.  I enjoy sharing my work with you and invite you to “Follow” my blog and to visit my site ~ “Not Just Scraps” on Facebook ~ where you can purchase my cards.


I’ll be entering this card in the following challenges: 

Cute Card Thursday ~ #652 Autumn 

Crafty Gals Corner ~ #211 Fall  

Fab N' Funky ~ #494 Add a Button  

Mod Squad Challenge ~ Autumn Foliage 

The Sisterhood of Crafters ~ Autumn Inspiration  

The Paper Funday Challenge ~ #221 Autumn/Fall  

Classic Design Challenge ~ September


Serving a Risen Savior,

Pam

 Products Used:


Friday, September 18, 2020

Things That Make Us Blessed

 Those of you who have been following my blog for a while, or know me personally, have heard me mention before about my best friend for life - Cindy.  We have been in each other's lives since I was four and she was five.  What an amazing journey of 58 years plus of friendship we have shared.  

Earlier this summer, Cindy joined the ranks of retirement!  I think I was as happy for her as anyone, knowing that she would be able to come down for more visits or that we would have time to take a trip for some new adventure. 

Today's card is the one that I sent to her for her retirement. I made it using images from Polka Dot Orchard.  The Koi fish image is from the set Wonder Often (artist Jeanie Hays) and the sentiment is from Good Morning Spring (artist Jessica Pickeral).


 I sized the image and sentiment to go horizontal on the A2 size card front, but wasn't satisfied with how it make the fish look crowded with the wordy sentiment.  So I increased the image slightly and die cut the front to be just over 4 1/2 x 5 1/4.  I used my Copic markers for coloring and selected deep, rich shades of the orange and blues.

When complete, I die cut the edge of the image with Tattered Lace Nested Beaded Chain Rectangle die.  I cut two matting pieces - one from a solid deep orange and one from an aqua woven scrap paper.   I selected a cream 5 1/2" square card base and layered the matting and image, making sure everything was securely attached. I elected not to add a bow since the card had to go through the mail.

This past weekend Cindy was able to come down for a few days.  Although our time ran out quickly, we had a lot of time for long talks about our childhood and where our Lord has us today.  We both pray that our friendship will be allowed to continue for many years to come!


Happy Retirement!

Thank you for stopping by today.  I enjoy sharing my work with you and invite you to “Follow” my blog and to visit my site ~ “Not Just Scraps” on Facebook ~ where you can purchase my cards.


I’ll be entering this card in the following challenges: 

D. L. Art ~ Sept ~Thankful Thursday 

Krafty Chicks #525, Week 3 CAS 

A Bit More Time to Craft ~ Challenge #124  

Creative Cottage ~ #133 Include an Animal  

Let's Create ~ #163 AG and Best of Friends


Serving a Risen Savior,

Pam

Products used:


Thursday, September 17, 2020

You Are Tutley Awesome!

 Today I'm back with another Angie Blom Digital Design.  I recently made a birthday card for my friend that enjoys the Sea Turtle hunts along the SC coast.  Angie's Turtley Awesome was one of my recent digital additions and seemed to be the perfect one to use for this occasion


I used one of the pre-designed layouts, which include the sentiment under the image, and printed it on Neenah 110# card stock.  I used my Copic markers for coloring and then used the My Favorite Things Elegant Rectangle Stax Die for trimming the edge. 

Next I took a piece of light blue plastic netting and cut a strip about 3/4" x 4".  I attached it to the colored image piece with a blue ocean colored brad. I covered an A2 card base with a coordinating purple mat, then added the image.   I added the nautical washi tape across the bottom to complete the card.

Thank you for stopping by today.  I enjoy sharing my work with you and invite you to “Follow” my blog and to visit my site ~ “Not Just Scraps” on Facebook ~ where you can purchase my cards.