Friday, January 29, 2021

Have Your Cake and Eat it Too!

 Today I'm here with the Design Team from Colour Crazy Challenge Blog and our sponsor for this week is Bugaboo Stamps.  For my project card, I selected their Birthday Bird 001 which like so many of their images are just cute and color up quickly. 

Here's my completed card and afterwards how I put it together.


 After sizing to fit the front of an A2 card base and printing, I colored the image using Copic markers.  I used Gina Marie Designs Arched Stitched Tag Die set for the completed image and the green stamped sentiment tag. The stamped sentiment is from Penny Black's Sprinkles and Smiles set.  I cut a blue coordinating mat over the 4 x 6 card base, and added the matted strip on the left side.  I added the ribbon to the double tags, placed them on the card base, then glued the top tag to the bottom first.  Then I glued them (as one piece) to the card base.  Lastly to complete the card, I added the random enamel dots. 

Thank you for stopping by today.  I enjoy sharing my work with you and invite you to “Follow” my blog and to visit my site ~ “Not Just Scraps” on Facebook ~ where you can purchase my cards.


I’ll be entering this card in the following challenges: 

Di's Digi ~ Tic Tac Toe (Blue/Digi/Sentiment) 

The Paper Shelter ~ #454 Happy Birthday 

Water Cooler Challenge #306 ~ Occasions 

Crafty Sentiments ~ Anything Goes #26 

Digi Tuesday ~ Week 4 

Crafting Happiness ~ Challenge #81 Anything Goes 

CD Sunday ~ Challenge #52


Pam's Pearls


Copics Used:

Bird: BG01, B02, B04, B05, Beak: YR16, YR18, Balloon: Y08, Y15, Y19, Icing & Hat: YG06, YG13, Cupcake Paper: E23, Fork & Plate: N1, C3, Shadow: W2


Products Used: 


Thursday, January 28, 2021

Wonky Donkey Birthday

 Today I'm celebrating my nephew's birthday (a day early) and wanted to share his card with you so you can join me.

Aaron is a pretty special guy in my book and I truly had a lot of fun using Whimsy Stamps Wonky Donkey images by Dustin Pike to make his card.


I started by stamping the three donkey images on Neenah 110# card stock, coloring them with my Copic markers and then cutting them out.  I used one of the sentiment stamps from the set (Say What) and the other two I typed up from Pinterest.  I also stamped and colored the Birthday Cake from Art Impressions and set it aside after cutting it out. 

I used the Whimsy Slimline Window die and an olive green card stock paper to cut out the frame for the card.  White standard card stock works fine for the card base, folding it on the 8 1/2" side x 3 3/4".   I matched up a small coordinating mat piece for each of the colors of the donkeys ( green, red & blue).  Next I die cut the three sentiments to fit in the windows where I wanted them to go.  A couple of the windows I had trimmed the cross section away to allow the objects to fit into the card a bit better.  I also die cut the three patterned pieces to fit their spots as well.  Then I carefully glued each piece to the back side of the frame, being sure they were secured and on straight when the front cover was turned over.  As I put the 3 patterned papers on, I quickly flipped the frame over and stuck the donkey's neck between the frame and the background matting, securing it under the edge of the frame.   I also took a couple of the small foam dots and placed under the heads of each of the donkeys for added dimension.  Once all the sentiments and donkey heads were in the right place, I added my glue to the back of this frame and carefully turned the piece over placing it on top of the slimline card base and securing it to complete this card. 

Thank you for stopping by today.  I enjoy sharing my work with you and invite you to “Follow” my blog and to visit my site ~ “Not Just Scraps” on Facebook ~ where you can purchase my cards.


I’ll be entering this card in the following challenges:

The Cutie Pie Challenge ~ The Boys are Back in Town #155 

Dream Valley ~#240 ~ Our Four Legged Friends 

Penny Black January Challenge ~ Anything Goes 

Crafter's Castle ~ January 2021 

Seize the Birthday ~ #206 

Simon Says ~ Anything Goes ~ Wednesday Challenge #80 

Art Impressions ~ Challenge #300 ~ Celebrate with AI


Pam's Pearls

Copics Used:

Donkeys: 1- B01, B02, B04, B05, 2 - R24, R27, R28, 3 - YG01, YG03, YG23, YG25, Ears: R20, R21Tongue: R00, R01, R20, Birthday Cake: Multiple~ your choice 


Products Used: 


Wednesday, January 27, 2021

Follow Your Heart

Today I'd like to share another sweet Valentine card ~ this one from Conie Fong Art, called Bunny Heart Girl.


I sized the image to fit the front of an A2 sized card and printed it on Neenah 110# card stock.  I used various shades of purple and lavender Copic markers for the balloons, and Copic markers E30 through E35 for the bunny.  Next I die cut the completed card using the Gina Marie Designs Nesting Label 2.  I added the background 'clouds' with a homemade cloud stencil and lavender Quick Quotes Chalking ink.  I also used a deep shade of green and blurred the bottom edge to appear like grass or the ground. 

I secured the completed image to a deep purple card base, then added the white organza ribbon and tied the double heart charm in the knot.  The little bunny sure makes a cute Valentine card or really one that could be used for many different occasions. 

Thank you for stopping by today.  I enjoy sharing my work with you and invite you to “Follow” my blog and to visit my site ~ “Not Just Scraps” on Facebook ~ where you can purchase my cards.


Also if you are a local to my area ~ I'd love to invite you to visit 

The Gallery in Newberry SC where a selection of my cards are available for purchase. Here are few of the Valentine jewels that I dropped off there yesterday ~ 


I’ll be entering this card in the following challenges: 

Crafting Happiness ~ #81 ~ Anything Goes 

CD Sunday ~ #52 ~ Anything Goes 

Crafty Chicks ~ Challenge #543 CAS 

Clean and Simple on Sunday ~ Challenge #197 Animals 


 Pam's Pearls

 Products Used:


Tuesday, January 26, 2021

Brace Your ELVES!

It's Officially Started!  Build Your Christmas Stash 2021! 

The ladies on one of the card swap sites had the best time last year working one weekend out of the month (when it fell close to the 25th).  Now as of this past weekend, we've started again for the new calendar year. 

For my first Christmas card I used C. C. Designs, Christmas Elves and selected the cute little guy peaking through the wreath.  


After stamping him and coloring with my Copic markers, I set him aside.  I glued the red plaid paper on the front of the a2 sized card base and laid it open on my Sizzix machine.  I took the largest ring of the Gina Marie Designs  Wonky Stitched Circle dies and the cutting ring for each side and placed them all together on the card front, about 1/2 inch from the top.  This gave me the larger hole in the card base and the 'stitched ring frame'.  Next I positioned the colored elf inside the card base and trimmed the paper he's colored on to fit to the edge of the card base, then secured so that he shows through the center of the open window. Then I added the wonky stitched ring around him and glued it down and also added the stamped sentiment at an angle on the front.  It also would be easy to add acetate to the inside of the open window and another piece of cardstock to cover the edges, giving the card an additional layer of support on the front flap, if you liked that method. 

Thank you for stopping by today.  I enjoy sharing my work with you and invite you to “Follow” my blog and to visit my site ~ “Not Just Scraps” on Facebook ~ where you can purchase my cards.


I’ll be entering this card in the following challenges: 

Crafty Catz ~ Challenge #535 ~ Anything Goes ~ Winter Fun 

Creative Fingers ~ Challenge #200 

Crafty Hazelnut ~ Challenge #526 Christmas 

Crafty Calendar ~ January ~ Make it Cute 


 Pam's Pearls


Products Used:


Monday, January 25, 2021

I've Reached the Age

This past weekend as I started crafting I had Valentine cards in mind.  I'd started a few the previous week and knew I needed to get busy and finish the rest up.  As it turned out, not the first Valentine card made it off my busy desk.  I did manage to complete about five cards and colored images for nine more but somehow, those cute little Valentine sentiments just didn't fit the flow. I think you'll agree on today's card...

Today's card is from Whimsy Stamps, Dudley's Valentine by the very talented artist Dustin Pike.  


Dudley is just funny hanging out (literally) of this tea cup, don't you think?  

After stamping him on Neeneh 110# card stock, I used my Copic markers for coloring.   I used Gina Marie Designs Frilly Lace Nested Circle dies for the red and patterned papers. I also stamped and cut out the center heart on the patterned paper for paper piecing.  When I secured the tea cup to the red circle, I glued it at the bottom and added several foam dots across the top edge to give it dimension.

For this card, I used a 4 x 6 card base with a deep aqua matting.  I stamped the "Reached the Age" sentiment from Rubbernecker on a shade lighter aqua card stock and die cut it using the Memory Box Matinee Rectangle die.  

I secured the image with the circles dies at the top of the card base and then centered and secured the sentiment directly under to complete the card.

Thank you for stopping by today.  I enjoy sharing my work with you and invite you to “Follow” my blog and to visit my site ~ “Not Just Scraps” on Facebook ~ where you can purchase my cards.


I’ll be entering this card in the following challenges:

Clean & Simple ~ Challenge #197 ~ Animals 

Seize the Birthday ~ Challenge #206 

Crafty Animals ~ Challenge #46 

Gem of a Challenge ~ Week #2 


 Pam's Pearls

Copics Used:

        Dudley: YG17, YG67, YR23, Y15, Y19, Cup: B00, B01, B02, BG02, B04 

Products Used:


Friday, January 22, 2021

Ahoy There!

Today's card is a cute digital image from Di's Digital stamps called Animals Ahoy!  I created it this past weekend for a challenge for Anything Transportation ~ a bit out of the box, right?  


  I think it's just as cute as it can possibly be and can be used for anything from baby to retirement and anything in between.

I used Copic markers to color the image and I used a cloud stencil and Quick Quote Chalking inks for the clouds. I used the Whimsy Stamps Zig Zag Border Die for the edge, and added a tiny salmon liner mat before adding it to a Kraft A2 size card base.  For the final touch I added an Aqua double organza bow and also a white mat inside for a nice writing area.

Thank you for stopping by today.  I enjoy sharing my work with you and invite you to “Follow” my blog and to visit my site ~ “Not Just Scraps” on Facebook ~ where you can purchase my cards.


I’ll be entering this card in the following challenges: 

A Perfect Time To Craft - Open Challenge 

Crafty Animals ~ Challenge #46 

Creative Cottage~ Challenge #136 ~ Use a Digi 

Digi Doodle ~ Challenge #34 ~ Anything Goes 

QKR Stampede ~ Challenge 412 ~ Anything Goes 

Simon Says ~ Make Your Own Background 

The Male Room ~ Challenge #146 ~ Animals


Pam's Pearls

Products Used:


Thursday, January 21, 2021

Shelter From the Storm

 This past weekend several of my girlfriends enjoyed four days scrapbooking, making cards and relaxing away from all the troubles of everyday life.  

As I made the featured card, I thought about these ladies...

Sometimes, all we need is shelter from the storm....

There hiding under the protection of a colorful mushroom, we find another adorable gnome.  Unity Stamps, Jeanie Hayes has certainly given us a sweet image with Sunshine and Laughter Gnome.


After stamping the image and sentiment, I colored the gnome with Copic markers and used Gina Marie Designs Label 2 die for the edge.   I used a top fold Kraft card base, covered with a plaid mat.  After I secured the colored image to the card base, I added the brown twine and the coordinating emerald button.

Thank you for stopping by today.  I enjoy sharing my work with you and invite you to “Follow” my blog and to visit my site ~ “Not Just Scraps” on Facebook ~ where you can purchase my cards.


I’ll be entering this card in the following challenges:

 Lost Cost Creativity ~ Challenge #114 Gnomes 

Stamp & Fun Equals Creativity ~ Challenge #381 

Crafty Sentiments ~ #19 Anything Goes 

Crafty Creations ~ Challenge #417


Pam's Pearls 

Products Used:


Wednesday, January 20, 2021

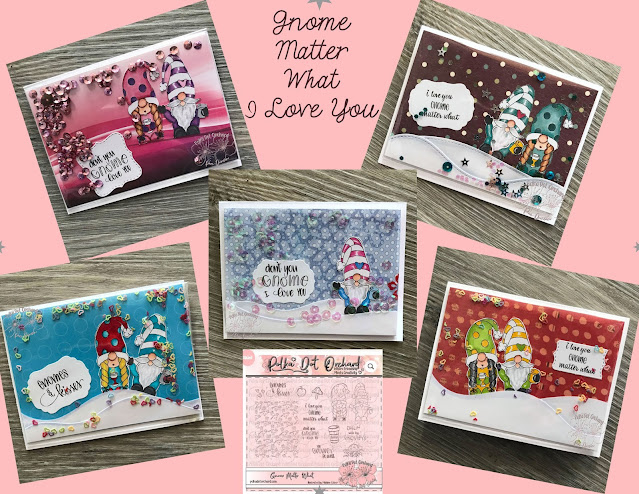
Gnome Matter What ~ I Love You

If you haven't started your Valentine card making, now is the time to start! Today I have the cutest sets of Gnomes to show you from Polka Dot Orchard, made into shaker cards. 

Now these are the EASY shaker cards so keep reading, please.  

Here's the finished cards~


First, I used Gnome Matter What, I Love You from Polka Dot Orchard.    I also pulled some other images to color for future projects, so you'll see more than just gnomes on the next photo.  I sized the gnomes to about 2" tall and a little over 1" wide, filled up the sheet with images and began Copic coloring.


Next I carefully cut each of the images out and put the bunnies and penguins aside for another project.   I also used a curved hillside die and cut about a dozen 5" strips for snow mounds. 

After pairing the gnomes together I matched a piece of patterned cardstock to each set and cut it to 3 3/4" x 4 5/8".  I added two pieces of the curved snow hills to each card front and secured them down.  I tucked the gnomes feet under the snowy hill and glued the rest of the body to the card front. I had printed and die cut several of the sentiments from this package also, so I glued one of the cute sentiments to the side of each of the pairs of gnomes.  Once all the pieces were secured and dried, I slipped the card front into one of the cellophane envelopes from an embellishment package. (YES, from an embellishment package!).  If it doesn't fit perfectly, simply crease at the edge of your cardstock, fold back and use double sided tape to secure the part back, under the back. After three sides have been folded and secured, I carefully added my flat/small shaker mixture to the front of the card, then sealed the fourth side.  Next I added double sided tape around the edge of all four sides, then removed the protective covering and added the shaker to the card base.  Press down really good to be sure it's sealed.   To me this is the easiest shaker I've ever made. I hope you'll try one - and especially try one with something from Polka Dot Orchard

Also a special thanks to Debra, the owner of Scrapsalot, who shared this shaker technique and many others that I use.  Her online store also has some amazing craft products you need to see!


Thank you for stopping by today.  I enjoy sharing my work with you and invite you to “Follow” my blog and to visit my site ~ “Not Just Scraps” on Facebook ~ where you can purchase my cards.


I’ll be entering this card in the following challenges:

 Cardz 4 Guyz ~#262 Let It Snow 

Dream Valley Challenge #239 ~ Winter & Snow 

Gem of a Challenge ~ Week 2 

Challenge Up Your Life #131 ~ Snowflakes 

Crafty Calendar ~ Make it Cute 

Di's Digi Design ~ Show Some Snow

Pam's Pearls 

Products Used: 


Tuesday, January 19, 2021

You Are My Sweetheart

Today I'm here with the Design Team from Jan's Digi Stamp Shop for our mid month inspirational sharing.   For my project today, I've selected Valentine Wishes.    This is a large digital package containing 7 color drawings, 8 black and white drawings and 7 sentiments.  

Plus it's currently On Sale!


Here's my completed card and then a few things about how I made it.


I printed the Heart shaped box of candy on Neenah 110# cardstock and used Copic markers for coloring.  Then I fussy cut the image out and set it aside.  

Next I took an A2 top fold white card base and used a Darice embossing folder to get the raised 'Valentine' at the bottom of the top flap.  I triple wrapped a gold thread around the top flap and knotted about an inch from the left side.  Then I secured the colored heart over the gold string, ensuring it was glued well around all the edges.  For the finishing touch I used a corner rounder punch for the bottom two corners.

Thank you for stopping by today.  I enjoy sharing my work with you and invite you to “Follow” my blog and to visit my site ~ “Not Just Scraps” on Facebook ~ where you can purchase my cards.


I’ll be entering this card in the following challenges:

Avenue 613 ~ January ~ Anything Goes 

Allsorts ~ Week 607 ~ Something New 

Crafty Calendar ~ January ~ Make It Cute 

Send a Smile 4 Kids ~ Valentines

 Creations In Pink ~ Challenge #30


Pam's Pearls

Copics Used:

  Box:Y28, Y26, R27, R29, RV24, Bow: R81, R83, R85, RV000


Products Used: 


Monday, January 18, 2021

Trust in Him

Happy Monday!  I'd love to start the week off by sharing an inspirational card that I made for a weekend challenge.  The challenge from the Christian Card Maker site was to use a scripture or quote about God's Peace for our card. The message we need to hear every day - 
Trust in Him. 

For my card, I selected one of the sentiments from Penny Black's Gifts from Above and the flower from Altenew's Floral Sprig.   Here's the finished card that I posted for their challenge. 


 The sentiment is quite large, so I stamped it first onto a standard A2 sized card front, then positioned and stamped the flower close to the words.  I used my Copic markers for coloring the flowers (referenced below).  Afterwards I used the Gina Marie Nested Scalloped Stitched Rectangle die for the edges.  I selected a dark purple cardstock that matched the purple in the flowers for the card base and cut it to a standard A2 card size.  I tied a gold thread around the colored image and added a cross charm.  Lastly I secured the image to the card base to complete the project. 

Thank you for stopping by today.  I enjoy sharing my work with you and invite you to “Follow” my blog and to visit my site ~ “Not Just Scraps” on Facebook ~ where you can purchase my cards.


I’ll be entering this card in the following challenges:

Penny Black Saturday Challenge ~ January (Winner)

QKR Stampede ~ Challenge #412 

Art Impressions ~ Resolutions Challenge 

Creative Knockouts ~ #384 Something to Say 

Word Art Wednesday # 473-474


Pam's Pearls

Copics Used:

Flower: Y21, Y38, YR04, YR18, BV08, Leaves: YG61, YG63, YG67, YG91, YG93, YG95, Background: G20


Products Used: 


Friday, January 15, 2021

Ice Cream Solves Everything

Including Another Birthday!

Harper Goes Head First is one of my favorite Stamping Bella images.  Don't you know.... "There is always room for ice cream ~ It fills in all the gaps!"

With the sentiment that is included in the package, she is perfect for a card of encouragement or a get well card. But today's card was made for one of my life long girlfriend's birthday.


To make this card I started by stamping the images and sentiment on Neenah 110# cardstock. 

{NOTE: I will say, if you are stamping this set it's a good idea to place the spoon a bit closer to the cup than I did in this card.  The distance from her leg extending to the left and the spoon to the right made it a bit difficult to fit into most of the dies.} 

I used my Copic markers for coloring the image.  When completed, I die cut the edges with the Pink & Main Scalloped Square die.  I matched a piece of 12 x 12 pink cardstock to the pink in the ice cream, then cut the cardstock in half (6" x 12") and folded one piece in half to make the card base (6" x 6").  Next I found the fun multi-colored circle patterned paper  that coordinates well with the colored image. I die cut it using the largest die in the same Pink & Main Scalloped Square set (~6").   I secured the dotted patterned  mat onto the pink card base (with the fold at the top).  Then I added the colored image, slightly tilted and secured it.  I added three domed dots at the bottom corner next and finished the card with a lavender double bow.

Thank you for stopping by today.  I enjoy sharing my work with you and invite you to “Follow” my blog and to visit my site ~ “Not Just Scraps” on Facebook ~ where you can purchase my cards.


I’ll be entering this card in the following challenges:

Daisy Chain ~ Challenge #48 ~ Happy Birthday 

Watercooler  ~ Challenge #304 ~ Occasions 

Try it on Tuesday ~ Uplifting Quote 

Avenue 613 ~ January Anything Goes 

We Love Chocolate Baroque ~ Feminine 

Stamping Bella ~ Facebook Challenge ~ Dec/Jan


Pam's Pearls 

Copics Used

Skin: E21, E04, E11,  E00, Dress: BV00, BV01, BV02, BV13, Bucket: B01, B02, B04 B05, Label: C1, E23, E25, RV10, C01, C03, Spoon: C01, C03, Shadow: W3


Products Used: