Friday, February 28, 2020

I'll Always Have Your Back

As I start to write today's blog, I honestly just took a deep breath and smiled
 as I looked at this card.  
Not that I'm smiling at the card I made, the way I made it or the way I colored it. 
Nope - I'm smiling at how cute this image is.

And to think we are so blessed to the point of being overwhelmed some days with tons of all these adorable images to color and make cards or scrapbooks or other projects!  

Isn't life good? Yes, it is! 


This image is Stamping Bella's, I'll Always Have Your Back Stuffies.  

I began by stamping them on Neenah 110# card stock and then used Copic markers for coloring.  I preselected the orange matting paper before coloring the flower so I could match the two. I used the Gina Marie Designs Nesting Labels #2 to die cut the completed image.  I also stamped the sentiment from the same package using VersaFine ink and a double fish tail banner die.

I’ll be entering this card in the following challenges:
  
Thank you for stopping by today.  I enjoy sharing my work with you and invite you to visit my site ~ “Not Just Scraps” on Facebook ~ where you can purchase my cards and other crafting items.

Serving a Risen Savior,
Pam

Products Used:


Thursday, February 27, 2020

I Think Your 'Soda" Awesome

Today I'd like to share a little card I made using a stamp set

She's a cute little 50's waitress with her tray of burgers and drink and comes with several appropriate 'Car Hop' humorous sentiments.


For my card I selected the 'soda' awesome and stamped the sentiment with Versa Fine ink.  I stamped the car hop girl with Memento ink on Neenah 110# card stock and colored her using my Copic markers.  I die cut the completed image and the sentiment using a standard stitched rectangle die.  I glued the sentiment onto a scrap of purple paper and hand cut 1/8" around for the mat.  I also cut the background mat 1/8" smaller than the card base and used a double cross stitched die to give it the finished edge.

I’ll be entering this card in the following challenges:

Thank you for stopping by today.  I enjoy sharing my work with you and invite you to visit my selling site ~ “Not Just Scraps” on Facebook ~ where you can purchase my cards and other crafting items.

Serving a Risen Savior,
Pam

Copics Used:
Dress: B60, V25, BV01, Hair: E11, E15, Y0000, Cup: Y18, B12, Burger: E17, Bun: E33, Lettuce: G82, Tomato: R14, Eyes: B26


Products Used:


Wednesday, February 26, 2020

To the Moon and Back

I know I'm not the only mother who fondly smiles as we remember telling our sweet babies...
"I love you to the moon and back". 

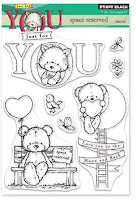
Today's card makes me smile with this Penny Black image from their Space Reserved stamp set and is sure a great addition to any of our collections.


For my card, I stamped the image on Neenah 110# card stock and colored using my Copic markers.  I used Broken China Oxide ink and a finger dauber with my cloud stencil to make the background clouds.  Then I cut a yellow frame die using the Simply Stampin Oval Frame Die and trimmed the colored image closely behind the frame.  I added the deep red heart mat to the card base then added the framed image and completed the card with a yellow organza double bow. 

I’ll be entering this card in the following challenges:

Thank you for stopping by today.  I enjoy sharing my work with you and invite you to visit my selling site ~ “Not Just Scraps” on Facebook ~ where you can purchase my cards and other crafting items.

Serving a Risen Savior,
Pam
Products Used
Simply Stampin, Oval Frame


Monday, February 24, 2020

Happy Holiday Poinsettia

Today I'd like to share a Christmas card from Polka Dot Orchard using the digital image, Holiday Poinsettia.  I selected non-traditional colors for the Christmas challenge on ATCM2.0.


After printing the digital image on Neenah 110# card stock I used my Copic markers for coloring.  I used Gina Marie Designs Labels #2 Nesting Dies to cut the image and the background paper.  The card base is 5 1/2" square with an aqua snowflake mat.  I completed the card using a magenta organza ribbon.

I’ll be entering this card in the following challenges:


Thank you for stopping by today.  I enjoy sharing my work with you and invite you to visit my selling site ~ “Not Just Scraps” on Facebook ~ where you can purchase my cards and other crafting items.

Serving a Risen Savior,
Pam
Products Used:


Friday, February 21, 2020

Polka Dot Orchard Love & Friendship Blog Hop

Valentine’s Day may be over and done for this year, but Polka Dot Orchard is still celebrating with our Love & Friendship Inspiration Blog Hop. The creative team has amazing creations to share with you featuring some of our newest releases! We have two $10 gift cards for two lucky winners chosen randomly from the comments. You have until February 24th, 11:59pm EST to leave a comment on each of the blogs, including the Polka Dot Orchard blog letting us know that you completed the hop. We will announce the lucky winners on February 26th on the Polka Dot Orchard blog.

Here is the list of our amazing Design Team members and their blog link to take you to each of their blogs to see their Polka Dot Orchard cards. 
Don't forget to comment on EACH Blog.

Kristina@https://www.kkraftology.com/2020/02/love-friendship-inspiration-blog-hop.html


From the new digital packages, I selected 'I Will Sing to The Lord' which was designed my Jeanie Hays for Polka Dot Orchard.  Here's my completed card ~  


To make this card,  I printed the image on Neenah 110# card stock and used Copic markers for coloring. {Bird:B12, B24, B26, YR04, YR14, YR15, C0, C1, Beak W5, W7, Branch: E11, E33, E34, E25, YG9}  I used a leaf stencil and Peeled Paint Distressed Oxide ink to make the background leaves around the bird and branch.  The scripture sentiment is also from the same package .  I used the Tattered Lace Beaded Chain Nesting Rectangle die for the image before mounting the image on a blue A2 card base. 

I invite you to visit Polka Dot Orchard's website to see all the new digital packages as well as many other items available for purchase. Please comment below for your chance to win in this Love & Friendship Blog Hop, then on to the next team member.


Thursday, February 20, 2020

Will You Be My Best Friend Forever?

Have you dropped by the Createful Hearts Digi page on Facebook or their Zibbet online store lately and see their new release named Hettie's Adventures?

It's our featured promotional image for the month of February ~ so you should see several different designs floating around Facebook with this wide eyed goldfish and this curious hedgehog attempting to have a long conversation.  You can also visit the Createful Heart Blog(click here) to see all of the Design Team's cards gathered in one special posting.

Here's my card ~ 


For this digital image, I sized it to fit an A2 card base and colored it with my Copic markers (listed below).  I used the Memory Box Wrapped Scallop die to make the pretty edge and then returned the colored image to the Misti to add the sentiment. The Hello Lovely is from Altenew's Fancy Greetings package.    I added the  embossed bubble mat to the card base then added the colored image to complete the card.

I’ll be entering this card in the following challenges:


Thank you for stopping by today.  I enjoy sharing my work with you and invite you to visit my selling site ~ “Not Just Scraps” on Facebook ~ where you can purchase my cards and other crafting items.

Serving a Risen Savior,
Pam
                                                               
Copics Used:
Fish, Y06, Y08, Y15, Y18, BV01, BV02, BV13, Hedgehog:E11, E21, E23, Tummy N0, N1 Shell: BV01, BV02, BV13, E93, E97, Water: BG000, BV11, B60, BG90, BG93, B00, B01, Bowl: B04                                                                                                                                                                                   
Products Used: 


Wednesday, February 19, 2020

Your Space Is Reserved

Today I'd like to share with you a card I made using a cute little bear from Penny Black Stamps.

This image is from the 'Space Reserved' stamp set, and although I used it for a birthday card, it certainly could be used for just about any occasion. 


There are several cute bears in this set ~ I really had a hard time deciding on which one to use.  But this one was perfect for letting a friend know there is always a space reserved beside me!

After stamping the image on Neenah 110# card stock, I used my Copic markers for coloring.  I used Distressed Oxides (Broken China and Spun Sugar) and my cloud stencil to make the background clouds.  I die cut the image and the solid blue paper using Pink & Main's Cloudy Frame die. This gave me the perfect fit for the image inside the frame die.  After the clouds, I put the image back in my Misti and added the sentiment ~ Today is all about you! ~ from Penny Black's Sparkles & Smiles sentiment package.   

I used a lavender 5 1/2" square card base and cut the polka dotted paper 5 1/4" square.  You'll notice on this layout I laid the ribbon under the mat (on top of the card base), then glued the mat piece down.  This step is just a matter of preference verses including the card base.  Next I secured the image and frame to the base, then tied the ribbon bow.

I’ll be entering this card in the following challenges:

Thank you for stopping by today.  I enjoy sharing my work with you and invite you to visit my selling site ~ “Not Just Scraps” on Facebook ~ where you can purchase my cards and other crafting items.

Serving a Risen Savior,
Pam

Copics Used:  Bench:E70, E71, E74, Grass: G94, YG69, YG93, YG94, Bear: E23, E25, E27, Balloon: BG05

Products Used:


Tuesday, February 18, 2020

Love is Brewing

It's Tag It Tuesday at Polka Dot Orchard and I'm up today to bring you my creation.  
I've selected the digital package 'She Said Tea' by artist Jessica Pickeral and made a Vintage pouch that could be added to a scrapbook page or could be used to store special memory notes or other ephemera.


For this project I started by printing the image of the lady from the digital package and colored her with Copic markers.  I also printed two of the sentiments from the package onto gray card stock and die cut them with small tag dies.  I gathered several vintage type items including the gray herringbone patterned envelope to use for the base of the project.  I removed the string used for sealing and replaced it with a piece of Handmade Cotton Candy Clouds Crinkle Ribbon from Polka Dot Orchard.  I added to the layers including the image of the lady,  tiny pink pearls to the flowers on her cup and in her hair, buttons, lace with pearls, a butterfly, hearts and lace.  I think it all came together quite nicely, don't you?  

I’ll be entering this card in the following challenges:


Thank you for stopping by today.  I enjoy sharing my work with you and invite you to visit selling site ~ “Not Just Scraps” on Facebook ~ where you can purchase my cards and other crafting items.

Serving a Risen Savior,
Pam
 Products Used:


Monday, February 17, 2020

Love You Pop!

Good Monday Morning! 

I'm starting the week off with Polka Dot Orchard's Digital package Lollipop Love by designer Crystal Minkler.  

Here's my completed card and then the directions 
on how I made it. 


I printed the trio of lollipops and the two sentiments onto a piece of Neenah 110# card stock, then duplicated the lollipop layer twice so that I had three sets of that image across the page.  I placed the two sentiments with enough room around them to allow for die cutting, then printed this page.  I colored both of the lollipop images exactly alike and fussy cut as close to the outer edge as possible; then used my craft knife to cut in between the stems of the lollipops.  

Next, I wanted to make a piece of background paper.  I carefully laid the three sets of colored images in a staggered row on the printer glass (colored side down) and scanned them in as a jpg image.  Then I was able to open the scanned document and duplicate the three images, continuing to arrange them in rows down the paper, until I'd covered the entire page.  I lightened the opacity to 75% so the main image would remain the focus point of the card.

On the 5 1/2" square card base, I added a navy mat, then a bright red mat, and then the copied image mat.  I added several large foam squares between the two layers of the candy part of the image and glued them together at the base of the lollipop sticks.  Then I added the narrow ribbon around the sticks and through the "I Love You" fish tail banner.   I used a Book Mark Page die for the top sentiment and added a ultra thin piece of sparkle washi across the top edge.  Now that everything looks complete, it's time to add glossy accents and glitter glue.  I used diamond Stickles to fill inside the heart on the center lollipop. Then I carefully covered both the heart on the left and the purple lollipop on the right with Glossy Accents to give them a high gloss.  After checking to be sure I didn't have any air bubbles, I set this to the side to dry overnight. 

There sure is a lot of different occasions this image 
could be used for.  I hope you will check out all the new products on  Polka Dot Orchard. 

I’ll be entering this card in the following challenges:


Thank you for stopping by today.  I enjoy sharing my work with you and invite you to visit my selling site ~ “Not Just Scraps” on Facebook ~ where you can purchase my cards and other crafting items.

Serving a Risen Savior,
Pam
 Copics Used:
Heart: R35/R37, Center: YG01/YG03, Purple: B63/B66, Sticks: E23

Products Used:


Saturday, February 15, 2020

A Silent Moment

Today I'd like to share with you a card I made using an image from Createful Heart Digi's and Designs.  For this project I selected 


I sized the digital image to about a 3" square and printed it on Neenah #110 card stock.  I used Copic markers for coloring which are referenced below. To obtain the mountain texture (and also the fur on the dog) I used my  Copic blender solution and dabbed a small amount on a piece of Terry cloth towel,  Then I held a 'finger spot' sized area to the colored area for about 3-4 seconds, then carefully moved to the next spot.  This allows the texture of the cloth to leave it's imprint on the card while removing the Copic coloring where the fluid is coming in contact with the paper. I did this technique over the mountains and also the back of the dog.  Afterwards, I die cut this piece using the Penny Black Elegant Stitching Die.  

I used a Blue A2 card base and added an additional orange mat then added the colored image, each at a slightly different angle.  I stamped the scripture on a scrap of paper that matched the card base then popped it up with several foam dots before adding it to the card base. 

Be sure to enter YOUR cards in the Createful Hearts Monthly Blog Challenge ~ Here's the Link : click HERE. Be sure to "follow" the blog to be eligible to play and win!

I'll be entering this card in the following challenges:


Thank you for stopping by today.  I enjoy sharing my work with you and invite you to visit my selling site ~ “Not Just Scraps” on Facebook ~ where you can purchase my cards and other crafting items.

Serving a Risen Savior,
Pam

Copics Used:
Boy: Hair: E13, Jeans: B95, B26, Shirt: YR01,  Girl:  Shirt: BG02, BG05, Jeans: B95, Hair: E29, E23, E21, Dog: N1, N3, Flowers: Y17, Clouds: B01, B00, Sun: Y32, Y00, BV00, E95, R11, Mountains: YG67, YG95, YG03, YG63, G46, G09

Products Used:


Friday, February 14, 2020

So Much Love For You!

Happy Valentine's Day!

I've saved my favorite Valentine to show you today!  I simply love this little set of bears holding up the letters to the word LOVE!
They are from Art Impressions Valentine Bears stamp set.


This card was made by stamping the image on 110# card stock.  I used my Copic markers to color each cute little bear and the letters they are carrying.  Because the image is rather large for the standard A2 card base, I elected not to add any die cut edges that might distract from the fun image. 

I matched a blueish-purple plaid paper to use for the matting on the A2 card base and glued it down.  I also had a Heart Border die that is made by Pink & Main  - that I cut out of deep red card stock and added under the colored image.  I finished the card by adding a red organza ribbon with a double bow. 

I’ll be entering this card in the following challenges:

Thank you for stopping by today.  I enjoy sharing my work with you and invite you to visit my selling site ~ “Not Just Scraps” on Facebook ~ where you can purchase my cards and other crafting items.

Serving a Risen Savior,
Pam
Copics Used:
Bears: E31, E34, E35, E15, E13, E17, E23,  Hearts: R35, R37,  Shirts: N0,  Love:B63, B66

Products Used: