Monday, February 28, 2022

Happiness Has No Limit

It's hard to believe the last day of February is already here.  What a fun month of celebration here at Grateful Reflections with both of our birthdays and our first anniversary.   We are truly blessed and thankful for all the sweet cards and messages throughout the month. 

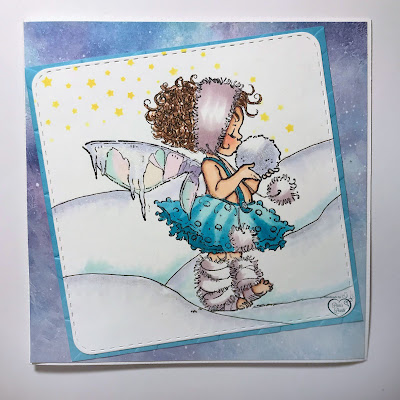
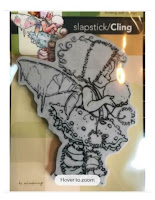
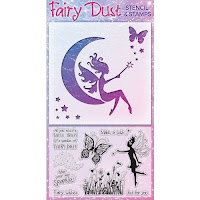
Today's card is one I made for a 'tech' challenge - Silhouette Card.  I had one of the 6" Fairy Dust stencils that came in a Papercraft magazine I'd been wanting to try out ~ here's what I came up with.


I started by using a heavy weight watercolor paper taped down on my glass mat.  Although this stencil had a crescent moon, I wanted the full moon, so I die cut a 5" circle and masked the center top of the card front.  I blended Wilted Violet and Shaded Lilac Ink Oxides around the masked circle, out to the edges and down toward the bottom of the paper, leaving about a 2" white border at the bottom.  

After carefully removing the mask, then I blended in Fossilized Amber and Mustard Seed Ink Oxides to make the moon.  Next I taped the fairy stencil over the background and masked over the moon (on the stencil) since I didn't it want on this card. Then I used Black Soot Ink Oxide for the fairy.  

At this point I had really planned to cut the card off, making it square.  But one of my Unity Stamp Co Kit of the Month (01/19) packages was also near by and had a border stamp that I thought would give the effect of the forest floor ~ so I inked it up and added it at the bottom of the design. I left it white to add the dimensional effect between the sky and ground. I think this stamp was designed for the top of a card or to decorate an envelope edge, however I loved the effect it gave at the bottom of my card designs. 

After trimming the edges, I added a 1/8" black liner mat and then mounted on a yellow cardstock card base that I cut to fit the larger card image.

Thank you for stopping by today to view my blog.  I enjoy sharing my work with you and invite you to “Follow” my blog and to visit my site ~ “Not Just Scraps” on Facebook ~ where you can purchase my cards.

 I’ll be entering this card in the following challenges: 

Crafters Cafe ~ Challenge 282 ~ Create Your Background 

Sisterhood of Snarky Stampers ~ Q=Quirky 

Crafty Calendar ~ February Challenge 

We Love Stamping ~ February Challenge 

Lil Patch of Crafty Friends ~ February

 Pam’s Pearls


Products

from Papercraft Magazine, unknown edition

Unity, KOM 01/19, Beautiful Forever & Ever


Friday, February 25, 2022

A Day of Surprises!

Spring is coming and I'm so ready to celebrate warm, sunny birthdays!  It's time for a new challenge and the Polkadoodles Design Team is rolling out some really cute spring birthday cards.  Click HERE to visit the Polkadoodles Challenge blog to see my teammates cards and also to enter your cards in the challenge.  

For my project card, I've selected Winnie Surprise Gift and Birthday Wishes Free Cupcake.


To make this multilayered card I started with Winnie image sized to about 3-1/2" tall and the Free Cupcake image about 1-1/2" tall (to the candle tip).  I printed both of those on Neenah cardstock and colored them using my Copic markers.  

The bold line on the free cupcake make it easy to cut out close to the image.   Using one of my nesting tag sets I used the smallest and the largest ones and die cut using navy cardstock.  I also die cut the image one size under the largest one.

I selected a 6" square card base turned with the top fold and covered the front with paper from the Polkadoodles Fresh Twist paper pack using the same navy cardstock as a 1/8" matting behind the orange floral piece.  

I secured the colored image to the largest navy tag, then punched a small hole in the top and added the coordinating fibers.  I added the cupcake to the smallest tag by securing it at the bottom and adding a foam dot at the top (behind the icing) to give the tag a little more dimension. 
 
Next it was just a matter of moving and tucking the two tags and the sentiment to see what fit where.  This step of course is always personal choice!  Once they were set to where I liked them I added glue here and there to keep them from moving.  All done and ready to be hand delivered to one of my crafting friends! 

Thank you for stopping by today to view my blog.  I enjoy sharing my work with you and invite you to “Follow” my blog and to visit my site ~ “Not Just Scraps” on Facebook ~ where you can purchase my cards.

I’ll be entering this card in the following challenges: 

Addicted to Stamps ~ Challenge 423 ~ Birthdays 

Fab N Funky  ~ Challenge 545 ~ Birthdays 

Lil Red Wagon ~ Challenge 642 ~ Make It Stitched 

Simon Says Wednesday Challenge 92

 Pam’s Pearls


Copics: Hair: E12, E23, E25, Flower: Y17, Y15, Dress & Shoes: Y15, Y17, Y11, Gift: B24, B28, B29, Cupcake: Y11, Y15, Y19, R46, B24, Shadow: W3

Products: 


Wednesday, February 23, 2022

Pretty in Pink

Every time I use a Bugaboo image, I can't help but think how much we miss them and so many other digital stamp companies that have had to close up.  

However today's card was started because I had a new die that I received and I actually built this card around the die! 

Penny Black Edger Die (51-209) (shown on the bottom of the plaid paper) with it's delicate wave of 'X' open weave is so delicate and pretty! 


After laying this on the top fold solid hot pink card base, I selected the Handful of Hearts from my Bugaboo files and sized it to just under 3" tall.  I colored the image with my Copic markers and stamped the Rubbernecker 'Smiles' vertical sentiment on the right side.  I used Spellbinders Nesting Labels 15 for the decorative edging, then added it to the card base.  For the final touch I added a very light pink organza ribbon and bow at the top fold. 

Thank you for stopping by today to view my blog.  I enjoy sharing my work with you and invite you to “Follow” my blog and to visit my site ~ “Not Just Scraps” on Facebook ~ where you can purchase my cards.

I’ll be entering this card in the following challenges: 

Crafting Happiness ~ February 

Get Creative ~ Challenge 108 ~ Use Hearts 

My Time To Craft ~ Challenge 475  

Ike's World ~ Challenge 153 ~ Valentine or Love

 Pam’s Pearls

Products:

Bugaboo, Handful of Hearts


Tuesday, February 22, 2022

Every Chapter

Today I'd like to share a wonderful card  that speaks so true to our long friendships.  There are so many chapters in our lifetimes, like chapters in a book.  Stampin Up made this image called Every Chapter.


I used my Copic markers for coloring and the Penny Black Elegant Stitching Rectangle die for the edging.  Next I added a 1/8" solid burgundy mat behind the image. The 5 1/2" sized card base is covered with a floral patterned paper and turned with the fold to the left before adding the image and matting.  I tilted these slightly to the left prior to adhering to the card, then added the rust colored organza ribbon and bow.  

Lastly I added Glossy Accents to the glass lens just to give the card a little extra WoW!


Thank you for stopping by today to view my blog.  I enjoy sharing my work with you and invite you to “Follow” my blog and to visit my site ~ “Not Just Scraps” on Facebook ~ where you can purchase my cards.

I’ll be entering this card in the following challenges: 

Crafty Calendar  ~ February 

My Time to Craft ~ Challenge 475 ~ February 

Creative Fingers ~ Challenge 225 

A Bit More Time to Craft ~ February 

Cards Galore Encore ~ February

 Pam’s Pearls


Copics: Cup: BG000, BG01, BG02, Glasses: R37, R39, "Enjoy": R00, R02, R56, R89, Y26, "Chapter": BG05, BG07, R00 R02, BG72, "of Our": BG07, E07, E93, "Friendship": BG10, BG11, BG13, BG18, Shadow: W2

Products:

Special Thanks to my Stampin Up Rep for this stamp ~ Visit her site to get your products!

Geri's Stampin Up Site:  Click Here


Monday, February 21, 2022

A Basket of Spring Tiger Lilies

I'm starting off the week with my Design Team ladies at Jan's Digital Stamp Shop as we bring you our mid-month cards today.  I've selected a second image from Spring Tiger Lilies as I really loved both images in the set and couldn't just not do one of them! 


 I love the old fashioned water pump and the overflowing bucket of beautiful lilies.  They just speak SPRING and we are all ready!

The Copic markers that I used for coloring are listed below for reference.  I used Gina Marie Designs Nesting Stitched Scalloped Rectangle die for the decorative edge.  You'll notice I tied the black gingham ribbon around just this image layer, not the entire top layer.  Usually I just knot the ribbon at this point and continue the card assembly.

The A2 card base is a left fold style with the olive coordinating  mat added.  Then I secured the top colored image layer.  Since a bow would take away from the flowers, I trimmed the edges diagonally and added the small 'love' heart over the knot. 

I hope you will join our team over on the Challenge Blog with your card entries and see all the other Design Team cards there too.  Thank you for stopping by today to view my blog.  I enjoy sharing my work with you and invite you to “Follow” my blog and to visit my site ~ “Not Just Scraps” on Facebook ~ where you can purchase my cards.

I’ll be entering this card in the following challenges: 

CAS On Fridays ~ Challenge #225 ~ Spring Flowers

Cards Galore Encore ~ February 

Daisy Chain ~ Challenge #60 ~ For the Girls 

QKR Stampede ~ Challenge #438 

World Wide Design Challenge ~ February 


 Pam’s Pearls


Copics: Tub: C3, C4, C5, C6, Water Pump: YR21, YR23, YR27, Lilies: R81, R89, RV84, Y19, Y15, Greenry: YG63, YG93, G84

Products: 

Jan's Digital Stamp Shop, Spring Tiger Lilies


Saturday, February 19, 2022

Happy Birthday Ya ol' Geezer!

Another day of Celebration here at the Lake!  

As we celebrate my husband's birthday today ~ or really just continue through the entire month of February!

(But officially today!)

For his special card I pondered over quite a few images but landed on Art Impressions #4161 ~ Catching Z's with the sentiments from #5278 ~ Dance It Out.

Here's what I came up with ...


After I stamped the image and colored him with my Copic markers, it just wasn't enough without something else around him.  Again, I'm NOT an artist!  So I carefully sketched in the pier under him and I'm sure any artist would tell me how wrong the angle is, but at least it's holding him up out of the water for the moment!  Then it was easy to color in the water and the sunset.  

I thought both of the sentiments fit the card well.  My sweetie is a kid at heart and we share so many laughs about when we grow up.  But I wanted the birthday greeting to be included on the front of the card also.  I think it's always the designers choice to finish a card without a sentiment or to have multiple. There are no rules in concrete on these choices! 

I then selected the brown mat to separate the multi colors in the image and background matting. This solid allows both to compliment each of the sets of coordinating colors without clashing.  The 6" square Kraft card base allowed me to spread out the design, especially since I was adding the additional sentiment.

Thank you for stopping by today to view my blog.  I enjoy sharing my work with you and invite you to “Follow” my blog and to visit my site ~ “Not Just Scraps” on Facebook ~ where you can purchase my cards. 

I’ll be entering this card in the following challenges: 

A Perfect Time to Craft ~ February 

Classic Design Challenge ~ February 

Crafter's Cafe ~ Challenge 282 ~ Make Your Own Background  

Creatalicious Challenge 229 ~ Create Your Background  

Art Impressions ~ Challenge 321 ~ Oceans of Fun 

Seize the Birthday ~ Challenge 233 

Addicted to Stamps ~ Challenge 423 ~ Birthdays 

Lil Red Wagon ~ Challenge 641 ~ Make It Masculine


 Pam’s Pearls


Copics: Sunset: YR65, E95, R11, Y32, YR20, Y06, Water: BG11, BG01, B01, B21, B60, Pier, E70, E71, E74, Tacklebox, C2, N8, Pole: N8, B95, R46, Worm: G94, Chair: C4, B93, Waders: YG91, YG93, G94, Vest: E33, E35, T-Shirt: B60, Hair: N8, Hat, B93, B95

Products:


Friday, February 18, 2022

What's Your Wish?

Happy Friday ~ I hope you have big weekend plans! We're continuing our 'month' of celebration here as tomorrow is my husband's birthday.  He's pulling out the smoker early and loading it up! Yummy!

Today I'm sharing yet another February family birthday card. This is the special card I made for my Granddaughter, Skyla, who just turned 18!


This is Penny Black's Make A Wish.  Another great image that is good for any age and any sentiment.

After stamping this one, I used my Copic markers for coloring.  I used the Gina Marie Nested Scalloped Stitched Rectangles for the decorative edge with a 1/8" wider solid aqua mat behind it.  The card base is a top fold 5 1/2" square with the solid embossed pink paper on top.  I tied the white organza ribbon around the top flap and knotted to the far right side.  Then I added the completed colored image with the matting.   After securing that, I used small foam dots to add the Happy Birthday embellishment over the knot being sure I left two pieces of the ribbon showing on each side.

Thank you for stopping by today to view my blog.  I enjoy sharing my work with you and invite you to “Follow” my blog and to visit my site ~ “Not Just Scraps” on Facebook ~ where you can purchase my cards.

I’ll be entering this card in the following challenges:

Penny Black Saturday Challenge ~ February 

Creations in Pink ~ Challenge 45 

Cards Galore ~ February 

A Bit More Time to Craft ~ February 

Addicted to Birthdays ~ Challenge 423 

QKR Stampede ~ Challenge 438 

Daisy Chain ~ Challenge  60 ~ For the Girls

 Pam’s Pearls


Copics: Hair: E13, E17, E19, Dandelion, R02, Heart & Bloomers: RV02, R04, Skirt & Socks: B02, B05, Shirt & Shoes: C1

Products:


Wednesday, February 16, 2022

Cased Card ~ Waiting In Heaven

Today I'm sharing two versions of a card that I 'cased' from my friend Vicki Parsons of Stamped Smiles.  

Recently she posted a very glittery pet sympathy card with a rainbow background and a perfect sentiment.  It had black paw prints placed across the rainbow background... I just loved it! 

Not long after seeing her card, my daughter had to put her sweet dog Mindy down after 16 years of companionship.  Immediately I knew that was the card I wanted to make for her.  Here's my cased card. 


For this card I used Distressed Oxides to make the background.  The dog, paw prints and clouds are all die cut and added as well as the sentiment which I also cased from her card.  I mounted the completed card front on a 8" x 6" yellow cardstock card base.

Within the next week one of my close friends lost their family dog and cat!  That's when you're always glad you made more than one oxide background!  This time I simply added both animal silhouette's to the card base. 


Many thanks Vicki!  This is a great card design that is also just a good one to have on hand for this type event.

Thank you for stopping by today to view my blog.  I enjoy sharing my work with you and invite you to “Follow” my blog and to visit my site ~ “Not Just Scraps” on Facebook ~ where you can purchase my cards.

I’ll be entering this card in the following challenges: 

Through the Craftroom Door ~ Challenge #15 

Stamp + Fun = Creativity ~ H = Heaven 

Lil Patch of Crafty Friends ~ Challenge #175 

Crafty Calendar ~ February 

Creative Fingers ~ Challenge #224 

 Pam’s Pearls


Products:

Distressed Oxides for background: Fired Brick, Wild Honey, Squeezed Lemon, Lucky Clover, Blueprint Sketch


Reference: 
https://stampedsmiles.com/2022/01/25/making-condolence-and-get-well-cards/


Tuesday, February 15, 2022

The Sweetest Kiss

Today I'd like to share a card I recently made for a 'Snow' Challenge.  I used a new stamp I received for Christmas  ~ this adorable Penny Black Winter Fairy.


I started by stamping her on a 6" square and coloring with my Copic markers.  I used Wink of Stella, Clear on the 'ice' on her wings after coloring.   I'm NOT an artist but tried to draw in the snow and added a few shades of Copics on the snowy hills also.  

I wanted it to look like she was 'making magic' when she kissed the snowball, so I stenciled in the stars.  I made sure they were in a small pattern near her face and the stream of stars broaden as they flowed behind her.  I used the Altenew Milkway Stencil to give this wavy effect. 

When completed I used Pink & Main's Stitched Rounded Square die for the edging.  This reduced the size to about 5 1/4" square.  Next I cut a solid coordinating aqua mat about 1/8" larger than the colored image.  For the card base I selected a 6" white base and covered the front with a galaxy paper.  I secured the mat and colored image to the card ~  front tilted to the left.  This left plenty of room in the bottom left corner to add a sentiment when I decide how I'll use the card. 

Thank you for stopping by today to view my blog.  I enjoy sharing my work with you and invite you to “Follow” my blog and to visit my site ~ “Not Just Scraps” on Facebook ~ where you can purchase my cards.

I’ll be entering this card in the following challenges: 

Stamping Sensation ~ February ~ Anything with Wings 

We Love Stamping  ~ February ~ Option Stenciling 

Crafty Calendar ~ February  

Penny Black ~ February ~ Love is in the Air 

Sweet Stamping ~ Love, Love, Love 

The Fairy and the Unicorn ~ February 

Alphabet Challenge ~ W is for Winter  

Classic Design Challenge ~ February

 Pam’s Pearls


Copics: Hair: E21, E23, E25, Multiliner Black, Dress: BG05, BG02, BG000, Socks, Headband, Pompoms: V91, Snowball: BV000, Wings: YR0000, V0000, BV000, B00, BG10, Snow Mounds: B60, BG10, B0000

Products:


Monday, February 14, 2022

I Love You More Each Day

Happy Valentine's Day!

And Happy 1st Anniversary to my husband Carl!


Today I'm sharing Whimsy Stamp Co. 'To The Moon' by artist Dustin Pike.  I just love the silly expressions on all of this artist's designs.  They are just perfect for a comical card or something more sincere.  This one I think conveys both!

To make this card I sized the image to about 3" and used my Copic markers for coloring.  After coloring I stamped the sentiment using Purple Versa Clair ink,  I used the Tattered Lace Nested Beaded Chain Rectangles for the edging.  I love using this die set as it adds a nice decorative touch without being too fancy.  The matting is a lighter coordinating shade of lavender and the card base is a standard A2 size.  After securing the mat and the completed image I added the small bling dots from Gina Marie Designs

Thank you for stopping by today to view my blog.  I enjoy sharing my work with you and invite you to “Follow” my blog and to visit my site ~ “Not Just Scraps” on Facebook ~ where you can purchase my cards.

I’ll be entering this card in the following challenges: 

Dragonfly Dreams ~ February ~ Love 

My Time To Craft ~ 475 ~  All You Need Is Love 

Daring Cardmakers ~ Sweet Valentine 

Creative Knockouts ~ 439 ~ Love/Valentine's Day 

Moving Along With the Times ~ 139 ~ Feb/Love

 Pam’s Pearls


Copics: 

Purple dragon: V15, V17, V91, W5, Green Dragon: YG17, YG23, YG25, YG13, YG01, YG21, Moon: B60, BV000, G20, V12, YG00

Products:


Friday, February 11, 2022

Love & Best Wishes!

Here we are this morning with a new week for the Polkadoodles Challenge Blog.  Our Design Team challenge this week was Love and Valentine cards and I've selected Polkadoodles Wedding Car for my Design Team card.  

Although it's not a quote 'Valentine' card, it is all about love and in recognition of the first year wedding anniversary for my husband and I!


 Hopefully you can see in the photo, the fancy fold that I used ~ the back of the card is 8 1/2" x 5 1/4" and then the front flap is a 5 1/4" square.  Here's a few things about making this card. 

I started by sizing the image to fit the front of a 5 1/2" square card.  After printing on Neenah 110 # cardstock, I used my Copic markers for coloring, and then used a stitched square die for the edging on the colored image and the solid olive matting.  I used solid black and made the card base at 5 1/4" square, then added these two layers on top. This basically makes the square card a completed card, which could be mailed separately at this point.   

Next I added the deep red strips on each end of the black background paper. These strips measure 5-1/8" x 1-1/8".  I sized the digital sentiment to fit on the sentiment piece then printed and trimmed the sentiment to fit the allowable area.  


 I also printed the words I 'd selected for the inside sentiment at this time.  Each of the sentiment pieces is secured on the vertical strips and the third piece is secured inside the card.   Once everything is attached and dry, I glued and secured the black card 'back' to the center of the larger piece, making sure when opened that the front is slightly shorter so that the card will open and stand alone.  For the final touch I added the purple filigree cut pieces on each side of the card and then added the sparkly ribbon to the outside top layer of the card.

Now the car is ready for someone's special day!

Be sure to visit the Polkadoodles Challenge blog to see the other Design Team cards and to enter your card for the weekly challenge.

Thank you for stopping by today to view my blog.  I enjoy sharing my work with you and invite you to “Follow” my blog and to visit my site ~ “Not Just Scraps” on Facebook ~ where you can purchase my cards.

I’ll be entering this card in the following challenges:

Creative Knockouts ~ Challenge 439 ~ Love & Valentines 

The Card Concept ~ Challenge 158 ~ Love is in the Air*

{I Love it when a color challenge matches the card colors so well and with the Valentine / Love heart being the center of the design - it doesn't even require words!}

Mod Squad ~ Hearts & Flowers 

Moving Along with the Times ~ Challenge 139 ~ Feb/Love 

Word Art Wednesday 529-530 

Classic Design Team Feb 

 Pam’s Pearls


Copics: Bride:  Hair: E40, E50, Y11, Y23, E43, Flowers: RV14, RV09, Crown: RV09, Y28, Dress: RV09  Groom: Hair: E23, E25, E27, Hat: N5, N3, RV09, Suit: N5, Tie, RV09,  Car: Lights: Y15, Y17, Bows: RV09, RV14, G01, C3, C5, C7,G24, YG61, G94, Road: W5, Sunrise: YR65, R11, Y32, YR20, E95, Y11

Products: