Wednesday, May 17, 2023

Beauty in Being Different

I'm continuing to play along with the 31 days of MerMay over on Friends of Sweet November Stamps. You should see some of the fabulous mermaids being colored by amazing Copic colourist. 

I'm showcasing Octavia Softsand today - a different kind of Mermaid. 


I love the description on the website about this image and it's why I purchased her. 

Octavia Softsand was born from the bubbles a bit different than the rest of her mer sisters... rather than a long lovely tail she was graced with eight strong and clever tentacles. She never let her uniqueness hold her back or make her feel less than the other mermaids, instead she is proud to be her own kind of beautiful.

I started this card by sizing her to just under 4".  All the coloring was done with Copic markers and I posted on the challenge my work in progress photos.

Tentacles

Body

Hair

Bubbles

Water


I selected a pale yellow cardstock and cut a 5 1/2" card base.  After selecting the background paper, I used Cheery Lynn's French Clair Scallop die set.  Next I secured the two layers to the card base and added the stamped sentiment at the bottom right corner.

Thank you for stopping by today to view my blog. I enjoy sharing my work with you and invite you to 'Follow' my blog and to visit my site - "Not Just Scraps' on Facebook - where you can purchase my cards. 

I will be entering this card in the following challenges:  

Paper Dragonfly ~ Challenge 17 ~ Island Paradise 

Leigh SB Designs ~ Challenge 17 ~ Fanta Sea 

The Fairy and the Unicorn ~ May Challenge ~ Fantasy  (Top 5)

Cupcake Inspiration ~ Challenge 569 ~ Mermaids


Pam's Pearls


Copics 

Hair: Y18, Y38, YR15, YR16, Tentacles: Y38, Y11, BG11, BG45, BG56, BG49, Bubbles: BG15, BG13, BG11, BG10, RV02, RV00, RV000, BV04, BV02, BV00, BV000, Y11, Y000, Y0000


Products


Tuesday, May 16, 2023

Hello Little Kitty

Today I have another Mariola Budek design to share.  This one is Little Katy.


I sized this one to about 3" and then used Copic markers for all the coloring.  I used my Tattered Lace Nesting Chain Rectangle dies for the image and the pink coordinating mat.   The sentiment 'hello' is from Sweet 'n Sassy, Script Sentiments.

Thank you for stopping by today to view my blog. I enjoy sharing my work with you and invite you to 'Follow' my blog and to visit my site - "Not Just Scraps' on Facebook - where you can purchase my cards. 

I will be entering this card in the following challenges:  

Cutie Pie ~ Challenge 182 ~ Four Legged Friends 

Alphabet Challenge ~ C is for Cats 

Crazy for Cats ~ Challenge 7 

World Wide Crafters and Colourist ~ May Challenge 

Pam's Pearls


Copics 

Hair: E21, E23, E25, Shirt: R81, R83, R85, Jeans: B91, B93, B95, B97, Bench: E70, E71, E74, Cat: YR23, Y21, Grass: YG61, YG63, YG67, Grounding: W3  


Products  


Monday, May 15, 2023

Hello Little Daisy Fairy

Today I'm posting with the All Dressed Up Design Team for our May Challenge opening.  Be sure to check out all the Design Team inspirational cards and enter yours too!.  

For my project card, I selected Daisy Fairy


 I started by sizing the fairy to just over 3" and colored her with my Copic markers. 

After matching the coordinating floral and solid lavender papers, I covered just over half of the A2 card base with the floral design.  I used Simon Says Twisted Stitched Borders die for the pretty edge on the lavender and the colored image.   After securing these two layers to the left side of the card front, I cut the 'hello' die.  I cut it in lavender and also in the darker purple that matched the card base. This new die is from Sweet 'n Sassy, Script Sentiments.  Lastly I secured the hello over the floral paper, offsetting it slightly for added dimension. 

She turned out perfect for me to send on to a long time friend who teaches gymnastics.
Happy Birthday Rhonda! 

Thank you for stopping by today to view my blog. I enjoy sharing my work with you and invite you to 'Follow' my blog and to visit my site - "Not Just Scraps' on Facebook - where you can purchase my cards. 

I will be entering this card in the following challenges: 

 Avenue 613 ~ May Challenge 

Paper Dragonfly ~ Challenge 17 ~ Island Paradise (Top 3)

Cardz4Galz ~ Challenge 198 ~ Flowers for a Friend  

C.R.A.F.T ~ Challenge 677 ~ Birthday 

The Sisterhood of Crafters ~ May Flowers

Pam's Pearls


Copics 

Hair: E41, E41, E42, E43, Leaves: G43, G46, Top: B63, B66, Flower Skirt: YR18, YR65, YR61, B66, B63, Around: B60, Under: W3 

Products 


Kisses of an Angel

Happy Monday!  It's Mid-month inspiration day for Jan's Digital Stamp Shop and I'm showcasing her Butterfly Frame package today.  


 For this card, I selected one of the single butterflies and enlarged it to 'run off the card front'.  I layered the angel sentiment close to the center of the design and made it on the larger side also.  

After printing I used Copic markers, all pink to burgundy, to achieve the monochromatic design.  Next I used Gina Marie Designs X-Stitch Rectangle dies for the image.  The pink marble like paper for the card base matting was just the right shades for the butterfly.  I cut a black liner mat about 1/4" larger than the completed image and secured them together.  After adding that layer to the card base, I decided to add Wink of Stella (Clear) to the entire butterfly.   I elected not to add a ribbon or twine since I wanted as much of the background paper to show as I could get. 


I really like the light to bold colors in this monochromatic card. 

Thank you for stopping by today to view my blog. I enjoy sharing my work with you and invite you to 'Follow' my blog and to visit my site - "Not Just Scraps' on Facebook - where you can purchase my cards. 

I will be entering this card in the following challenges: 

 Lil Patch of Crafty Friends ~ Challenge 205 - (Top 5)

Creative Fingers ~ Challenge 254  

My Time to Craft ~ Challenge 507 ~ Monochromatic  

Creative Knockout ~ Challenge 494  

Word Art Wednesday ~ Week 595/596

Pam's Pearls


Products  


Gina Marie Designs, X-Stitched Rectangle


Sunday, May 14, 2023

Happy Mother's Day ~ 2023

Happy Mother's Day 2023!

I'm sharing a Mother's Day card that I made for one of my customers.  The image I selected is from Jan's Digital Shop and it's called Floral Flourish.


This is such a pretty grouping of flowers that can certainly be used from Mother's Day, to a wedding, to just a note. 

I sized the flowers to about 3 1/2" long and then rotated them to the placement towards the upper left corner.  I layered the sentiment from the same package, close to the flowers and enlarged it to be easily read. 

I colored the flowers with Copic markers and used Gina Marie Designs Pierced Nesting Labels to get the stitched scalloped edge.   

For the A2 white card base, I covered the front in the golden yellow patterned paper then secured the colored image in the center.  I used the coordinating blue organza ribbon and added the heart charm at the knot. 

Thank you for stopping by today to view my blog. I enjoy sharing my work with you and invite you to 'Follow' my blog and to visit my site - "Not Just Scraps' on Facebook - where you can purchase my cards. 

I will be entering this card in the following challenges: 

 Crafty Catz ~ Challenge 637 

Cardz4galz ~ Challenge 198  Mother's Day or Flowers 

Creative Knockouts ~ Challenge 494 

Crafty Gals ~ Challenge 243 ~ Flowers for Mum 

Pam's Pearls


Copics  

Roses: Y18/Y15, R81/R83/R85, V91/V93/V95, BG02/BG05, Stems: G28, Baby's Breath: E42, Ribbon: R56, Around image: RV000 

Products  


Friday, May 12, 2023

Wishing You Peace

Today I'm sharing a sympathy card I made using Beccy's Place's Precious Memories digital stamp.  

There is something special I think about birds that gives us peace in difficult times. 


I sized the double bird houses to just over 3" and layered the selected sentiment to the left of the image.  By the way, this amazing set has SEVEN sentiments and two images.  

All the coloring was done with Copic markers and are referenced below.  Once I'd selected the solid and floral papers, I used Jillian Vance's Stitch Dot Emerald Backdrop die set for stitched shape.  Isn't the inlaid look amazing with this die?

The multiple layers were secured on a standard A2 white card base to complete the design. 

Thank you for stopping by today to view my blog. I enjoy sharing my work with you and invite you to 'Follow' my blog and to visit my site - "Not Just Scraps' on Facebook - where you can purchase my cards. 

I will be entering this card in the following challenges:  

Little Red Wagon ~ Challenge 704 ~ Spring 

Word Art Wednesday ~ Week 595-596 

World Wide Crafters & Colourist ~ Challenge 4

Beccy's Place ~ May Challenge

Pam's Pearls


Copics 

Bird Houses: E19, E15, E13 / E09, E13, E17, Leaves: YG61, YG63, YG97, N6, Flowers: R21, R22, R24, Y17, Around image: B000 


Products 


Thursday, May 11, 2023

I Need to SEA You Soon!

Today I'm sharing my second card in the Sweet November 31 days of Mer-May Challenge.  For this slimline card, I used 'The Look Out'.


After sizing the image to about 5" tall, I printed her on 110# Neenah cardstock.  Here are a few of my progressive coloring photos. 

After coloring the skin, I started on her hair. The Copics I used are: B41, N2, N3, N4, N5, and N6.


For her Mermaid tail, I started with RV66.  Next would be RV63, but I discovered it was very much in need of new ink, so I switched and added V06 and V04.


Next I colored the rock and water.  Rock Copics are W3, W5, with the creatures ~ RV42, RV95, R21, R22.  The Copics for the water are: BG34, BG15, BG13, BG02, BG05, B14, and B01. 


Lastly was the sky - I used Quick Quotes Chalking Ink and a finger dauber with my home cut stencil.  The top blue was done using Sky Blue and the bottom yellow was done with Chunky Monkey. 


As I was assembling her, I also decided the tail needed some 'glittery' effect so I covered it with Wink of Stella clear.


Love how she turned out! 
I trimmed her down and made the light blue card base from a 12" square blue card stock.  I generated the sentiment on my computer, then die cut it into a downward pennant and attached it at the top right corner.


Thank you for stopping by today to view my blog. I enjoy sharing my work with you and invite you to 'Follow' my blog and to visit my site - "Not Just Scraps' on Facebook - where you can purchase my cards. 


Wednesday, May 10, 2023

Consider the Lilies

Last week for our Bible Art Journal, the verse was from Luke, chapter 12, verse 27.

I selected Penny Black's Tiger Lily as my image. 


I started by typing the scripture, leaving about 4 1/2" at the top for the image.  After printing, I trimmed the paper to 4 1/2" wide by 6" tall to fit my journal size.  

Placing the scripture piece in my Misti, I then stamped the Tiger Lily, slightly above the scripture.  Next I colored the flower with my Copic markers. 

When completed, I cut the green 'leaf' patterned paper about 1/2" larger than the scripture page and secured them together then added them to my journal. 

Thank you for stopping by today to view my blog. I enjoy sharing my work with you and invite you to 'Follow' my blog and to visit my site - "Not Just Scraps' on Facebook - where you can purchase my cards. 

I will be entering this card in the following challenges:  

Avenue 613 ~ May ~ Floral Twist 

Crafting Happiness ~ May ~ Challenge 142 ~ Flowers 

Get Creative  ~ Challenge 121 ~ Flower Frenzy 

Allsorts ~ Week 727 

Penny Black ~ May Challenge ~ Patterned Paper 

Pam's Pearls


Copics  

Stems & Leaves: G40, G43, G46, Flowers, Y13, Y19, YR07, YR14 


Products  

Penny Black Tiger Lily 


Monday, May 8, 2023

Rowana

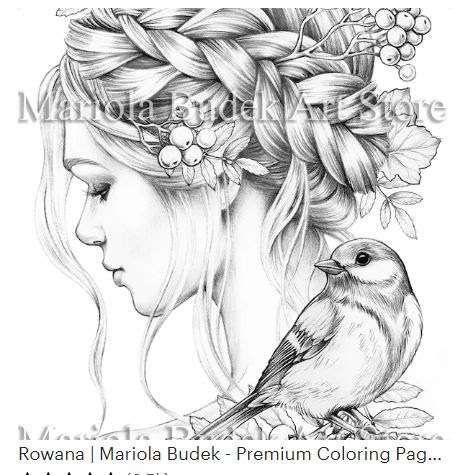
I've never heard the name Rowana, but after seeing this Mariola Budek image, she's named perfectly!

I'm sharing two cards today of Rowana. One I did last month at a retreat and the second I just finished.   They are similar yet very different. 


I used Copic markers for coloring and Gina Marie Designs Stitched Scalloped Rectangle die for the edges.


This is also colored with Copic markers.  I changed the colors of the bird and some of the leaves. 

She's die cut using Penny Black's Elegant Stitching.  After adding the background papers and securing to the card base, I added the soft aqua ribbon and flower at the fold. 

Both were fun to do and I can't wait to color more of her images.

Thank you for stopping by today to view my blog. I enjoy sharing my work with you and invite you to 'Follow' my blog and to visit my site - "Not Just Scraps' on Facebook - where you can purchase my cards. 

I will be entering this card in the following challenges: 

Cupcake Inspiration ~ Challenge 568 

Dream Valley ~ Challenge 293 ~ Make it Female 

CD Sunday Plus ~ Challenge 109 

Corrosive ~ Challenge 5  

Pam's Pearls


Copics

First Card: Hair: E40, E41, E42, E43, E44, Berries: R24, R35, R37, E37, Leaves: YG61, YG63, YG67, YG91, YG93, YG95, Bird BG000, BG01, BG02, BG05, YR27

Second Card: Hair: E40, E41, E42, E43, Lips: R20, Leaves: G40, G43, G46, YG93, YR19, Y19, Berries: R24, R35, R37, E37, Bird: BG49, BG53, BG57, Y19, YR23, YR27, N6


Products 


Soaking Up the Rays

Have you heard or read about the 31 day Mermaid Challenge over on Sweet November's Facebook page? (Friends of Sweet November) It's for the month of May and to play you have to post every day with progress and cards using their mermaid images. 

I decided to give it a try, cause you can never have enough mermaid cards!

I selected 'Skipper' for my first card.  Here's the completed card first. 


After adjusting the image to work for a slimline card, I printed her and started on May 1st.  

That day I completed her skin and hair.  


The Copic markers for her hair are B01, B02, B04, and B06.

Day 2, I colored the sea gull using C1, C3, and YR24.  Next was her mermaid tail and the bra.  For those areas I used BG18, BG45, BG48, BG53, and BG72.


On Day 3, I added the sand under Skipper  (using Copic E30, E31, E41. E42, E51, E53) and the sunrise/set under her (using YR65, E95, R11, Y32, and Y11).  The starfish is colored with YR21, and YR24.  The lobster peaking out of her hair is colored with R21, R22, and R24. 


Finally on the 4th I was able to die cut the completed image using Gina Marie Designs Scalloped Stitched Rectangle Slimline dies.   


I elected not to add a sentiment until I'm ready to use the completed card.  More Sweet November mermaids to come...

Thank you for stopping by today to view my blog. I enjoy sharing my work with you and invite you to 'Follow' my blog and to visit my site - "Not Just Scraps' on Facebook - where you can purchase my cards.