Sunday, May 7, 2023

It's a Celebration!

The weekend festivities continue as one of my card swap groups has Cinco de Mayo for the weekend challenge. 

I made this card today to add to their challenge. 


I was again able to find this image using free coloring page for Cinco de Mayo.  I think he turned out really cute!

After coloring with Copic markers, I used Spellbinders Curved Rectangles to die cut the edge.   The orange background matting is on a standard A2 sized card base and the sentiment was from my extra stash.

Thank you for stopping by today to view my blog. I enjoy sharing my work with you and invite you to 'Follow' my blog and to visit my site - "Not Just Scraps' on Facebook - where you can purchase my cards. 

I will be entering this card in the following challenges:  

Creative Fingers ~ Challenge 254 

Creative Inspiration ~ Challenge 2 

Crafty Addicts ~ Challenge 1


Pam's Pearls


Copics  

Cactus: YG03, YG23, YG25, Hat: YR18, YR14, Y19, YG06, B28, B24, Guitar: E11, E17, E19, Ground, W3, G46


Products 


Saturday, May 6, 2023

Happy Birthday Beautiful Friend

This weeks challenge for the Polkadoodles Design Team was FLORAL inspirational cards.  If you're like me, you have LOTS of floral stamps and/or digital images.  Even in just my selection of Polkadoodles digitals it was tough to select the one for today.  

The one I landed on is 'Blooms 5 Tulip Peony Flower Bundle' and boy it's a beauty!


I started by enlarging the image to about 4 1/2" tall and printed it on 110# Neenah card stock.  All of the coloring was done using Copic markers and are referenced at the bottom of my blog.  

After die cutting the edge with a stitched edge die, I selected a hunter green 12" card stock and cut it in half to make the 6" card base.  I really liked this plaid paper since it picked up many of the colors I'd used.  If I'd been at home making this, I would have printed one of the Polkadoodles plaid digi papers - there are so many to choose from.  But since I was making this while at a recent retreat, I went with the alternate paper.  

The card base was covered with the plaid, then the image secured to the left of the center.  The large stamped 'Happy Birthday' needed something to help it stand out, so I added the 1" purple strip across the bottom edge of the flowers.  Then I added the sentiment overlapping the flower image and the solid horizontal strip to complete my design. 

Thank you for stopping by today to view my blog. I enjoy sharing my work with you and invite you to 'Follow' my blog and to visit my site - "Not Just Scraps' on Facebook - where you can purchase my cards. 

I will be entering this card in the following challenges: 

Beautiful Blooms ~ Challenge 4 ~ Floral 

Creatalicious ~ Challenge 258 

Sheepski Designs ~ Challenge 74 ~ Flower Power 

World Wide Crafters & Colourist - Challenge 4 

Crafting Happiness ~ May ~ Challenge 142, Flowers 

Make Mine Monday ~ Challenge 199 ~ Flowers  

I Love Promarkers ~ Challenge 534 (Winner - 2 free images from sponsor)


Pam's Pearls


Copics  

Greenery: G21,  G40, G43, G46, G82, Left: Y15, Y19, Top: Salmon: R21, R22, R32, Center Purple: V12, V15, V17, Bottom: Red: R01, R29, R37, Right: Pink: R81, R83, R85, Around: B000


Products

Blooms 5 Tulip Peony Flower Bundle

Friday, May 5, 2023

Fiesta Weekend!

 Let the Cinco De Mayo weekend begin!  

When searching for an image for this festive time, I was at a loss other than the die cut word 'fiesta'.   But I found several cute free coloring book pages and thought I'd use the Donald Duck one for today.  


 I started with sizing him to about 4" tall, printed him and then used Copic markers for coloring.  Nothing too fancy since this was just a card for fun.

For the decorative edges, I used Carnation Crafts Pretty Shabby Square Labels.  I love the orange patterned paper that gives him even more of a festive mood!

I secured both layers on a craft 6" square card base.  Lastly, I did cut the 'fiesta' word in purple cardstock and added it across the left corner.  

Thank you for stopping by today to view my blog. I enjoy sharing my work with you and invite you to 'Follow' my blog and to visit my site - "Not Just Scraps' on Facebook - where you can purchase my cards. 

I will be entering this card in the following challenges:  

Fab 'n Funky ~ Challenge 572 ~ Anything with Wings 

The Male Room - Challenge 174 ~ Animals 

2 Crafty Critters  ~ Challenge 74 

Passion for Markers ~ Week 688 ~ Cute Characters (Top 5)


Pam's Pearls


Copics 

Hat: YG25, YG23, Y15, V04, G15, Y32, Shakers: Y35, G14, V04, E19, Beak & Feet: YR15, Y17, Y15,  Shirt: B93, B95, B97, Y15, R46, Stool: R56


Products 


At Your Age

Today I'm sharing a masculine birthday card using an image from My Favorite Things, Old Friends.

It's a double flap card with a belly band.  The inside sentiment is shown at the bottom corner of this photo. 


To make this card, I started by stamping the birthday guy on a scrap of paper.  After coloring him with Copic markers, I fussy cut around him and laid him to the side.  

For the card base I used a 5" x 11" white card stock, scoring and folding at 2" from both ends.  Next I cut the green solid and multi striped paper to 2 3/4" x 4-3/4"  for the front panels.  

I placed the solid green piece in my Misti and stamped the sentiment at the top and bottom. Then secured it to the left front panel and the multi striped to the right front panel.  The image of the birthday man could be placed anywhere on the card, I randomly secured him about middle of the front left flap, allowing just a little of his arm and the present to hang over.

Using a scrap of 'number' paper, I cut it just under 1" wide, wrapped it around the card and secured at the back, leaving it loose enough to slide off easily but not so tight that you'd have to rip it.  The little bit of excess that was left after securing, I trimmed away.  This belly band completed my card project. 

Wishing a very happy birthday to our dear friend Coy!

Thank you for stopping by today to view my blog. I enjoy sharing my work with you and invite you to 'Follow' my blog and to visit my site - "Not Just Scraps' on Facebook - where you can purchase my cards. 


Wednesday, May 3, 2023

Here Come the Graduates!

With the months of May and June, comes the graduation announcements.  Kids that you remember being born, are about to turn a huge page in their life's story book.   We are all so proud of this accomplishment and want to help them celebrate. 

One of my repeat customers really specializes her monetary gifts by having a custom designed Graduation card for each of them.  For the last several years, I've gotten her list of gals and guys complete with not only their school colors but the color of their hair!   

For these I continue to use Unity Stamps 'Graduation Wishes' for the girls and 'You Did Good' for the boys.

Here's a sampling of a few of the cards: 


Once I stamped each design, I scanned and made the digital files so that I can ensure each card is the same. 


Images of my work in progress.  

Sure makes assembly go a bit faster when you have this many to make. 

For the guys, I didn't want to use any fancy dies, so they were just cut close to the image.  I added a coordinating royal blue matting behind the image and then secured all layers to the card base. 

For the gals, I used Penny Black's Elegant Stitching die for the edge of the colored image and for the coordinating matting.   These were also secured to a white standard A2 card base. 

As a card maker - I know you're like me and hope these young adults are appreciative for this lady taking so much extra effort in their gifts.  They sure make a nice keepsake. 

Thank you for stopping by today to view my blog. I enjoy sharing my work with you and invite you to 'Follow' my blog and to visit my site - "Not Just Scraps' on Facebook - where you can purchase my cards. 

I will be entering this card in the following challenges: 

Dream Valley ~ Challenge 293 ~ Make It Female 

Little Patch of Crafty Friends ~ Challenge 204 ~ Sheepski Designs 

Allsorts ~ Week 726  

Cupcake Inspiration ~ Challenge 568 

Pam's Pearls

Copics

Hair: Blonde: Y06, Y21, E42, Brown: E21, E23, E25, Ash Blonde: E41, E42, E43, Red: YR27, YR24, YR21,  Gowns: Royal Blue: B18, B23, B24, Gold: Y21, Black: N3, N5, N7, Orange: YR14, Yellow: Y18, Y19, Ties: N5


Products


Tuesday, May 2, 2023

Sliding Window Card

One of the recent events for my card swap team was a Sliding Window Card.  I have to admit, I was hesitant to sign up for this one.  But since only one member was on the list, I decided to go for it.

The 'Tech Challenge' always has a youtube video attached to follow.  Even so, some are still plain hard to do. This one was a bit challenging! 

Here's the front of the completed card..


And when you pull the tab on the right - this is the hidden window image. 


 Pretty cool huh?  

As you can see I used my fairy silhouette stamps and two shades of blue cardstock.  I also added the dotted washi tape to add a little color to the finished project.  

Here's the referenced video from Jennifer McGuire if you'd like to give it a try. 

https://www.youtube.com/watch?v=aHdl-atxel4

Thank you for stopping by today to view my blog. I enjoy sharing my work with you and invite you to 'Follow' my blog and to visit my site - "Not Just Scraps' on Facebook - where you can purchase my cards. 

I will be entering this card in the following challenges: 

The Paper Players ~ Challenge 638 ~ Layers/Die Cut/ Fun Fold 

Allsorts ~ Week 726 - For the Girls 

Crazy Catz ~ Week 635 ~ Things with Wings 

Creative Creases ~ Fun Fold #56 

My Time To Craft ~ Challenge 506 ~ Fantasy  

Dream Valley ~ Challenge 293 ~ For a Female


Pam's Pearls


Monday, May 1, 2023

Meet Me

Good afternoon from Morgan's ArtWorld Design Team.  As we are opening the May Challenge Blog, we are sharing another group of wonderful images by Morgan.  

I've selected Fairy Child 3 for my project card today. 


 For this card, I started by sizing the Fairy Child to just under 4 inches.  After printing on Nennah 110# cardstock, I colored the image with my Copic markers.  I used Penny Black's Elegant Stitches for the decorative edge after completing my coloring. 

I selected a sentiment from Technique Junkies, Sky Touches the Sea, (SDX096) and stamped and die cut it on a scrap of white cardstock.  

I made the 6" square card base to coordinate with the salmon in her gown.  I also selected the multi dotted background paper and cut it about a half inch larger than the completed image.

Assembly of the card starting at the bottom - secure the dotted background paper, then the image;  add the sentiment to the right.  I elected not to add a bow at this time.   

Be sure to visit Morgan's Art Studio for more images


and the Challenge Blog to see all  the Design Team cards and enter yours in the challenge also. 

Thank you for stopping by today to view my blog. I enjoy sharing my work with you and invite you to 'Follow' my blog and to visit my site - "Not Just Scraps' on Facebook - where you can purchase my cards. 

I will be entering this card in the following challenges: 

Inspirational Challenge ~ Challenge 288 ~ Dots/Stripes 

Crafty Catz ~ Challenge 635 ~ Anything with Wings 

My Time To Craft ~ Challenge 506 ~ Fantasy 

World Wide Crafters and Colourist ~ April 

CD Sunday Plus ~ Challenge 109 (1st place)

Pam's Pearls


Copics 

Hair: B41, C4, C6, C7, Headband of Flowers: B46, R43, R22, Dress: R24, R22, R21, Eyes: G07, Wings: G07, BV00, BG10, R20, Around: B60

Products 

Morgan's Art World,  Fairy Child 3

Technique Junkies, Sky Touches the Sea, SDX096


Penny Black, Elegant Stitching 


Lather Up and Enjoy Your Day!

Well here we are - May 1st!  What?  Just hard to believe how fast time is going by isn't it! 

Even though Mother's Day is the 'May Holiday', I wanted to share with you this 'Father's Day' image and card from Jan's Digital Stamp Shop.  

The May Challenge Blog opens today too so be sure to hop over to see all the Design Team cards and to enter yours also! 


This was a fun image to play with as I layered the blade in front of the cup and the sentiment close to the side.  After printing I used Copic markers for the coloring.  

I made the chocolate brown card base by cutting a 12" square piece of cardstock in half.  Then I die cut the image and the sparkly matting paper with the Whimsy Notched Stitched Square die cut.   Each layer is secured with book binding glue and the twine and key charm were added last.  This completes my design for this card. 

Thank you for stopping by today to view my blog. I enjoy sharing my work with you and invite you to 'Follow' my blog and to visit my site - "Not Just Scraps' on Facebook - where you can purchase my cards. 

I will be entering this card in the following challenges: 

Lil Patch of Crafty Friends ~ Challenge 204 

The Corrosive Challenge ~ April 

Creative Fingers ~ Challenge 253 

Krafty Chicks ~ Challenge 661  

Word Art Wednesday ~ Week 593/594


Pam's Pearls


Copics 

E44, E43, E41, C4, C2, under W3


Products 

Sunday, April 30, 2023

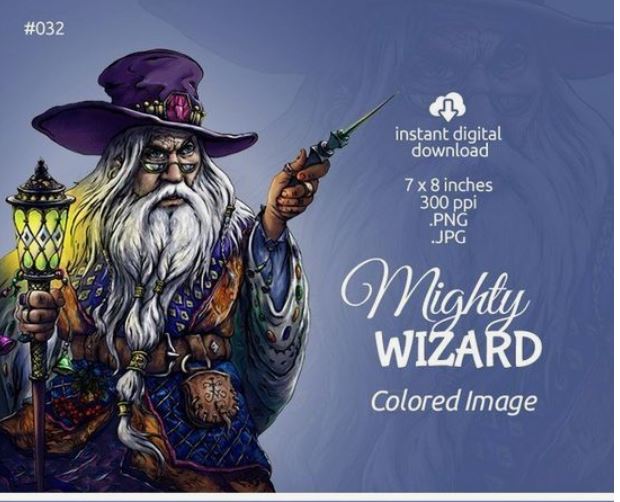
Mighty Wizard

This afternoon I'm joining with my Design Teammates as we open the Classic Design Challenge for May.   Our sponsor for the month is Fabrika Fantasy and I've selected Mighty Wizard for my project card. 


This image is quite detailed and took a while to color.  However I just loved it because of the detail.

After sizing to almost 4" tall, I printed him on Neenah 110# cardstock and used my Copic markers for the coloring.  I added the Be Brave stamp with coordinating ink, then die cut the image to get the beautiful edge.  

The card base is 5 1/2" square and covered with the aqua green marble patterned paper from Stampin Up.  Then I secured the image to the center of the card base.  I wasn't totally satisfied, as the contrast wasn't enough.  As you can see, I added two pieces of dark green cardstock on opposite corners. These were just random scraps but really added to the card and gave it the contrast needed. 

Thank you for stopping by today to view my blog. I enjoy sharing my work with you and invite you to 'Follow' my blog and to visit my site - "Not Just Scraps' on Facebook - where you can purchase my cards. 

I will be entering this card in the following challenges: 

Just Add Ink ~ Challenge 650 ~ Large Numbers or Letters 

My Time To Craft ~ Challenge 506 ~ Fantasy  (Top 3)

Krafty Chicks ~ Challenge 601  

Simon Says Stamps ~ Wednesday Challenge ~ Game 105  

World Wide Crafters and Colourist ~ Game 4 

Creative Fingers ~ Challenge 253


Pam's Pearls


Copics

Hair: N6, N4, N2, C0, Hat BG78, BG75, BG72, Y28, R39,  Clothes: BG78 BG75, BG72, R39, R29, E74, E71, Belt: E39, E23,Y26  Pouch: E71, E74, Light: Y02, Y15, R39, Y26,  Flowers: YG93, BV04 


Products


Friday, April 28, 2023

Listening to Nature

Recently, I ran across a selection of digital images on Etsy that intrigued me.  There were quite a few that the ladies had long flowing hair or braids and a few that included birds.  

The artist is Mariola Budek and you know I had to have a few of these beautiful designs.

The first one I colored was 'Listening to Nature'.  Besides her beautiful hair, I loved the two little birds with her. 


I worked on this last weekend while I was out of town on a crafting retreat.  She gained a lot of attention as the other ladies walked by and peered over my shoulder.   

I used Copic markers for the coloring, going a shade lighter than normal since the image was slightly shaded in the printing. 

Just as I was finishing my work, one of the ladies who had walked by several times, decided this one was going home with her.  She didn't want her on a card, but planned on framing her.  What an honor! 

I then trimmed the image up a bit, and die cut the edge with Penny Black's Elegant Stitching.  I mounted her on the aqua print card stock that I die cut using the Tattered Lace Nested Beaded Chain die set.  

Thank you for stopping by today to view my blog. I enjoy sharing my work with you and invite you to 'Follow' my blog and to visit my site - "Not Just Scraps' on Facebook - where you can purchase my cards. 

I will be entering this card in the following challenges: 

Addicted to Stamps and MORE ~ Challenge 444 

Simon Says Stamps ~ Wednesday Challenge #105 

Word Art Wednesday ~ Week 593-594 

Passion for Markers ~ Week 687  

CD Sunday Plus ~ Challenge 108 

Dragonfly Dreams ~ April Colour Palette Challenge  

Pam's Pearls


Copics 

Birds:  BG000, BG01, E93, E95, YR27, Dress: V20, Hair: E21, E23, E25, Eyes: B05 

Products