Monday, January 9, 2023

It's Time to Start Something New ~ Growing in Unity 2023 Day 1

This morning I'd like to welcome the new friends from Unity Stamps who will be following my Growing in Unity posts this week.  I am very honored to have been selected for 2023!  I have to admit, when the list came out on 12/12/22, my excitement of seeing my name quickly turned to 'What? Second week in January! Oh my!'  My husband had just had shoulder surgery five days before and I certainly wasn't even ready for Christmas!  Amazingly everything has fallen into place as he's doing great post surgery, Santa did arrive, and my cards were completed before the new year began. 

I think we all reflect a lot in January... about what we could've, would've, should've done last year... or all the goals for things we'd like to do for 2023. This week I'll be focusing on two things that brought me to Unity Stamps many years ago.  I've always been a fan and collector of 'Angie Girls' and the positive sentiments that encourage girls and women to believe in themselves.  I hope you'll stop in each day to enjoy what I've made for this week.  Don't forget to comment for your chance to be one of my two winners of the Unity $20 gift certificates. 

For Day 1 I've selected 'Start Something New' by Angie Blom. She's the perfect encouragement to many of us to push us past that first step of doing something different in our lives.  If it's time, you will know it and you will be amazed how much happier you will be!


I've used the girl image and the sentiment from this package.    After stamping them on Neenah 110# cardstock, I used Copic markers for coloring.   For the background, I used a bookshelf image from a coloring book.  I scanned it, sized it to fit my stamped images and also colored it with Copic markers after printing.

I used the Gina Marie Designs Label Six to die cut the completed girl image and also the sentiment.  On the bookcase, I trimmed the image leaving about 1/8" on the sides and top and about 3/4" on the bottom.

For the card base, I cut the dark blue cardstock 
in half at 4 1/4" on the short side, making the base 4 1/4" x 11".  I secured the girl image close to the edge on the right end. Then I fussy cut around the right half of the image.   Next I added the sentiment on the left side of the image.  Then I was able to make my fold line about 1/2" to the left of the sentiment.    This fold allows for the back to be longer so the inside image can be seen with the card folded.  It's easy then to place the bookshelf inside at whatever point 'looks right' behind the girl, and then secure it.  If you have excess to the right of the inside image, trim it away leaving about 1/4" to 1/2" border. 

Lastly I added the organza ribbon at the fold with a Heart charm tied in at the knot.   I also added a strip of white cardstock on the inside left (behind the girl) for writing.

Thank you for stopping by today to view my blog. I enjoy sharing my work with you and invite you to 'Follow' my blog and to visit my site - "Not Just Scraps' on Facebook - where you can purchase my cards. 

I will be entering this card in the following challenges: 

Beyond the Blue ~ Challenge BB77 ~ Something New 

Craft Rocket ~ Challenge 99 ~ Not a Square 

Little Red Wagon ~ New Beginnings 2023 

Word Art Wednesday ~ Week 57-578 

Crafty Friends ~ Challenge 163  

Unity Stamp Growing  in Unity


Pam's Pearls


Copics 

Inside: Books W3, Y02, YR23, YR27, N7, N4, E70, E73, Shelf: E25

Front: Jeans: B93, B95, B97, Shirt: BG45, BG49, YR02, Shoes: BG45, N3, Hair: B41, N3, N4, N6, N7, N0


Products 

Unity Stamps, Start Something New

Coloring Page, Bookshelf


Thursday, January 5, 2023

What To Do With Little Phill

After following 'Beccy's Place' this past November/December and having so much fun in her 30 Days of Christmas Cards challenge, I am determined to follow a little more closely for 2023.  I really enjoy her coloring skills and her blogs are so well written.  

You know I've been told that I like a challenge.  I hadn't really thought about that but with all the design team work I do, I guess I'm somewhat use to a challenge.  We'd all agree that some images just look weird to us, right?  Being on the design team comes with the responsibility to make your card sell the image. 

Beccy's January Challenge  came with a Freebie - Little Phill image and a sheet of digi paper.  While you can enter any of Beccy's designs in her monthly challenge, she is giving us Phill to use also and post.  Like all 'good' challenges - there's a twist. 

For January, I want you to "keep it local". Include something in your project that reminds you of your home or your neighbourhood. Feel free to interpret the extra challenge however you wish, and remember that it's just an optional extra.

Doesn't sound bad, until you see Little Phill and you realize he's holding a game controller.   Hmm.... great for young mothers but not much here locally that has anything to do with a game controller.  I live on the lake, my kids are adults and I'm just thinking okay - color him, forget the twist she added, and move on. 

But as I happened to walk past our large picture window I see a heron fishing from a small patch of tall grass. (See photo at the end of this posting.) My brain started turning as I looked through all the packages of digis that I own from Beccy's Place.   It took a while to design, but here's the finished product. 


I've incorporated parts from Beccy's Wetlands package, placing Little Phill on the floating log, right outside my door in 'my lake'.  Don't you love the turtle on the log with him!  I couldn't find a sailboat in her images so I placed a small silhouette of a sailboat between Phill and the land. 

After sizing down to 5" square and printing, I colored the image with my Copic markers.  I used a 6" square royal blue cardstock for the top fold card base and added the red/orange paper to cover all but 1/4" all the way around.  I printed a small strip of the free digital paper and secured it through the middle of the card base, then added the colored image in the center.  

I printed the computer generated sentiment 'You Float My Boat' and die cut it out using Gina Marie Designs Drop Pendant die set.  After securing it at the top right, I added the blue string/twine around the top fold and place a helm charm in the knot. 

How's that for making Little Phill fit locally here at the shores of Lake Murray?  

Thank you for stopping by today to view my blog. I enjoy sharing my work with you and invite you to 'Follow' my blog and to visit my site - "Not Just Scraps' on Facebook - where you can purchase my cards. 

I will be entering this card in the following challenges:  

Beccy's Place, January Challenge ~Twist, make it local 

Sweet Stampers ~ Challenge 75 

QKR Stampede ~ Challenge 458 

Love to Craft - Challenge 72  

Crafter's Cafe ~ Challenge 292 

A Perfect Time to Craft ~ January


Pam's Pearls


Copics 

Sky: YR65, E93, Y32, Hair: E41, E42, E43, Shirt: R27, R29, R37, B95, Jeans: B91, B93, B95,B97, Shoes: R27, R29, R36, N3, Sand: E30, E31, Water: B91, B93, B97, B63, B14, BG01, BG02


Products

Beccy's Place, Wetlands (2021) 


My Inspiration! 


Wednesday, January 4, 2023

Home Sweet Home

When is it okay to use a Christmas image on your card, when it's not Christmas? 

Today I'm sharing a card I made last week for a sweet couple who just moved into their new home ~ on Christmas Eve. 


 This House Mouse image, was perfect for their house warming card and captured that it was on a special day in December. 

For this one, I stamped the image sometime back since I was departing with some of my wooden stamps. Unfortunately it was a thrift store find and didn't have a name.  Thankfully I now have several of them scanned and can use digitally.  I sized the image to just a little larger than the stamped image, since I wanted the card to be a 6" square size.  I also placed the sentiment at the bottom on the image before printing. 

I used Copic markers for coloring and then used the Gemini Scalloped Edge Square 2 die set for the image and the solid matting.  I cut and folded the ivory cardstock for the base, then added the printed patterned paper for the next layer.  After securing the image to the solid green mat, I then added that layer to the card base.   I elected not to add a bow or twine as I wanted the image to be the focal point of their card. 

Thank you for stopping by today to view my blog. I enjoy sharing my work with you and invite you to 'Follow' my blog and to visit my site - "Not Just Scraps' on Facebook - where you can purchase my cards. 

I will be entering this card in the following challenges: 

House Mouse Monday Challenge #380 

Crafty Animals ~ Challenge 68 

Crafty Friends ~ Challenge 163 

Merry Little Christmas Challenge ~ #48 

Scribbles ~ Challenge 115 ~ Not a Creature was Stirring 

2 Sisters on the Blog ~ Challenge 70 ~ New Home


Pam's Pearls


Copics 

Roof: E17, E19, Stone: W2, W3, W4, W5, E52, Ground: E50, E57, Rug: BG45, BG49, Stockings: R27, R29, Mice: E21, E23, E25, E93, and E31, E33, E37, E93, Candle: BG45, Y11, Y17, R27, Sky: B000


Tuesday, January 3, 2023

Enjoy the Adventures Ahead

Today I'm sharing a birthday card I recently made for an 'old' and dear friend. I spent over half of my 31 year working career working with him.  Although I retired over ten years ago, he is just getting ready to start enjoying his well deserved retirement.

One of his retirement 'toys' is a new red Ford GT Mustang! What better image to use for this milestone birthday.

  I used a Goggle free image hoping that I'm close to the actual car.  Anyone that colors with Copics, knows how hard Red is to shade and blend. This one was no exception. 

Once I got the car colored, I penciled in the mountains and colored in the shading.  Then I added the setting sun and sky coloring accordingly.  

   I used a 6" square card base, covered with the peachy paper.  I trimmed the completed image and added the black liner mat. The sentiment was computer generated, matted in the same black liner mat and added near the bottom of the card front.  I added the washi tape from the left side to the sentiment.  Lastly I added glossy accents to the windshield and side window to complete the design. 

Thank you for stopping by today to view my blog. I enjoy sharing my work with you and invite you to 'Follow' my blog and to visit my site - "Not Just Scraps' on Facebook - where you can purchase my cards. 

I will be entering this card in the following challenges: 

Crafty Friends ~ Challenge 163 ~ January 

Give a Crafter a Cookie ~ Challenge 176 - January - RED 

Creative Crafter Challenge ~ Challenge 59  

AAA Birthday Challenge ~ Game 45   

Crafting Happiness ~ Challenge 138 ~ Celebrations 


Pam's Pearls


Copics 

Sky: YR65, E95, R11, YR20, Sun: Y11, Y15, Y18, Y19, Mountains: W0, W1, W2, W3, W4, W5, Mustang: R000, R27, R29, R37, R39, R56, R59, RV19, C0 C2, C4, C5, C6, C7, Windshield, B000, B00 


Monday, January 2, 2023

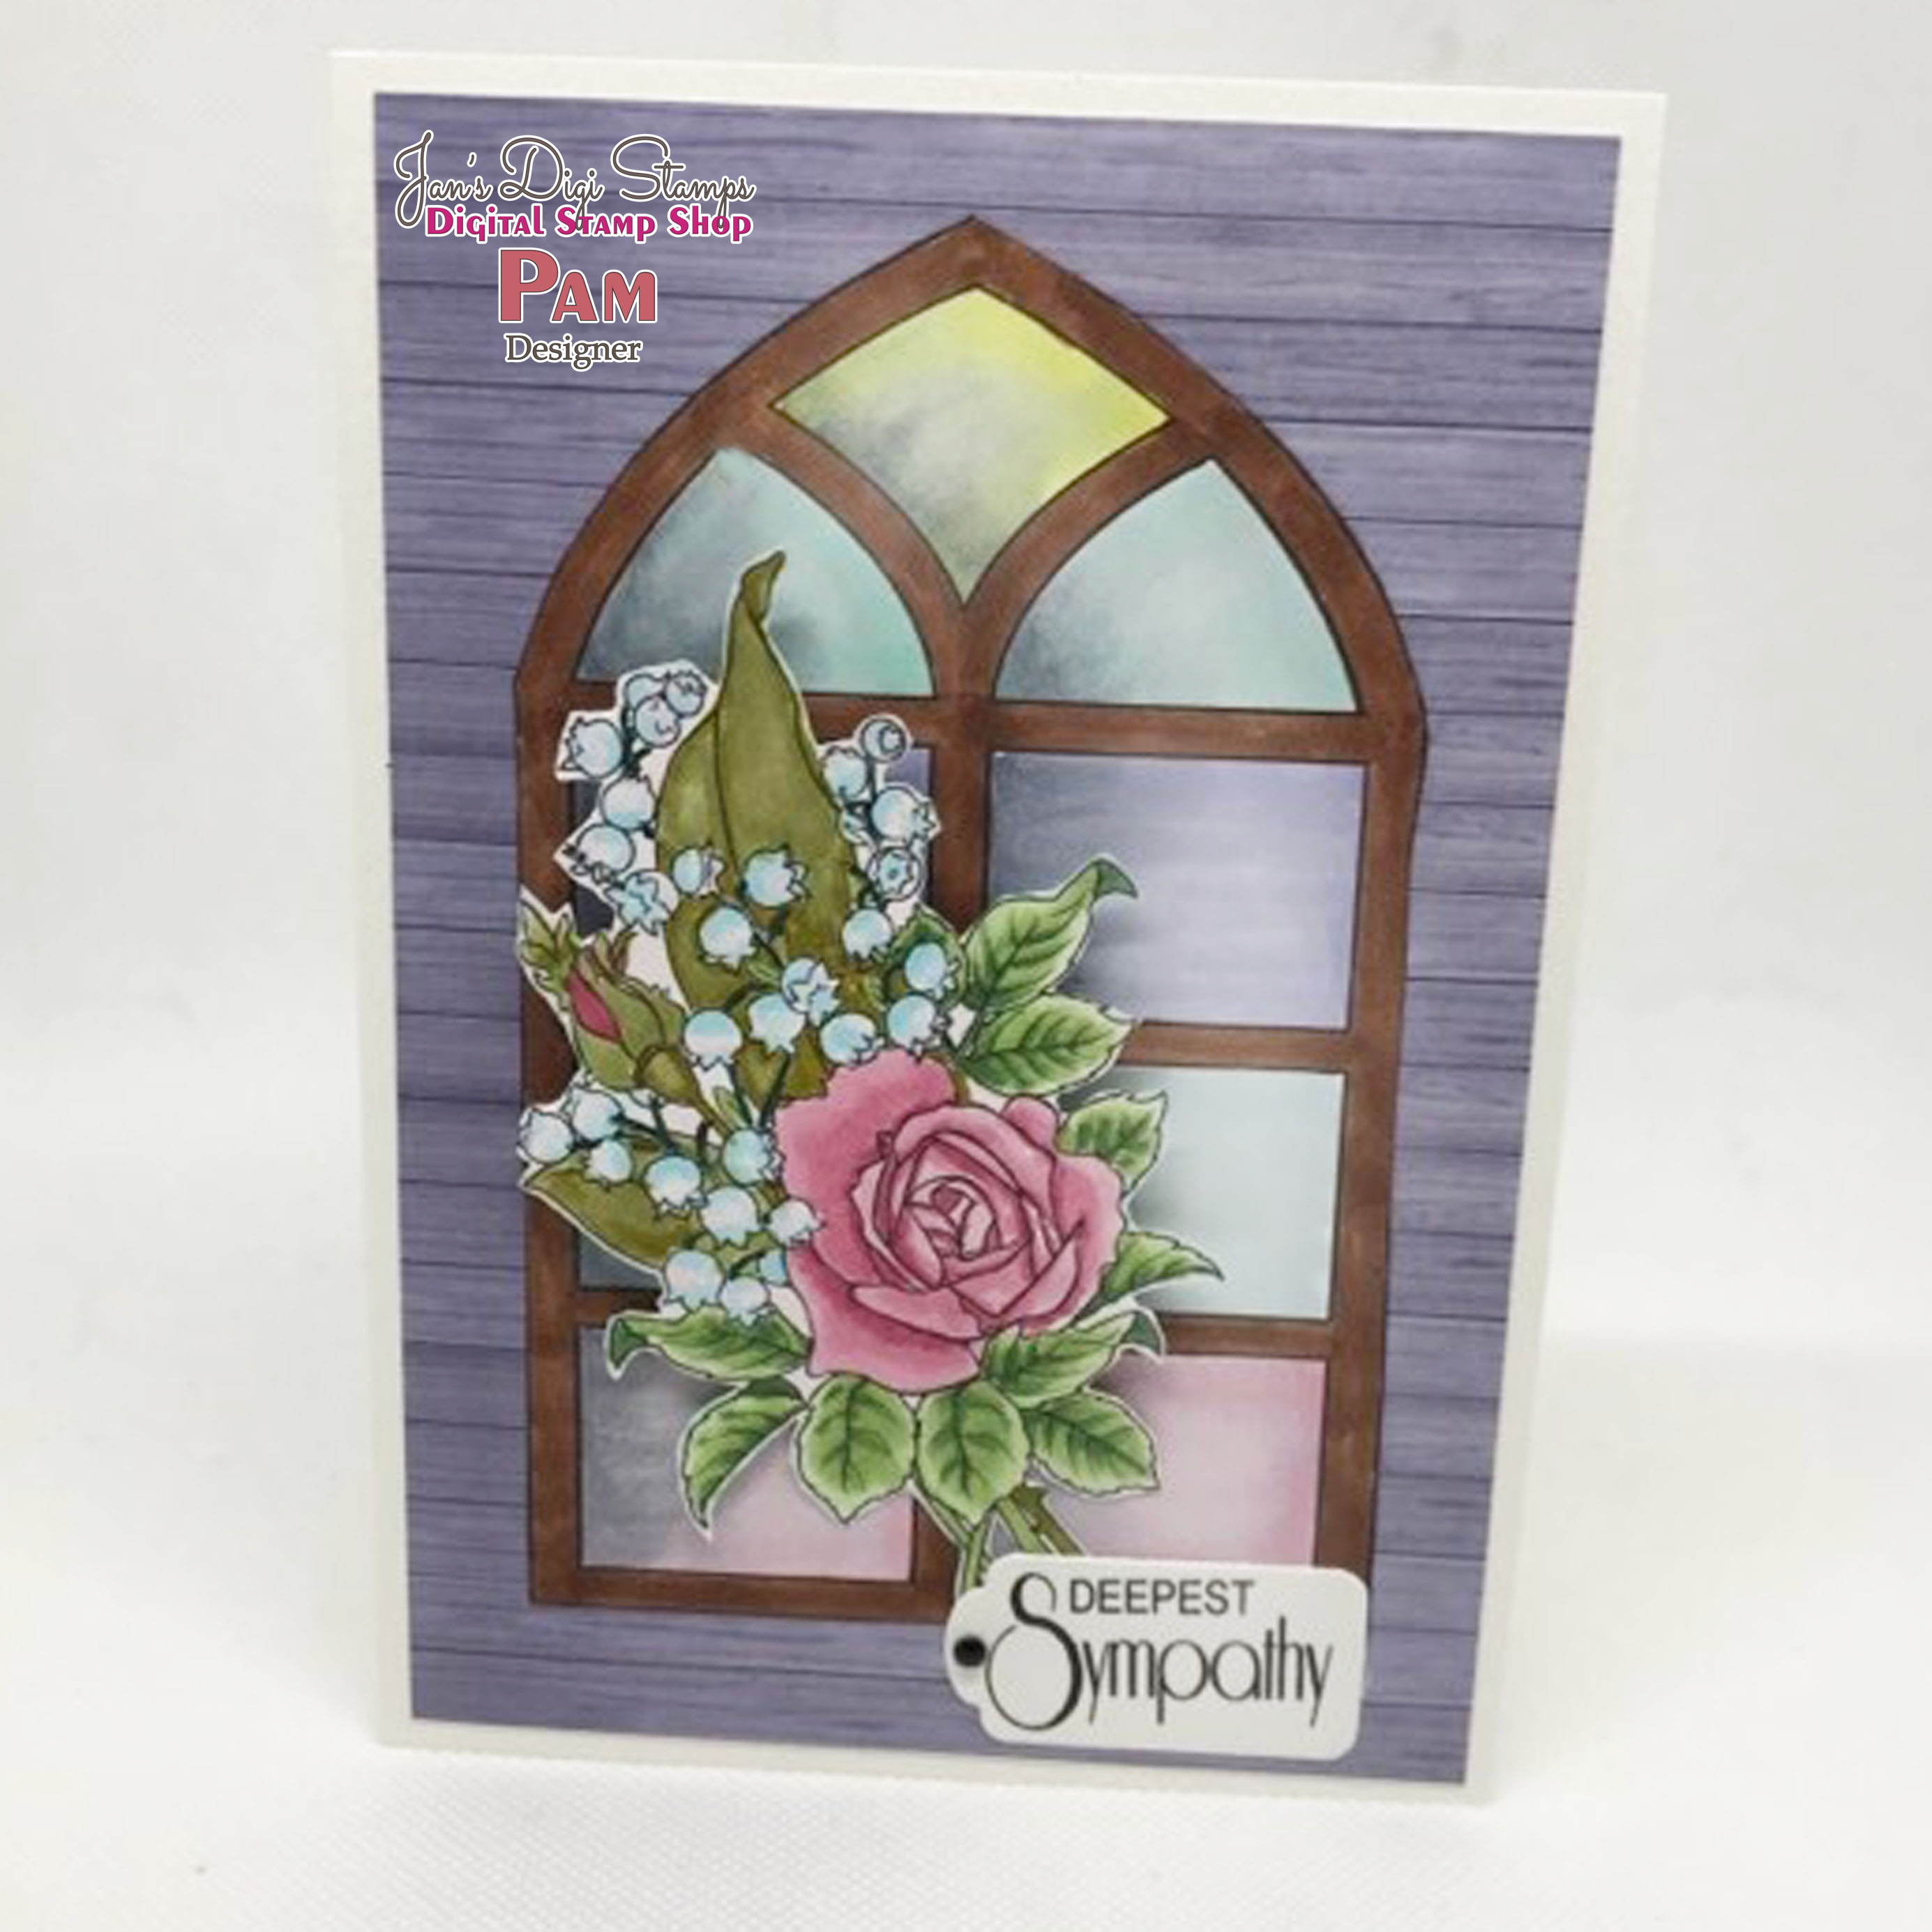
Deepest Sympathy

Happy New Year from Jan's Digital Stamps and her Design Team!  Today we are opening the January Challenge blog and showcasing several of Jan's new images.

For my card of inspiration, I've selected Lovin' Lily of the Valley.  This set includes the flowers and the paneled frame in the background. 


 When I started this card, I only intended to use the flower spray.  I sized and printed it and I also printed the window design.  I had seen a fellow card maker using a stained glass die on several cards and I loved how she'd completed her cards.  But that was a die and this was an image.  

After I finished the flowers, I was still trying to figure out how to use that window.  When in doubt - check Pinterest, right?  I seriously went for pages and pages and nothing even remotely resembling what my brain was looking for.  Then I happened to see a Copic tutorial on gray shading.  That was it!  A technique I'd never done and knew it would give me a great window.  

Of course mine looks nothing like hers did nor did I color it the same way. However I really like how it turned out.  Basically you use 3-4 shades of gray and color all the panes the same direction, dark to light - blending well as you go.  Then you 'color over' with the shades you need.  I'm sure this would work on lots of images other than window panes.  

Once I completed all the coloring, I carefully trimmed around the outside frame and secured it on the woodgrain cardstock. I added several foam dots under the top of the flower bouquet and secured it at the base.  This adds dimension to the card design.  Lastly I added the Deepest Sympathy tag at the stems of the flowers along with one tiny black enameled dot.

Don't forget to check out all the Design Team cards and join us on Jan's Challenge Blog.

Thank you for stopping by today to view my blog. I enjoy sharing my work with you and invite you to 'Follow' my blog and to visit my site - "Not Just Scraps' on Facebook - where you can purchase my cards. 

I will be entering this card in the following challenges: 

Word Art Wednesday ~ Week 575 

Creative Knockouts ~ Challenge 484  

Creatalicious ~ Challenge 250  

A Perfect Time to Craft ~ January (Spotlight Winner)

World Wide Open Design Team Challenge ~ #12


Pam's Pearls


Copics 

Rose: R81, R83, R85, Lily of the Valley: B00, B000, V000, Large Leaves: YG91, YG93, YG95, Small leaves: G40, G43, G46, Stems: Olive Multiliner, Around: V0000

Window: Frame: E27, Gray shading C4, C2, C1, C0, Colors: Y11, BG11, BV01, B0000, R81


Products  


Jan's Digital Stamps, Lovin' Lily of the Valley


Sunday, January 1, 2023

A Cup of Tea

I'm back this afternoon with another Design Team posting.  Morgan's ArtWorld's Challenge Blog is now open for the month of January.  

I'm joining my Design Team members there with several beautiful cards using Morgan's Art.  I've selected Fairy Wishes for my project card. I hope this represents your quiet New Year's Day afternoon - relaxed and enjoying the first day of 2023!


 When I received this image I fell in love with the head full of curls!  With lots of 'red-heads' in my family, that's what I wanted to do  ~ deep auburn red hair.  I sized the image to just under 4" and used my Copic markers for the coloring.  All the many layers were lots of fun to color.  Don't you just love the expression on her face as she's gazing into her tea cup. 

The color I picked for her dress is one of my favorites also.  But there's one problem using this shade - it's got to be the hardest (to me) to match paper too!  The paper is always too purple or too blue.  I'm sure you can relate! 

But in a box of specialty paper a friend had gifted me, I found the perfect match with this metallic shiny paper.  However the glossy finish made it hard to get the image to stick to the mat.  After gently wiping the glue off, I used an old scrapbooking trick.  It's usually used to save paper, but also a great way to secure images when the paper is slick. 

Simply die cut a much smaller die in the center of you paper/die shape.  This allows you to secure you image in the center and still have the slick frame or matting behind it.

I used a 6" white card base and covered it with the patterned paper, then added the image left of center. 


 I added a sentiment from one of my coffee/tea stamp sets and then added the lavender organza bow at the fold to complete my design.

Thank you for stopping by today to view my blog. I enjoy sharing my work with you and invite you to 'Follow' my blog and to visit my site - "Not Just Scraps' on Facebook - where you can purchase my cards. 

I will be entering this card in the following challenges: 

Creative Fingers ~ Challenge 245 

Creative Knockouts ~ Challenge 484 

The Paper Shelter ~ Christmas Break Chellenge 

Word Art Wednesday ~ Week 575


Pam's Pearls


Copics

Hair: YR21, YR24, YR27, E39, Dress: RV02, B60, B63, B66, Cup: G43, Flowers: RV93, Napkin: Y1, Y19, Wings: BV01, RV00, BG11, Around: BG10


Products


Happy 2023!

We've survived another year and now 2023 has slipped in.  For some I'm sure it came in with a Bang and for others like my husband and I, we enjoyed a quiet evening here at the lake with an occasional sound of fireworks in the background. 

I'm starting the new year off with a freebie from Gerda Steiner.  I love all these little penguins dancing around in celebration!  A few look like they have been dancing a while!


It's really nice when our talented artist generously give out their images, I am grateful. 

I'm also grateful for those that follow my blog, whether it's every day or just an occasional drop in.  I hope that you gain joy from being here. 

I'm looking forward to a great year of card making.  I'll be sharing five days of Unity Stamp designs starting January 9th as part of their Growing in Unity 2023 Project.  In March and April I'll be the Guest Designer for a couple of site ~ that should be fun.  And I have at least four retreats that I'll be attending throughout the year to learn new skills and improve my current card making. It's going to be a busy year! 

Keep popping in - and thank you for all your sweet comments! 

Pam's Pearls


Sending My Prayers

Today we are opening a new month on Critter Crazy Challenge Blog.  For my card today,  I have selected a large Luna Moth from Impression Obsession and made a Sympathy card.


After stamping the moth on 110# Neenah cardstock, I colored it with my Copic markers.  Then I carefully cut out the moth as close as I could, not leaving any white showing.  One 'trick' when trying to achieve this is to take a dark marker, like Copic N6 and carefully go around the edge of the card.  I hold the pen vertically and use the side of the brush tip, carefully rotating the image to cover the sides with black.  

I selected the plum cardstock that matched the center of the month as the background paper.  Then I embossed it using the Sizzix embossing folder Organic Petals.  After trimming the edges I secured it to a standard A2 white card base.   

Next I added the moth, tilted to the left slightly and secured him.  I stamped the sentiment 'Deepest Sympathy' with Versa Clair Monarch ink and die cut it with a fishtail die before securing it to the top left of the card. 

Be sure to visit the Critter Crazy Challenge to see all the Design Team members cards for inspiration and to enter your animal card too! 

Thank you for stopping by today to view my blog. I enjoy sharing my work with you and invite you to 'Follow' my blog and to visit my site - "Not Just Scraps' on Facebook - where you can purchase my cards. 

I will be entering this card in the following challenges: 

Cards Galore Encore ~ January ~ Challenge 107 

Can You Handle the Pressure ~ Dry embossing 

Stamping Sensation ~ January 

We Love Stamping ~ January


Pam's Pearls


Copics 

YG25, V000, BV20, BV23, V17, YG01, N6


Products


Saturday, December 31, 2022

You Are Simply Amazing

This afternoon I'm here with the Classic Design Challenge Blog as we are opening the January challenge.  Our sponsor for this month is Conie Fong Art and we are grateful for their support.  

I've selected Penelope Poppy for my card of inspiration.


 To make this card, I started by sizing the image to about 3" tall and printed her on 110# Neenah cardstock.  She was a fun image to color with my Copic markers.  

I selected a layout designed by Crystal Minkler that I'd used in a Christmas card challenge.  I selected the coordinating plaid and solid peachy shades and die cut the colored image into a simple oval shape.  After all the pieces were secured, I added the brad that says 'Simply Amazing' near the right side of the image.  Lastly I tied the aqua organza bow at the fold to complete my card. 

Thank you for stopping by today to view my blog. I enjoy sharing my work with you and invite you to 'Follow' my blog and to visit my site - "Not Just Scraps' on Facebook - where you can purchase my cards. 

I will be entering this card in the following challenges: 

Creative Fingers ~ Challenge 245 

C.R.A.F.T. ~ Challenge 662 

Creative Knockouts ~ Challenge 484  

Krafty Chicks ~ Challenge 644 ~ Week 5 

Through the Craftroom Door ~ December 6th Challenge

 Pam's Pearls

Copics:  

Flowers: R14, R22, R32, BG02, G46, Y28, Hair: E41, E42, E43, Eyes: B05, Blouse: B04, B05, R20, R21, R22, Pants: W2, W3, W4, B04, R20, R21, R22, Shoes: B06, W3, E41  

Products:  

Conie Fong Art, Penelope Polly 


Cheers!

Happy New Year's Eve from the shores of Lake Murray, South Carolina!


I hope you have had a nice recovery week after all the hustle and rush for our Christmas Day.  I certainly have enjoyed a few slower days, packing up the Christmas tree and decorations, and getting a little more organized for 2023. 

I'd like to wish you Cheers to the new year with this Unity Stamp by Tierra Jackson.  May your home be blessed, full of love and laughter, safe, and most of all guided by Our Heavenly Father each day.  

Thank you for stopping by today to view my blog. I enjoy sharing my work with you and invite you to 'Follow' my blog and to visit my site - "Not Just Scraps' on Facebook - where you can purchase my cards. 

I will be entering this card in the following challenges: 

Creative Fingers ~ Challenge 245 

My Time To Craft ~ #50 ~ New Year's Day (die cut frame) 

Creative Knockouts ~ Challenge 484  

Krafty Chicks ~ Challenge 644 Week 5 

Inspiration Station ~ Challenge 46 ~ Cup of Cheer ~ Warm photo inspired the warm glass of wine.

Simon Says ~ Monday Challenge ~ Party Time ~ WINNER!


Pam's Pearls


Copics 

Glass: RV00, RV17, Wine: RV52, Table: E34, Cloth, Y26, Cherry: R08, R35, R37, Pinecones: E13, E19, Bow: G09


Products  

Unity, Cheers!

Pink & Main, Stitched Rounded Rectangles