Friday, August 17, 2018

Who's Your Reel Great Guy?

You know... The one that always has the BIG Fish Tales!

Art Impressions sure captures most of our great fishing guys with their Reel Great Guys Set by Artist Bonnie Krebs.  

Today I'd like to share two cards made with the set and assembled with different papers and dies. 

First ~ A simple version
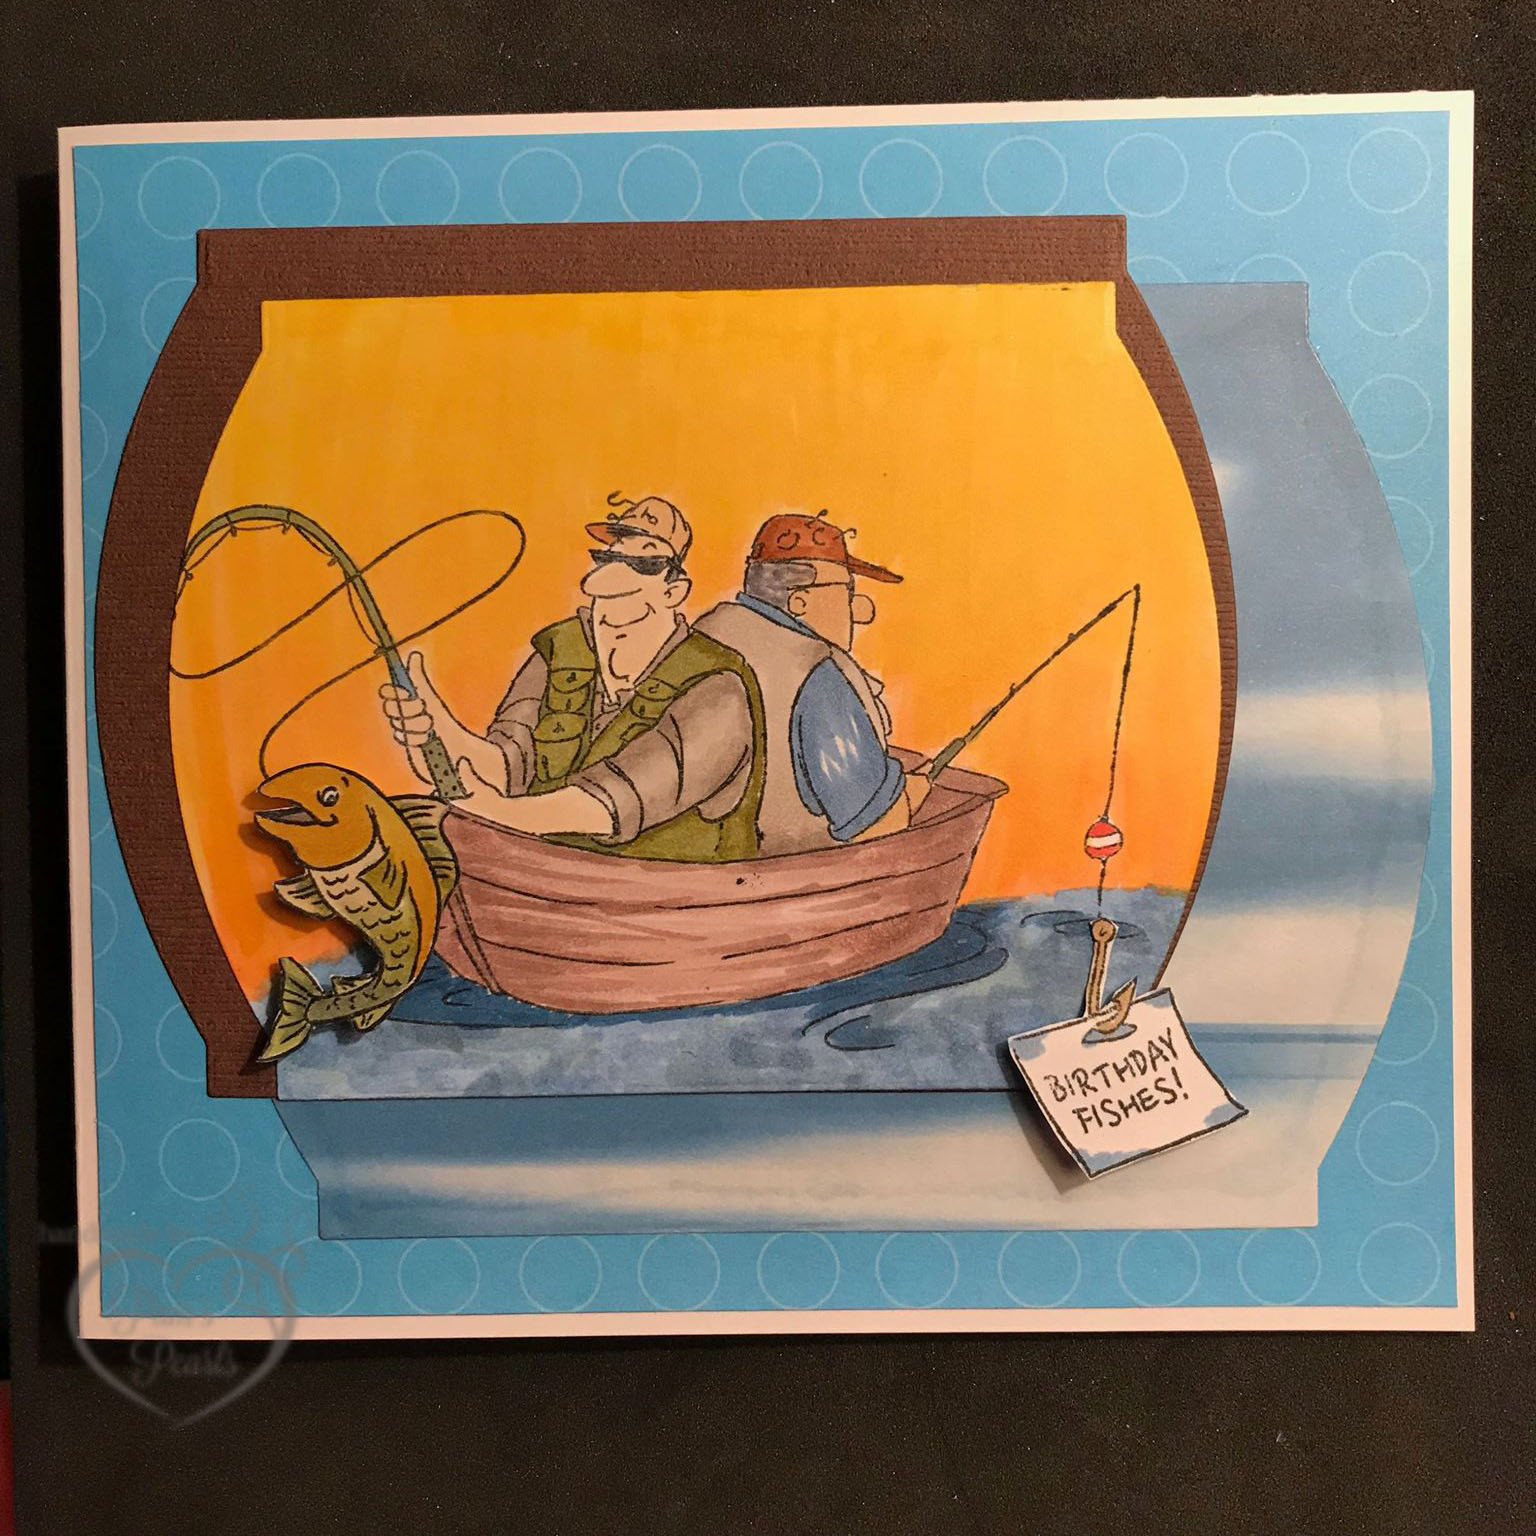
and second - with a few additional embellishments.

Both images were Copic Colored using the following combinations:
Back Guy: Hair C4,C5; Face  E0000,YR30, E42;  Hat E34, E37
Shirt & Pole, B45, Jacket W2-W4
Front Guy: Face: E0000, YR30, E41, Hat E31, E34
Shirt W2-W4, Pole YG93, Jacket YG93, YG95, YG97, & G85
Fish  YR23, Y26, YG97, G85
Water: Close to Boat use: B37 to ground the boat, then use B45 on hex chart and colors around that number randomly to make waves.
Sky: Blend dark to light from the water up starting with YR65,  E95, E93,  Y18, Y15, Y21, Y32. This can vary depending on how wide or narrow your blending is and what your desired finish is.

On the top card I used the My Favorite Things Die-namics Elegant Rectangle Stax Dies (MFT-1268) for the three pieces and mounted on a blue with white bubble paper onto a white card base.

On the second, the image and an additional bright yellow orange paper piece is die cut with the Spellbinder Curved Rectangles, S5-006.  An additional piece of woodgrain paper with torn side edes is added behind and then all are mounted on a Kraft 6 x 6 inch card base.  

The single fish, the Hooked sentiment and the bucket of fish are cut out and either glued or mounted with foam, then mounted on the cards as shown.   Additional small pieces of net were also added to the second card. 

Some days we have time to add all the extras to our cards and some days the basic elements still make the perfect card for our guys.  Cards at all levels are OKAY!  Every card maker is at a different level and will be at a different level tomorrow and next year.  Celebrate that YOU are blessed with the talent our Lord gave each of us today! 

Thank you for stopping by today to see my cards and to shop with me.  Your comments are always welcome.

Serving a Risen Savior,
Pam 


Tuesday, August 14, 2018

How Sweet It Is.... (Just for me)

Today is my first posting on the Whimsy Inspirational Blog (click HERE) to see that posting.  The posting here is basically a duplication, with a few additional details and linked social media postings.

My position on the Whimsy Team is on the Digital side.  I think as a shopper, that tab may get lost sometimes as we look through all the beautiful images shown by the designers of Red Rubber and Clear stamps.  Yet as our inventories quickly become filled, I am beginning to see the advantage of digital images each day.  
God doesn't open those doors without reason you know!

Let's get to showing you my latest card creations. 


Who couldn't fall in love with Crissy Armstrong's Penquin's Bubble Bath image?  I have to admit ~ I created this project for myself to celebrate my acceptance to the Whimsy Team!

The digital image is Copic colored, with a extra long edge die for the sides.  The shower curtain is a pale green piece of vellum (3 1/2" x 5" ) accordion folded every 1/2", then the bottom edged is rounded with decorated scissors and the top is punched with an oval hand punch.  I punched a small hole in the colored image for the brads about 1/2" from the top and sides.  Then I took several strands of green floss, twisted and threaded them through the hole to the back and taped them down.  The larger headed orange Swiss dotted brads covers the hole and the threads nicely making the shower curtain complete.  Any sentiment or single word die could be added to compliment the occasion of your card. After gluing everything down,  I mounted the card front on a deep hunter green side folded 6" x 6" card base with a white liner.

Thanks so much for stopping by today and your comments are always welcome.  
Serving a Risen Savior, 
Pam

This posting will appear on the following sites:

Friday, August 10, 2018

Congratulations On Your New Arrival

The call for Baby Cards has sure been on the increase around here lately, which made the new release of Gina Marie's Quilt Die #9 Building Block Die the perfect solution. Like the name indicates, this die is a nine blocked stitched flat die plate.

For today's blog, I  will show you two cards, that are basically the same, with just different items added to the card shelf, yet they give the card a totally different look.  


I first used a solid blue and a coordinating patterned piece of blue paper and cut each with the Quilt Die.  Then using a scrap piece of white, I glued the opposite blocks back into the frames, making the quilt pieces.  You could do this part a number of different ways.  Once all glued together, I carefully cut the square diagonally, giving me the corner piece for each quilt needed for the two cards. 
Next I die cut the white eyelet strip, the congratulations word, the domed stitched Pink piece and the blue domed center and stamped out the Moon, Stars and Teddy Bear.  I colored the small elements with Copic markers and cut them out.  Whew... that was a lot of little tiny pieces!  Layered them up to this cute card on a pink checked background and mounted it on a 6 x 6 card base. 

This makes the second card an easy peasy card since some of the left overs from the first card are used.


The quilt corner is the other half of the first card.  I used a different die for the white border and the word Congratulations.  I had cut two of the pink domed pieces, so I just needed one of the white smaller ones and I had a cute stamp of baby shoes that I stamped, highlighted with gray and cut out.  I glued them at the bottom and put a pop dot at the top for a little extra dimension. For the finishing touch on this one I also added the blue ribbon bow. 

Which one is your favorite?  

Thanks for stopping by today ~ your comments are always welcome. 

Serving a Risen Savior,
Pam


Thursday, August 9, 2018

Don't Just Fly ~

S O A R
This is the theme for today's card that I created for a card swap which was for a Balloon Card. Here's what I came up with and below are the supplies I used.


I selected the Ellentina Cutting Classic Collection Die, DCM023/024, Hot Air Balloons and two shades of pink paper.  On the scrap of the darker shade I added a strip of Washi Tape before running the smaller die through to the basket a woven effect, and the lighter one I added diamond stickles.  On the two larger balloons I filled the stars in with gold stickles.  The background Paper is from Whimsy Stamps, although it appears to be a really cool handmade technique! I used a premade gift tag, stamped my sentiment with matching pink ink and tied it to the card base with blue embroidery thread.

Thanks for stopping by today - your comments are always welcomed.

Serving a Risen Savior, 
Pam 

This posting will appear on the following sites:

Wednesday, August 8, 2018

Welcome to the Big Top


This week starts another exciting adventure for me as a card maker as I have been accepted for a six month term on the Whimsy Stamp Creative Team for the promotion of their Digital Products.  You can well image my excitement when I thought I was merely opening a weekly sales announcement email from them only to find this wonderful news!  I am truly grateful, honored and hope I can meet and exceed their expectations. 

For my first project, I have selected Autumn Harvest Ride from the Crissy Armstrong Collection.    Although her carousel horse today brings us this beautiful fall image, it also brought back many memories for me of a trip or two to visit the Big Top Barnum & Bailey traveling Circus.  


The stamped image is Copic colored then I die cut the edges.  I used a 5/8" purple sparkle Organza ribbon to make the bow and added several orange bling gemstones before mounting to the  6 x 6 Kraft card base.  The sentiment stamp is also an older/discontinued Whimsy stamp ~ Welcome to the Big Top.

I encourage you to pop over to Whimsy Stamps store to see all of the new August Release stamps and digital papers that are available this month. 

Thanks for stopping by today - your comments are always welcome.

Serving a Risen Savior, 
Pam 

This posting will appear on the following sites:


Saturday, August 4, 2018

Live Not Only the Length of Your Life

Last night a group of friends celebrated one of the guy's birthday. Several of the great cooks in the group brought wonderful snacks from wings and nachos to German Chocolate cake and Cheese Cake.  (Calories don't count on birthdays, remember?)

I was thrilled to make his card from the group and would like to share that with you today.  

Wanting a very masculine card, I selected the Unity Stamp Company, All Cylinders set by Tierra Jackson.


The stamped image was Copic colored using R05, R17, R24, R29, R35, R35, R39, N0, N2, N4, N4, N5 and Y8.  For the edging I used the Die-Namics Stitched Scallop Basic Edge by My Favorite Things. The sentiment is also part of the stamp set and the background map was a scrap paper.  The completed card base is 5" x 5".

Inside the card I stamped the sentiment

Don't just live the length of your life...
live the WIDTH as well. anonymous

What a neat and true saying don't you think?   

Thank you for stopping by today. Your comments are always welcome. 

Serving a Risen Savior, 
Pam 

This posting will appear on the following sites:

Wednesday, August 1, 2018

Supporting Operation Quiet Comfort

On one of the card making sites that I support, we had a month long challenge in July for each of us to make  30 cards to donate to support Operation Quiet Comfort.  

This organization exists solely for the purpose of honoring and comforting America's military men and women who become sick and injured while serving in harm's way.  Our group is fairly small but we are strong in our faith we able to submit over 500 cards to this effort. 
They requested that our cards have "Thanks for all that you do" or some similar message on the outside of our cards and were to be a patriotic design. Everyone submitted a variety of cards with envelopes. I'd like to share mine with you today. 

The first two were done with the Gina Marie Layered Dog Tags Military Stamps and the Soldier Silhouette Die.


 The two below were done with scrapbook papers.


These four were done with the Unity Home of the Brave stamp set.


These four were printed from material provided by the Facebook site, as were the five below them plus the Gina Marie Soldier Silhouette Die was added.


The White House image was found on a Scrapbook page.


The next two were done with scrapbook papers and the Gina Marie Soldier Silhouette die.  


 And the final nine were also done with scrapbook papers and the Gina Marie Layered Dog Tags Military Stamps.


I know our sponsor was proud to deliver this huge donation to the support center and each of us were blessed as we made these special cards and prayed for the recipients.  

Thank you for stopping by today.  Your comments are always welcome. 

Serving a Risen Savior, 
Pam

This posting will appear on the following sites:
Christian Card Maker, Unity {Show & Tell}, Gina Marie Designs/Scrapbook Outlet, Stamp Junkies, Karle's Passion, Stampers Swap Shop, Pinterest, and Not Just Scraps.


Monday, July 30, 2018

A Luau Surprise Birthday

Today's card is a REALLY LARGE card that I made for a surprise birthday party for one of the ladies at Shaggin at the Shrine.  Her sweet fellow made arrangements for several ladies to throw a huge Luau for this milestone birthday.  And with 108 in attendance, it was a good thing the card was large as there wasn't a place left open for any more signatures and happy wishes!


The 5 1/2" x 8 1/2" white card base has the front covered with a green monochromatic flower print. I cut the largest oval I could find and printed Happy Birthday in Hawaiian, and arched the text. At the bottom, One More Time, is a term used weekly at our gatherings when we take our group photo.  The image is Copic Colored, fussy cut at the bottom then oval die cut across the top. Yep, that was a bit tricky.  I then glued it at the bottom and mounted the top with foam squares to give it a little dimension.  A red organza ribbon and bow completed the front of the card. Inside I added a Happy Birthday musical die cut and left as much space as possible for everyone to sign. 

The event was perfect with decorations from the door, to tables, to the DJ platform (flamingo farm), to the photo booth.  Boy was Jackie surprised and grateful!


What a great event and reminder to celebrate every day as if it were your last.  God is so good to us, giving each of us way more than we deserve and loving us endlessly.

Thank you for stopping by today and following my blog.  Your comments are always welcome.

Serving a Risen Savior, 
Pam

This posting will also appear on the following sites:

Friday, July 27, 2018

New Frilly Lace Nested Rectangle Die Set

Today I'd like to show you two cards I recently made using the newly released Frilly Lace Nested Rectangle Die Set from Gina Marie Designs.  This is a three piece die set that leaves the center in the rectangle and cuts a very clean and crisp filly lace border.  
Both of my cards ended up being sympathy / thinking of you type cards, however the delicate border is great for just about any type card you may be creating.

The first card I used Unity's Tea Cup Flouret, by Gracielle Designs.


The image is Copic colored then the sentiment is stamped in the coffee cup.  I fussy cut and applied the colored image to the largest die cut, and then to a card base.  A flat back pearl is added to the center of the flower, and off it goes into the mail.

The second card is a digital image that I've had quite a while.


The printed image is also Copic colored and then I added the Unity sentiment 'today is all we need to nurture'.  I rubbed the edge with a coordinating green ink and then matted on the green Frilly Lace die cut and mounted on a contrasting hot pink card base.

Here is the link showing these card on Gina Marie's website (Wholesale Crafting Outlet - Frilly Lace Nesting Rect.).  Be sure to check out all the other great dies while you are there!

Thanks for stopping by today. Your comments are welcome anytime.

Serving a Risen Savior, 
Pam 

This will also appear on the following sites:

Thursday, July 26, 2018

CCM Sketch Challenge

One of prettiest sites here in South Carolina in late July and early August as you are driving through the country roads is the fields full of brightly blooming sunflowers.  Being a photographer, I love to stop along the way an snap a few shots of this stall sun chasing flower.

Whimsy's DoveArt New Sunflower has captured the image of one sunflower beautifully.  I have used as and entry in the Whimsy Blog Challenge and also the Christian Card Maker's Sketch Challenge.  Here is my completed card. 


The stamped image is Copic colored and die cut with the Pink & Main extra Large stitched rectangle as is the sentiment.  Ribbon and five flat back pearls complete the card.   Here is the sketch for the challenge. 


The Sunflower stamp is quite large, making my finished card ~ 6" x 7", but the designer did a great job with proper proportions on the leaves and stems to support the larger flower.  I can see this stamp becoming one of my favorites!

Thanks for stopping by today. Your comments are always welcome and I hope you will come back again. 

Serving a Risen Savior, 
Pam

This posting will appear on the following sites: