Thursday, November 29, 2018

The Greatest Gift

While yesterday's posting was full of fun and Be Merry, 
I will just a quickly turn us around to always stay focused on 
the Greatest Gift.


Unity's stamp, The Greatest Gift is Baby Jesus,  by designer Jeanie Dickinson simply gives us the visual image we need to bring JOY into our daily lives and into our family's each and every day. 

My wish for you this season ~ remember the greatest Gift!

Serving a Risen Savior, 
Pam 

This posting will appear on the following sites:

Wednesday, November 28, 2018

As the Holiday Begins... Be Merry

Although it's hard to believe - it seems the day after Thanksgiving is the day before Christmas doesn't it?  All the decorations continue to appear on the shelves earlier each year, pushing Halloween and Thanksgiving right out of the way.  

Today's Celebration Christmas card was made using the Unity's stamp, Bright Spirits.  


I remember last year when Designer Angie Blom and Unity released this stamp, it was super popular with it's cool floating ornament in the glass.  Of course by the time I ordered it, my cards were completed so I was totally thrilled to get it out early in my mass of card production this year.

The stamped image is Copic colored and the border die is from My Favorite Things, Stitched Scalloped Basic set. The sentiment 'Be Merry' was cut using a Spellbinder die using a lavender foiled paper.  The top pieces were mounted on a red metallic foil piece and then onto a deep purple card base.  Although tulle is wide, it was perfect for this card and added a little extra bling and sequin splatter that was needed.  

Merry Christmas to everyone as the season begins and please be careful driving. 
Serving a Risen Savior, 
Pam

This posting will appear on the following sites:

Tuesday, November 27, 2018

Time 2 Be Merry and Bright

I think anyone who 'is owned by a cat' might like today card.
Whimsy's, Scruffy Cat is back today and isn't so sure he's ready to be Merry and Bright!
 With his over-sized flowing Christmas hat, he's sure to bring a smile to the family that receives this card.


This digital image is a set that comes with two digital versions - one with the hat on the cat and one of the cat without the hat. My image is Copic colored with Diamond Stickles added to the fur of the Santa hat. I also used foam squares to raise the cat image above the wreath.  The Wreath die set is by Gina Marie Dies and the sentiment was taken from a piece of scrapbooking paper.  The completed image was mounted on a Hunter Green card base and then I added a tan rectangle mat inside for the writing space. 

Thanks for stopping by today to see another Christmas card.
Serving a Risen Savior,
Pam

This posting will also appear on the following sites:

Monday, November 26, 2018

Candy Cane Wishes and Mistletoe Kisses

If you followed my blog posting last year, you may remember the postings of the Countdown to Christmas starting December 1 and a different Christmas card every week day down to December 23rd.  Things are looking a bit different this year ... looks like I'm going to have to start earlier to be able to share all these wonderful designs and cards with you!  A few have already slipped in and there are so many in progress on my desk!
Let's don't play the game of What's On Your Desk please!

Today I want to share another new CC Design digital image that is now a new release from Whimsy Stamp, named Candy.
This card started out as a tag, but as it grew I decided it would be more useful and stable as a card.  


To make your own card like this one: I used a 5 x 7 white card base, green Christmas paper for the bottom mat cut 4 3/4" x 6 3/4", x-large tag using Gina Marie Arched Stitched Tag Set with the green and red dotted paper, then a solid green medium tag (miscellaneous die).  I used the Whimsy Christmas Branches die set to make the holly and berries and coated the berries with liquid glaze.  The sentiments were printed from Goggle and then 'x' stitched around the edge using Die-Namics Basic Stitch Lines  and adding a snowflake and sequin.  The newly released digital image, Candy, can be found in the Whimsy store with all the digital releases items - waiting for you to check them out and slip them right into your cart. 
I colored my image with Copics and used the following colors:
Skin: E0000, R30,0,YR30, RV0000, E50
Hair: E26, E32, E34, E42, E55
Reds: R14, R27, R35, R39
Greens, G21, G85, G94, YG63
Gray, C0, C2, C4
After cutting her out and mounting the the image in place, I then added a little Diamond Stickles  on the fur of her outfit and boots as the final touch.

Thank you for stopping by to read my blog and to follow my work. 
Serving a Risen Savior, 
Pam

This posting will also appear on the following sites:

Friday, November 23, 2018

Choo Choo Train is Coming....

Counting those TEN tiny fingers and TEN tiny Toes...
Oh what a sweet precious boy!

Today I'm proud to feature another new die from Gina Marie Designs ~ Choo Choo Train Die Set.


This new set comes with three train pieces and three track pieces.


For my card, I used a baby blue gingham check paper for the train and black paper for the track.  I used all six die pieces and added three tiny bubbles for the steam coming out of the Train engine. I used a double mat and then a piece of random word 'boy' paper cut 1/4" smaller than the white card base.  Blue crochet thread is wrapped around and tied before mounting to the card base, then I added the white button and tied it securely.  These dies are generic enough to be used for Baby showers, birth announcements, birthday's and many other events and are sure to be a big hit!

Be sure to check out all the new Gina Marie Dies just released on her web site HERE. For her Black Friday Weekend Sales, click HERE to see the details. 

Thanks for stopping by today and for visiting Wholesale Crafting Supplies.

Also I'd like to invite you to hop over to Whimsy to catch their Black Friday specials too: 


Serving a Risen Savior,
Pam

This posting shall appear on the following sites:


Thursday, November 22, 2018

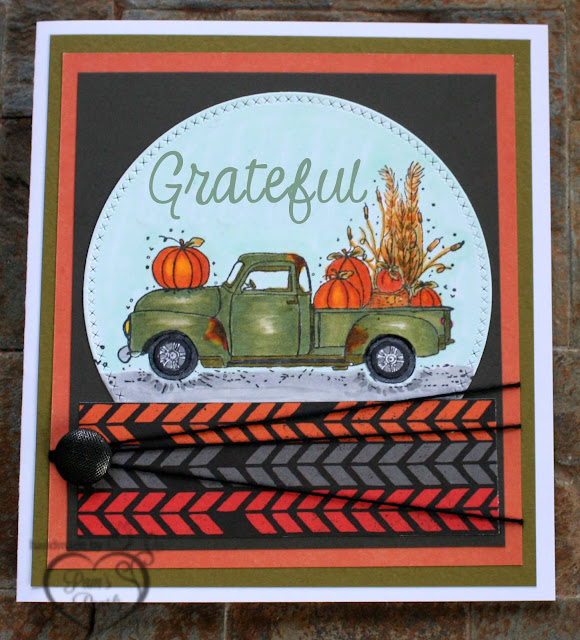
Grateful Today for...

Happy Thanksgiving Day to YOU!

Isn't this going to be a wonderful day to celebrate our blessings!


Today I just wanted to tell you ~

I am GRATEFUL that YOU are in my life's path and THANKFUL for the friendship we share. 

I am GRATEFUL that we serve a RISEN Savior
who guides our journey.

May your day be blessed as well as the upcoming holiday season 
as we prepare to celebrate the birth of our Savior.

~Pam~

Supply: Unity, Great Blessing, Designed by Angie Blom

Monday, November 19, 2018

Oh What Fun!

Oh What Fun it is to find such a cute image all dressed in PINK playing in the snow with her own little snowman!

That's what I have today to share with you - This new image from Whimsy Stamps by CC Designs named Snowy .  
As with all digital images she can be flipped, rotated or resized to fit your card size needs.  


After printing her on 110# card stock, I used Copic markers to color her outfit in Pink and Grey's with cute brown boots to match her hair coloring.  I used several miscellaneous dies to make the background snowy hills and dome shaped sky with large sparkly snowflakes falling.  The sentiment 'Oh What Fun!' was taken from the Whimsy Clear stamp Collections "Oh What Fun" (SWSD244) by Deb Davis. The completed project is mounted on a white 5 1/2" square card base ready for mailing. 

Thank you for stopping by today.  I hope you will click over to Whimsy Stamps and see what's new there, especially in the digital product line. 

Serving a Risen Savior, 
Pam

This posting will also appear on the following sites:

Sunday, November 18, 2018

Where's the Mistletoe?

One of the special card challenges this month was in honor of a special friend who loved Gone With the Wind.  Of course not many of our card groups have stamps for that particular theme and we're thankful that google could provide a few free images. 

Since it's close to Christmas, I decided to add a little twist to my card, especially since my colored image got lost on my desk for several hours...wonder what these two were doing?!? 


It was a fun image to color and I have to admit, I sure wouldn't have touched all those 6 shades of Copic red a year ago. (Thanks again to my Canadian mentor.)   

Thanks for stopping by to enjoy a little humor from an old familiar classic story.
Serving a Risen Savior, 
Pam

This posting will appear on the following sites:

Friday, November 16, 2018

Here's to Laughing...

My little group of ex-working girlfriends gathered last weekend to celebrate an upcoming birthday (11/18) for the last of our group that is still working full time.  As you know it gets harder to coordinate time together when you retire, move, or just start other interest. But our girlfriend time is so very important!  

For her birthday I wanted one of Art Impressions funny friends card - so I picked Live Laugh Love (AiCS15). Here's what I came up with and the instructions follow for those that would like to make one on their own.


Art Impressions stamps designer, Bonnie Krebs, captures women who seem to fit the women we all know.  So many of our friends could easily be found in this stamp.  It may have been months since we gathered, but we picked right back up and the conversation was filled with a lot of laughter and sharing.

The AI Stamp was quite large so I had to offset the standing lady so that it would all fit on the standard 6 x 6' card base.  The ladies were Copic marker colored and mounted on red card stock mat before mounting on the purple card base.  The sentiment is from the same package and is die cut and mounted from a coordinating scrap paper along with a Happy Birthday fish tail tag. I added several deep purple enamel dots to finish off the card.

Thanks for stopping by today - Give Ms West Virginia a big Happy Birthday hug if you happen to see her. 


Serving a Risen Savior ~ Pam

This posting will also appear on the following sites:

Wednesday, November 14, 2018

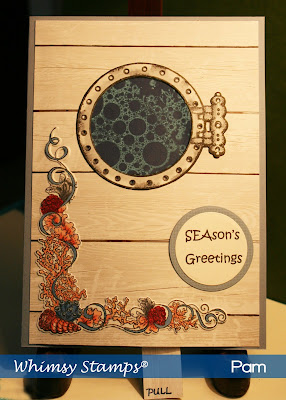
SEAson's Greetings Today with Whimsy's Seal in Water Digital Stamp

Good afternoon Whimsy fans!  Today I'd like to share with another take on Crissy Armstrong's Seal in Water Digital Stamp.

For my project I wanted him to pop up out of the water so I choose to do one of the interactive double slider cards.  

Here's the two-part front cover of my card~ 


For this design, I gathered several different product bit's and pieces that I had previously completed from other projects.  The port hole and seaweed corner are both from the Heartfelt Coral Reef collection

I wanted each piece to add to my card but the focus to remain on the the seal and the action of him popping up as the pull tab from the double slider at the bottom of the card is pulled out.  

I followed a tutorial for the double slider card by Jennifer McGuire. It was a bit of a challenge and of course she always makes it look so easy, but the port hole with the embossed water bubble background provided a a great frame for him.


    I then added a little seaweed border and an emphasized SEAson's Greetings sentiment on a white wood grain background mat, then mounted the entire sandwich of papers onto a blue 5 x 7 card base.


  The PULL tab sticks out about 1" at the bottom of the card to provide easy access to moving the seal in and out of the port hole.

Thanks for stopping by today and viewing how cute the Seal in Water digital stamp is with another possibility of him popping up in your card. Check out all the great images at the Whimsy Online store. 

Serving a Risen Savior ~ Pam

This posting will also appear on the following sites:

Thursday, November 8, 2018

You Are My SON Shine

Today's card is one that I designed especially a baby shower this past weekend with the nursery theme being Elephants. 

Looking through my Evernote system most of my elephant stamps were not the 'baby elephant' image that I needed.  I looked at Whimsy's Baby Girl Ellie - she is so adorable, but I needed a boy elephant... and I don't own Baby Boy Ellie so the search continued until I came across Whimsy's Jelly Bean's Flower.  Hmm... and I have him in the Digital version.  The wheels are turning now - let me show you the finished card next - then PLEASE stay with me if you are a crafter so I can explain what I did to modify this design - it's important for you to know in case you are considering purchasing this item. 


Now isn't that a cute personal card just for the new parents to be?  I was really excited with the finished product and especially that it was a perfect to fit in a 5" square frame later if they wanted to add it to the baby's room. 

The Jelly Bean's Flower is a Digital Stamp - I didn't want the flower pot - so I added a layer in Photoshop Elements (PSE) and CUT around the flower pot, the rain drops, and the end of Jelly Bean's nose and deleted it.  I added another layer and carefully drew in the lines to turn his truck up.  I did use the girl elephant, Baby Ellie as a visual guideline to help me modify the trunk.  

The wooden sign post was taken from the Cuttlebug Best Friends  embossing folder of a sign post.  I simply embossed the sign post and traced the edges. Then scanned that image so it could size it to fit the card and to have the ability to add the baby's name.  Once satisfied,  I printed it on 110# white card stock and colored it with Copic markers, and hand cut it out.  The fence is a die by Spellbinders and the sky, sunshine and assorted dies are by Gina Marie Designs.  Both the elephant and the welcome sign are secured at the bottom and raised about mid way with a foam square to give them added dimension.  

And for the final detail on this card, I added the strip at the bottom ~ An original created by Patrick and Courtney ~

The card was filled with prayers  and  best wishes for the young couple as they bring their first child into the world in just a few weeks. 

Serving a Risen Savior,
Pam 

This posting will appear on the following sites:

Tuesday, November 6, 2018

Time Out ~ For A Sketch Challenge

The November days are ticking away toward December and I'm beginning to feel the pressure of my schedule getting behind on the preparation for the holidays. This year is very different for me ~ each day is very full of new and exciting design team work with Whimsy and Gina Marie Designs ... and full of blessings of new friendships and adventures.  And the good part is - I will not let the pressure of the clock mess up the enjoyment of the day. Nope!  It's too much fun to allow stress or pressure to disturb it. 

The card that I'd like to share with you today is a Football themed card I made last night, using a sketch theme challenge.  The stamp I selected is a Whipper Snapper Design,  Champion Heartache .(#AV119).  


and the sketch we were given:


The image is Copic colored and I measured and cut the fish tail myself as I didn't have a die large enough.  Although the sketch didn't have that piece matted, I added an olive green matting behind it for contrast. I used a blue crochet thread and a wooden star button to tie on this piece before adding it to the rest of the card.  
The card base is 6" square.  Blue background is 5 3/4 x 6", Star patterned piece is 5 1/2" x 4 1/2" with a 1/4" yellow stripe added at the bottom.  The three stars are from the Gina Marie Designs Stitched Sky Die Set and the letters are from an alpha set made by Recollections.

Thanks for stopping by today and allowing me to share my featured card.  Be sure to visit my facebook page {Not Just Scraps} or my Pinterest page for other ideas or information on ordering from me.  

Serving a Risen Savior,
Pam 

This posting will appear on the following sites:

Monday, November 5, 2018

Weekend Challenge - What's at the Fair?

Over on one of the card making swap sites the weekend challenge was to make a card showing something you would see at the Fair or a Fall Festival.  It was getting a lot of attention on Friday when posted - I guess everyone always loves the fair, no matter what your age is.  

For my entry, I decided to use a Clown stamp designed by Norma Fickel called "Someone to cheer you up".  How nice it is to still be able to find CLOWN stamps that are fun and bring laughter when it seems so many are designed to be scary and mean.  Here's what I came up with ~ Instructions & supplies are listed afterwards for your reference.  


  I purposefully left the outside of the card without a sentiment so that the buyer could use the card for a Birthday or a Get Well or just about any other occasion that someone need to be cheered up.

The image is quite tall, my card stock is 2 3/4" x 5 1/2".  I used Copic markers to color  him and a Spellbinder Tattered Edge die with the edges rubbed with lime green cat eye ink.  The clown is layered on a deep purple matting with three sets of rhinestones to add a little touch of light.  To the right is a 1" x 5 1/2" strip of light purple dotted Swiss paper with the count down numbers from 5 down to 1.  I used the Whimsy Brushed Script Number Dies for the those numbers.  Both of purple pieces are then matted on the bright green 4 1/4" x 6 1/4" mat and onto the 4 1/2" x 6 1/2" white card base.

Thanks for stopping by today and allowing me to share my happy clown with you.  Your comments are always welcomed.

Serving a Risen Savior, 
Pam

This posting will appear on the following sites:
Addicted to Card Making 2.0, Stamp Junkies, Stampers Swap Shop, Pinterest and Not Just Scraps


Saturday, November 3, 2018

Fall On Your Knees

It's day three of Whimsy November New Release's and I'm here to share with you my card using the Penguin Nativity Digital image by designer Crissy Armstrong.

When I first saw this image, I was reminded of the live nativity scenes we often see at our local churches during the Christmas season. While here in the south we certainly don't have penguins and seals,... our sheep, goats and donkeys are always welcome additions to make our outdoor gatherings look more realistic.  
For my card project, my desire was to make a peaceful, soft image that would remind us of the reason we celebrate this wonderful upcoming season.  


My card is created on an A2 Kraft card base with a random music patterned paper mat.  The Penguin Nativity digital image is printed on 110# Card stock and then Copic colored.  I added a thin black mat for contrast before placing on the music paper.  Both the Angel wings and halo are also painted with Wink of Stella Clear.  The stitched banner was added last with the simple sentiment of 'Fall on your knees', again reminding us of the reverence of the season. 

Thank you for stopping by today and allowing me to share my card posting for today.  I do hope you will visit the Whimsy site and see the other new releases for November.   Be sure to especially click HERE for the Digital releases.  

Serving a Risen Savior, 
Pam 

This posting will also appear on the following sites:

Friday, November 2, 2018

Butterfly Birthday Wishes

Today I would like to share another quick and simple set of cards.  I'm going back again to encouraging my crafting friends to color every day.  The ladies at my retreat in September looked at me like I was growing an extra head when I said that!  I know - I'm retired and some of them were not.  Do you pick up a pen every day?  Put a few colored pencils on your desk, by the phone, where ever you sit to rest and doodle, or have a few printed images nearby.  You will be amazed how much difference it will make.  Not just in your abilities, but in your general mood and outlook on life. Just color, color and color some more.  Relax! 

The two cards below were colored using two shades of pink and two shades of green, done in reverse coloring.  Then later when I had time and needed birthday cards, my images were ready and my time greatly reduced to pull dies, papers to match and BAM, cards are made and ready to mail. 


The image used is the Unity, Butterfly Birthday Cupcake by designer Angie Blom. Both images were stamped on 110# card stock and Copic colored.

For the left card I used a Cross Stitched Dome die, the Gina Marie Designs Stained Glass Rectangle Die and a small stitched fish tail die for the sentiment Celebrate.  There is also an additional piece of coordinating washi tape placed vertically.  Each piece is glued to a white card base.

For the card on the right, I used a Mini Heart embossing folder by Cuttlebug, the Stitched Fish Tail Dieby Gina Marie Designs and one of the dies from the Party Banner Die Set which is also from Gina Marie Designs. 

As you can see the same stamp colored in reverse made up differently gives you two totally different effects making them suitable for different folks on your card lists.    Thank you for stopping by today to see these two cards and they combinations they can make and be used for. Your comments are always welcome. 

Serving a Risen Savior, 
Pam 

This posting will also appear on the following sites: