Thursday, October 27, 2022

Tweet Treats for These Trick or Treaters!

It's Day 7 of my 10 days of Halloween Cards count down.

Today's card really pulls fall in to our focus as I'm using Stampendous / House Mouse Tweet Treats. 


 So many of the House Mouse images incorporate birds, which really is a cool thing!  This time the little fellows are trick or treating at the neighborhood bird house!  I just love the fall leaves and little bird sticking his head out! 

I colored the image with Copic markers and used the Penny Black Elegant Stitches die to get the delicate decorative edge on the completed image.  The card base is dark brown card stock with the burnt orange gingham paper mat.  After adding the colored image in the center, I wound a piece of twine around the front twice and knotted it to the left corner, adding the leaf charm into the knot.  I also added a rectangle of white card stock on the inside for writing. 

Hope you'll come back tomorrow - it will be another cute House Mouse card! 

Thank you for stopping by today to view my blog. I enjoy sharing my work with you and invite you to 'Follow' my blog and to visit my site - "Not Just Scraps' on Facebook - where you can purchase my cards. 

I will be entering this card in the following challenges: 

The Sisterhood of Crafters ~ October ~ Fall Colors 

The Paper Funday ~ October ~ Challenge 46 ~ All About the Candy  

Try it on Tuesday ~ October ~ Halloween Time 

House Mouse Challenge 377 - Option of Birds 

Make Mine Monday ~ Challenge 186 ~ Halloween Colors 

Dragonfly Dreams ~ October ~ Halloween/Autumn


Pam's Pearls


Copics 

Birdhouse: E40, E41, E43, E44, R27, R37, Bluebird: B01, B04, Left House Mouse: N1, N2, N3, E30, E11, E13, Middle Mouse: E30, E31, E93, E21, E25, BV13, BV04, BV02, Right Mouse: N0, N1, G27, Leaves: Y15, Y18, YR27, E15, Limb: E11, E17, E19 


Products  

Stampendous, House Mouse, Tweet Treats


EEK! You're So Scary!

Day Six of my Halloween card sharing ~ four more to go.

I think I enjoyed this one the most of all the Halloween cards I made.  I've combined two stamp sets to make this Scary Scene.

The background stamp is Great Impressions, Halloween Trees and the characters are from Polkadoodles Spooktacular stamp set.


I started by stamping the background on a 4" square of cardstock and stamping the ghosts, mummy and bat on a separate piece.  For the background, I used Copic marker  BV000 to lightly color the night sky and marker B60 to color the spider webs in the trees.  I mounted that on black cardstock that I had die cut using Pink & Main's Scalloped Square.

Next I colored the Bat using Copic C5, the Ghosts using N0 and N1, and the Mummy using E40 and E41.  After fussy cutting them out, I used N5 to cover the edges of each image so there wouldn't be any white showing through. 

The sentiment is also from the Polkadoodles Spooktacular set.  I stamped it with Versa Clair Monarch and used a stitched fishtail die to cut it. 

The card base is 6" square and matted with black 'bat' paper.  Next I secured the framed Halloween Trees in the center and then added the Halloween characters around the card.  I added the sentiment using several foam squares.

Since this card was going to my nephew's children, I added 'Duncan 2022' to the tombstone! ;-)

Thank you for stopping by today to view my blog. I enjoy sharing my work with you and invite you to 'Follow' my blog and to visit my site - "Not Just Scraps' on Facebook - where you can purchase my cards. 

I will be entering this card in the following challenges: 

Crafty Gals Corner ~ Challenge 236 ~ Halloween 

Simon Says ~ Wednesday Challenge 

Try it on Tuesday ~ Halloween Time 

Cupcake Inspirational Challenge  #555  

Get Creative ~ Challenge 116 ~ Black & Purple  

Make Mine Monday ~ Challenge 186 ~ Spooky or Halloween Colours 

Pam's Pearls


Products


Wednesday, October 26, 2022

Spooky Count Maxwell

I'm back with Day Four of the countdown to Halloween!

Stampendous/House Mouse card is up again today. This time the request was for a nine year old boy.  I've selected Count Maxwell and added a cool spider and web for this one. 


 After sizing the image to about 3" tall and printing, I colored with my Copic markers.  I used the Whimsy Stamp Notched Square die for the image and the selected background paper. 

The spider web die from Polkadoodles, Spooky Hat dies set was just the right size for the card once I laid it on the card front and carefully trimmed off what I didn't need.  The spider is secured using a small foam square under it to give a little more dimension.  Lastly, I added the black organza ribbon at the card fold and knotted it securely.

Thank you for stopping by today to view my blog. I enjoy sharing my work with you and invite you to 'Follow' my blog and to visit my site - "Not Just Scraps' on Facebook - where you can purchase my cards. 

I will be entering this card in the following challenges: 

House Mouse ~ Challenge 377 

Cupcake Challenge #555 

Crafty Calendar ~ Challenge #611 

Paper Dragonfly Creative Challenge ~ #10 ~ Spooktacular 

Try it on Tuesday ~ #10 ~ Halloween


Pam's Pearls


Copics  

Mouse: N0, N1, N2, N3, E30, E31, E93, Cape: BV02, BV08, BV04, BV13, Pumpkin: Y18, YR18, YR16, YR14, YR02, Shadow: N3, Around image: B0000

Products


Tuesday, October 25, 2022

Have a Dino-might Halloween

It's Day Three of the Countdown to Halloween.

Today's Halloween card was made for a young trick or treater.  I've selected Stampendous, House Mouse Dino Treats since it looked so much like a sweet little boy out for his treats early. 


 After sizing the image and printing it, I've used my Copic markers for coloring.  I selected the colors for the double matting and secured them and the completed image together  Then I added the large candy corn brad before adding the stack to the card base.  I think the large candy corn brad really added to the card and completed it. 

Thank you for stopping by today to view my blog. I enjoy sharing my work with you and invite you to 'Follow' my blog and to visit my site - "Not Just Scraps' on Facebook - where you can purchase my cards.

See you tomorrow for another Halloween card!  

I will be entering this card in the following challenges: 

House Mouse Challenge #377  

Cupcake Inspirations ~ Challenge #555 

Make Mine Monday ~ Challenge #186 ~ Spooky/Halloween Colours

Dragonfly Dreams ~ #10 ~ Halloween/Autumn 

Di's Designs ~ Challenge #10 ~ Spooky/ Cute  


Pam's Pearls


Copics

Dino: YG01, YG23, YG25, Pumpkin: YR14, YR16, YR18, Corn: Y15, YR02, Mouse: E30, E25, E37, E31, E93, Shadow: W3, Around image: B0000

Products


Monday, October 24, 2022

Gnomie, Have a Spooktacular Halloween!

Back around the first week of September, Kit and Clowder offered a Gnome Halloween Trick or Treat image from Polkadoodles Crafting. Today I'm sharing the card I made using the free image.  


 They are some scary looking trick or treaters aren't they in this photo booth! 

Another fun image to relax and just color away.  After trimming the completed image close to the edge, I used Copic E74 and covered all the edges.  Then the dark brown mat was added before securing to the A2 card base.  I added 'Wink of Stella Clear' to all the pumpkins to give the card a little sparkle. 

Thank you for stopping by today to view my blog. I enjoy sharing my work with you and invite you to 'Follow' my blog and to visit my site - "Not Just Scraps' on Facebook - where you can purchase my cards. 

See you tomorrow with another Halloween card! 

I will be entering this card in the following challenges: 

Dragonfly Dreams ~ Challenge 10 ~ Halloween/Autumn 

Crafty Calendar ~ October ~ Halloween 

Craft Rocket ~ Challenge 97 ~ Autumn/Halloween 

Through the Purple Haze ~ Challenge 197 ~ October


Pam's Pearls


Sunday, October 23, 2022

Spinning By with Halloween Treats

Today I'm starting my count down to Halloween with a new Halloween card each day.  A couple of days I'll have other Design Team postings in addition to my Halloween cards.  I've had a lot of fun making extra cards for this little holiday.  I hope you will enjoy each one of them.  

First up is Penny Black's Spinning By.  


 Isn't this a fun image!  And a little bit spooky with that SNAKE coiled on the pedals!!!

She's colored with Copic markers and I added the Happy Halloween banner from the Polkadoodles Fang-tastic stamp set.  The decorative edges were die cut using  Pink and Main Scalloped Rectangle dies.

Hope you'll stop in tomorrow for the next Halloween card.

Thank you for stopping by today to view my blog. I enjoy sharing my work with you and invite you to 'Follow' my blog and to visit my site - "Not Just Scraps' on Facebook - where you can purchase my cards. 

I will be entering this card in the following challenges:

 Cardz 4 Galz ~ Challenge 184 ~ Halloween Colors

Craft Rocket ~ Challenge 97  ~ Autumn/Halloween  

Creative Knockouts ~ Challenge 475 ~ Halloween  

The Paper Shelter ~ Challenge 530 ~ Halloween 

Penny Black Saturday Challenge ~ Challenge 10/October 

Pam's Pearls 

Copics 

Hat: BV04, BV13, YG03, YR07, Bones: B40, Cat: Y21, Y23, YG03, Snake: YR23, YR27, Boots: N08, Her clothes BV13, YR07, YG03

Products


Saturday, October 22, 2022

Winter Wonderland

Today at Polkadoodles we are bringing you 'Christmas Snowmen cards with a pocket'.  I know you can't wait to see all the Design Team cards on the Polkadoodles Challenge Blog!

For my project card, I've started with the  'Cute Snowmen/ Dog' from the Winnie White Christmas Collection.  I hope you'll read on so I can fill you in on all the parts in today's card. 

But here's the final card first ~


I started with the image in Photoshop and sized them to about 3 3/4" square.  
If you notice at the end of my blog, this image originally has the snow couple with the little dog centered at the base of them.  I decided I wanted him on my pocket so I pulled that part of the image away and placed him to the side.  Then I printed both images on Neenah 110# cardstock.


I used my Copic markers for the coloring and have listed them below for your reference.   I used the Stitched Square die from Pink & Main for my decorative edges.

The papers I'm using on this card came from Polkadoodles Winter Wonderland Craft Paper. Love the red background as I think it makes the snowmen really pop! 

Next,  I cut the Festive Wishes square for the little pup, then used a larger die in the set to cut the square in half, diagonally, to make my Pocket.   At this point I felt like the card was going to need something else.  

After searching online at Polkadoodles, I found the Holly Berrry Lantern in the free download section. Next I went to my stamps and found the little Christmas tree. In the Gnome For Christmas clear stamp set, I was able to stamp and add the colorful Christmas tree.  After coloring both and fussy cutting them, I was finally ready to put the card together.

After securing the snowmen couple to the red dotted paper, I then added the Holly Berry lantern near the 'girl' snowman's arm.


I added the little dog near the bottom corner of the pocket then carefully lined the pocket up with the image and secured it at two sides.  Once it set then I added the completed Christmas Tree, touching the doggie but overlapping so that part of the tree was against the red background. 


The last addition  was the words 'Winter Wonderland' which also came from the same paper pack.

It still needed a little sparkle  so I painted Clear Wink of Stella on the Dog's scarf and holly and the glass panes on the lantern.  I added Diamond Stickles to the fur like brim of each hat, 


and traced the tiny star on the tree with Platinum Stickles.  Lastly, I added the tiny colored bling dots on the Christmas Tree.

Hope you like the end result and will visit the Challenge blog to see all the other great cards being shared today.

Thank you for stopping by today to view my blog. I enjoy sharing my work with you and invite you to 'Follow' my blog and to visit my site - "Not Just Scraps' on Facebook - where you can purchase my cards. 

I will be entering this card in the following challenges: 

Fab 'N Funky ~ Challenge 559 ~ Seasons Greetings 

The Holly and The Ivy Christmas Challenge 126 

Bastel Traum ~ Challenge 118 O Christmas Tree 

QKR Stampede ~ Challenge 454 

12 Months of Christmas Linkup ~ Challenge 93 

World Wide Open Design Challenge ~ October

Pam's Pearls


Copics  

Dog: E51, E53, R46, YG64, YG67, B93, B95, Male Snowman: B91, B93, B95, B97, B60, YR24, YR27, Female Snowman: YG64, YG67, R46, R17, R29, Lantern: Y15, Y17, R14, YR24, YR27, B93, B95, YG95, YG93, BG0000, Tree: YG95, YG93


Products


Friday, October 21, 2022

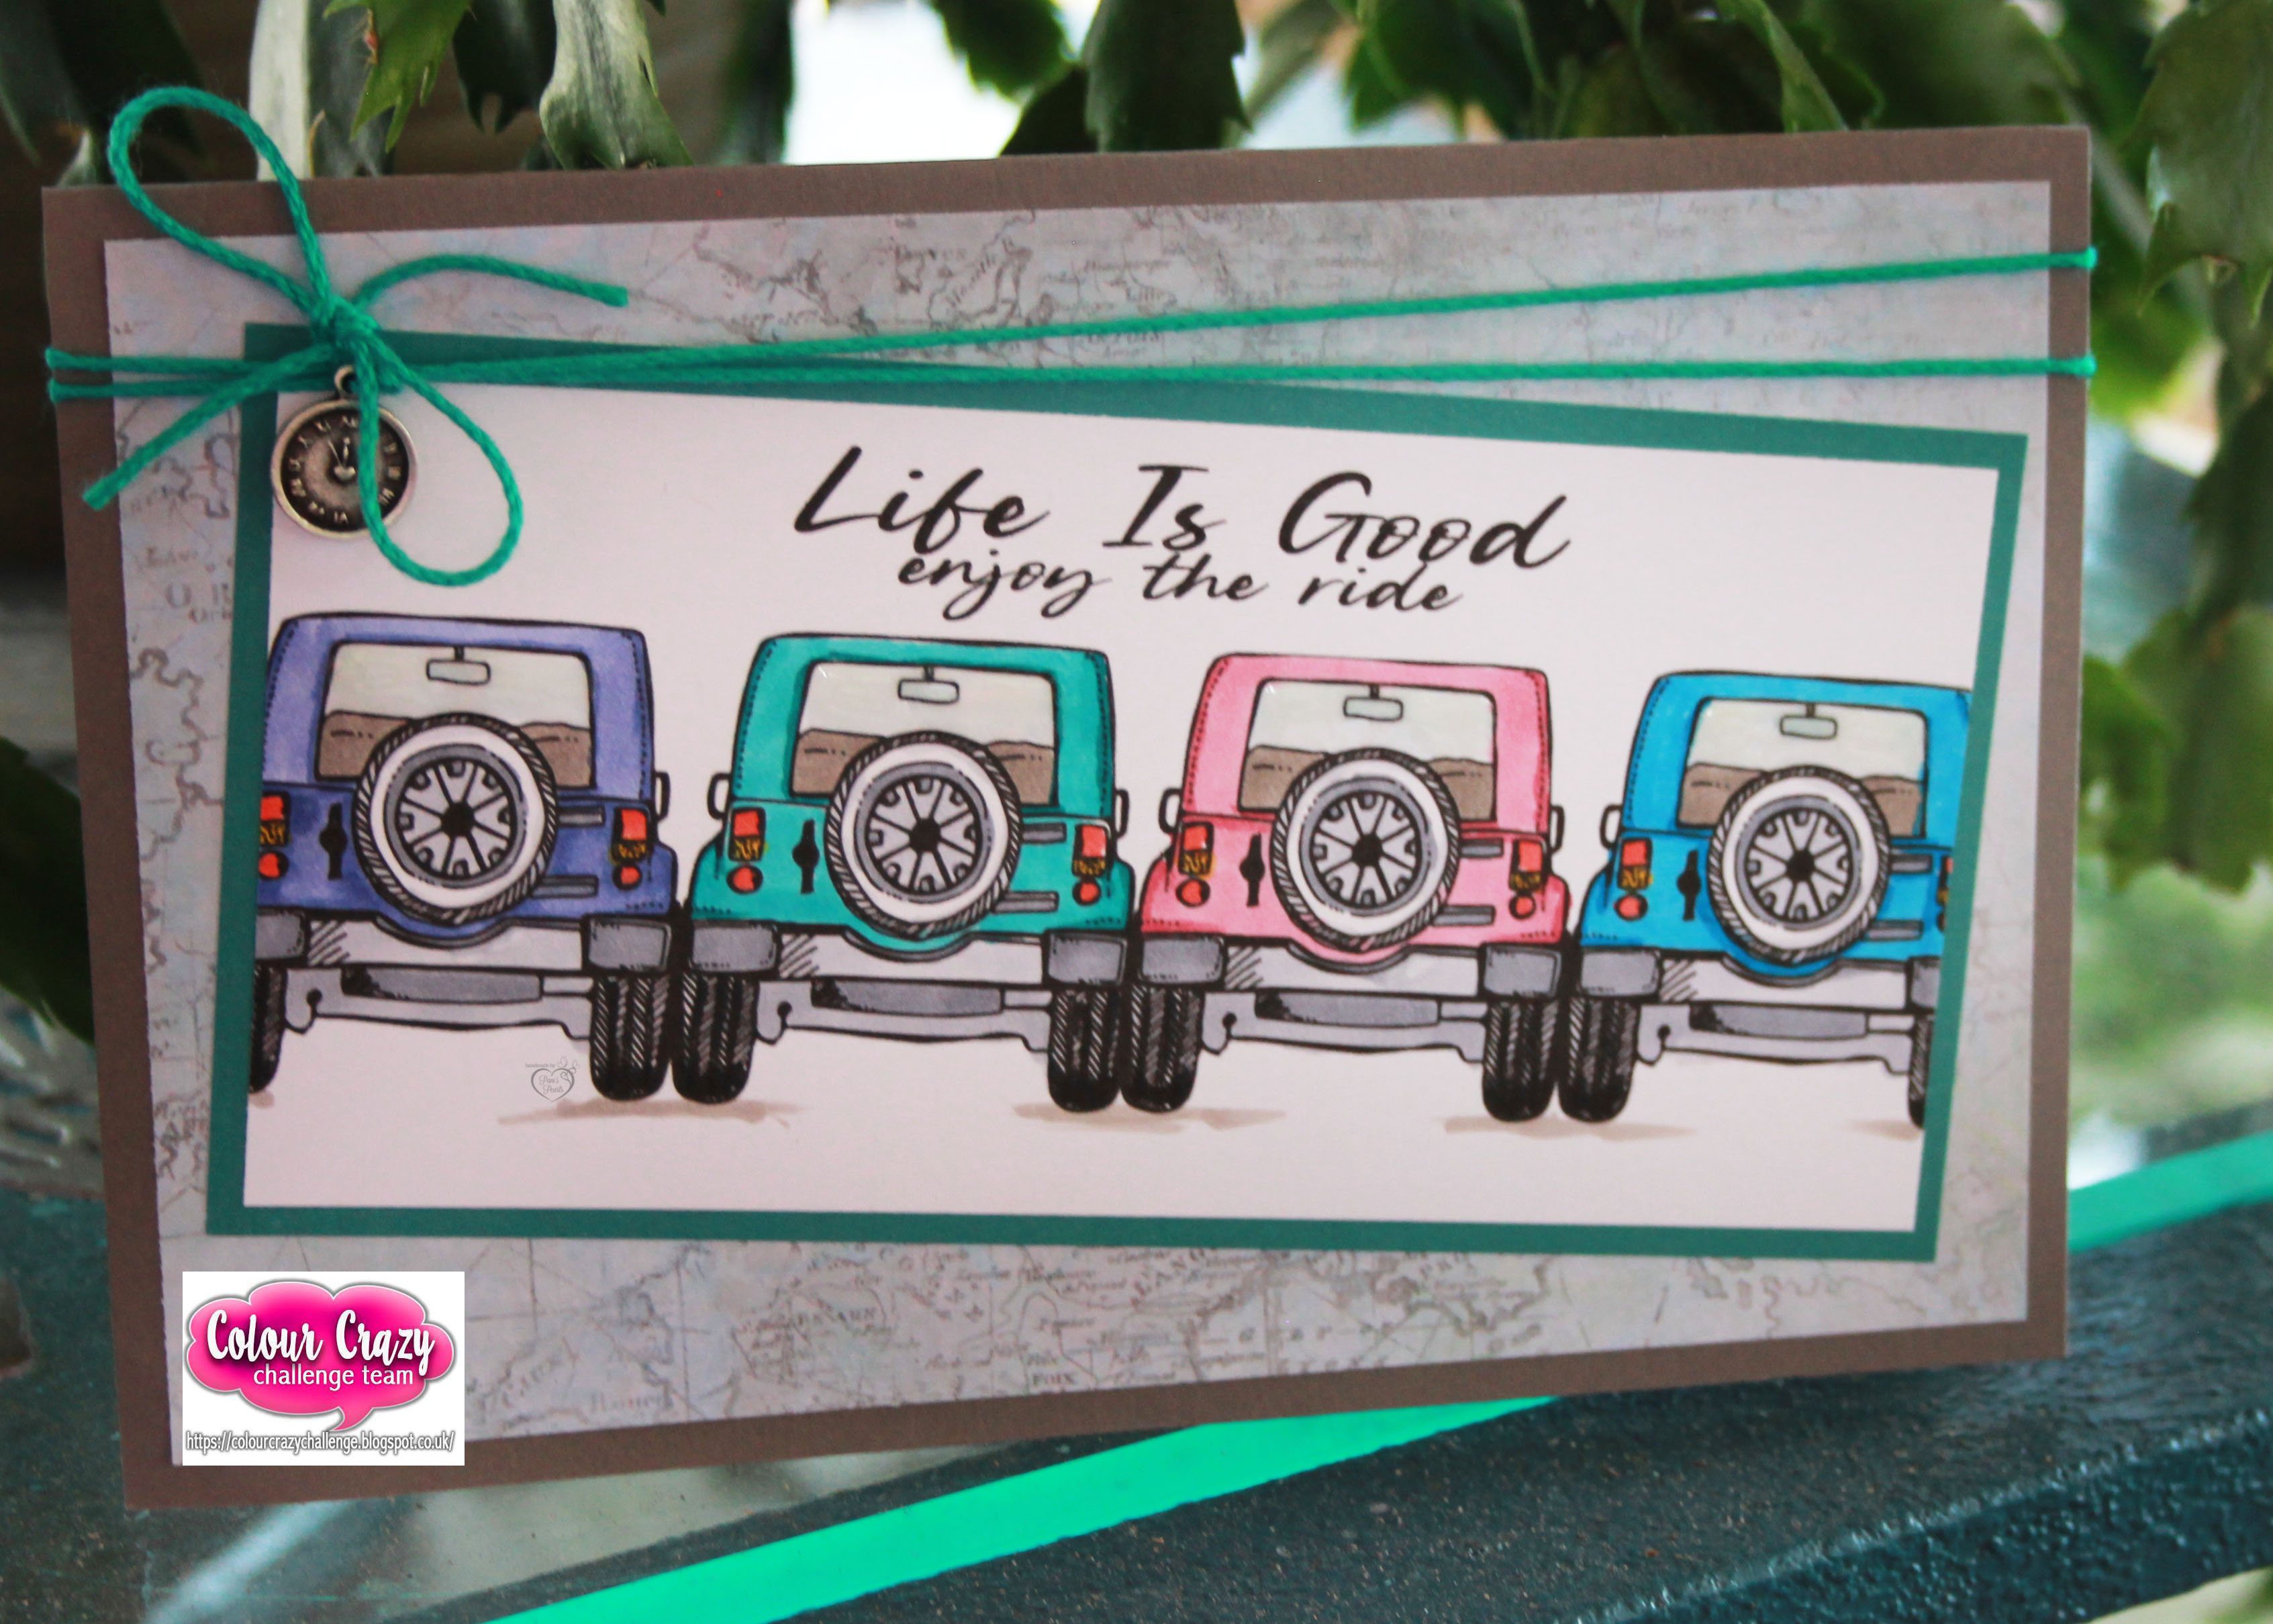
Life Is Good

 It's a new week starting today on the Colour Crazy Challenge blog and our sponsor is Angie Blom Digital Designs! 

For my project card I've used Enjoy Your New Adventure and selected the predesigned slimline image with four of the jeeps.


After printing on Neenah 110# cardstock, I used my Copic markers for coloring.  I selected a light green map print for the background matting and secured it on the dark gray slimline card base.  Next I cut the dark teal cardstock about a quarter inch larger than the card and secured the completed image in the center.  

When mounting the image I decided to tilt it slightly so that more of the map would show.  Then I added the light teal string wrap at the fold and a tiny clock charm in the bow.  Lastly I added glossy accents to the windows to complete my design. 

Thank you for stopping by today to view my blog. I enjoy sharing my work with you and invite you to 'Follow' my blog and to visit my site - "Not Just Scraps' on Facebook - where you can purchase my cards. 

I will be entering this card in the following challenges: 

Sisterhood of Crafters ~ One for the Guys 

Through the Craftroom Door ~ October 11th Challenge 

Perfect Time to Craft ~ October

Cards Galore Encore ~ October  

QKR Stampede ~ Challenge 454 

Rabisco Challenge #38 ~ October 

World Wide Open Design Challenge ~ October


Pam's Pearls


Copics 

Jeeps L/R: RV13/RV02, BG49/BG45, R85/R83, B06/B04, Tires & metal: C2, C3, C4, N8, Shadow: W3


Products 

Enjoy Your New Adventure


Wednesday, October 19, 2022

A Special Friend's Birthday

Today I'm sharing a birthday card I recently made for one of my special lady friends.  When we were chatting one day she was reminiscing about how she used to play the church piano, running her fingers over all the keys with grace and ease.   She told me that 'Precious Lord, Take My Hand' was her absolute favorite song.  With that in mind, I decided to use the hymn as part of her card. 


I googled the hymn and saved the image of the sheet music, then reduced it to about 3" x 4" and printed on card stock.  

I pulled two coordinating print 6" square papers and cut the polka-dotted piece the same size as the music.   I covered the front of the 6" card base with the coordinating floral paper. Tilting the patterned paper to the left of the music sheet allowed more of it to show.  Once it was where I liked it best, then I secured both pieces to the card base.  

Next, using the 1" strip that was cut off earlier, I added it across the center of the card front.  It was still 'too plain' so the search began for a coordinating trim.  The ivory lace was just the right sized, glued to the top and bottom edges of the belly strip. 

While looking for the lace, these peach flowers looked like a perfect match with the papers too.  They are secured with heavy duty glue dots as well as the gemstone center.  Lastly I added the shiny gold die cut butterfly (Gina Marie Designs) from my stash. 

Thank you for stopping by today to view my blog. I enjoy sharing my work with you and invite you to 'Follow' my blog and to visit my site - "Not Just Scraps' on Facebook - where you can purchase my cards. 

I will be entering this card in the following challenges: 

Through the Craft Room Door ~ Oct 11th Challenge  

A Perfect Time to Craft ~ October 

Colorful Options ~ Outrageous Orange 

Cards Galore Encore ~ October 

Scribbles Designs ~ Challenge #113 ~ Fall Colors  

Creative Crafters ~ Challenge 57 

Word Art Wednesday ~ Week 565-567


Pam's Pearls


Tuesday, October 18, 2022

Don't Make me Flip My Witch Switch

Today I'm sharing a Halloween card I recently made.  For this one I used Great Impressions, Batty Trees and Whimsy Stamps, So Witchy.


After stamping the two images on separate papers,  I colored with Copic markers.  The Halloween trees are die cut with Spellbinder Gilded Age, Nested Rectangle Die set.    

The A2 card base is covered with the purple spider web paper, then the tree image was added.  I fussy cut the witch and also added a couple of foam squares on the back of her hair and hat. She is secured  at the bottom so the foam squares raise her head up for added dimension.  Lastly,  the black organza ribbon was added at the fold and a pumpkin charm added at the knot.  

 Thank you for stopping by today to view my blog. I enjoy sharing my work with you and invite you to 'Follow' my blog and to visit my site - "Not Just Scraps' on Facebook - where you can purchase my cards. 

I will be entering this card in the following challenges: 

Colorful Options ~ October 

Creatalicious ~ Challenge 245 ~ Halloween Black/Purple 

Creative Crafting Uncles ~ Challenge 34 ~ Halloween 

Daisy Chain ~ Challenge 68 ~ Autumn/Halloween 

Papercrafting ~ Challenge 87 ~ Happy Halloween 

Sheepski ~ Challenge 67 ~ Autumn Things 

Sweet Stampers ~ Challenge 73 ~ Autumn or Halloween 

2 Old Bats ~ October ~ Halloween 

CD Sunday Plus ~ Challenge 96 

Dragonfly Challenge ~ #10 Halloween 

Whimsy Stamps and Inspiration ~ Halloween 

Pam's Pearls


Copics 

Hair: YR23, Y38, YR14, Y08, E33, Eyes:  B0000, Hat & Dress: V17, V15, V12, Stockings: Y38, YG23, Shoes: N2, N3, N5, N7, Broom: E13, E15, E19, Background, BV20, BV23


Products


Whimsy Stamps, So Witchy

Great Impressions, Batty Trees (discontinued)