Sunday, November 27, 2016

Casting all your cares upon Him

This morning's card will be sent to a friend's father-in-law
who is undergoing treatment for three major illnesses at one time.
How very overwhelming, especially as an elderly gentleman.

Yet our Lord tells us throughout the Bible that He will be with us,
 as He reminds us in 1 Peter 5:7


There are many today who are suffering and need an extra prayer.
  Be sure to add them to your conversation with the Holy Father today. 

This card is being submitted to:
Christian Card Maker ~ Encouragement Postings
and on my selling site, Not Just Scraps.

Thank you for stopping by  ~ may your day be blessed.

Serving a Risen Savior, Pam 


Friday, November 25, 2016

As the Season Begins ~ I SHALL...

Maintain My Focus 
On the Birth of Jesus Christ!

With 55-60 Christmas addresses on my list, no two will be alike and definitely they will all come from my crafting desk.  
Even the Christmas stamps and dies that are not religious in 
nature, they will be worked in with other scriptures to include a reference 
to the greatest birth ever!
I can't wait to share a few of them with you over the upcoming days till Christmas.


Today's card, which is focused on the nativity scene, was stamped
with navy embossing ink, sprinkled lightly with silver, and heat set.
  The sentiment was added after both cut image edges were inked with Stampin Up Not Quiet Navy.  
A scrap of silver sparkly ribbon was glued to the top before attaching to the card base.


This card will be submitted to the following and is also available for purchase on
my selling site, Not Just Scraps
Christian Card Maker ~ Short Challenge 11/26

Thank you for stopping by ~ May your day be blessed.

Serving a Risen Savior, Pam 

Wednesday, November 23, 2016

Fox & Friends Happy Birthday

When I re-entered the world of stamping about 2 years ago, 
I had a self imposed new rule.  When I get a new stamp, I have to use it, before I put it away. 
So those that know me and those that are true stampers,
know how long that rule lasted, right? 
The supply comes in a lot faster than the cardmaker can churn out quality card.  
But this week a sweet friend sent me a duplicate set of the Stampin Up Fox & Friends cling set, and I had just read the Critters and Creatures blog so what perfect timing to make a 
quick boy birthday card using the Gina Marie Stitched Background Circle Die Cut.
Even with the gel pen coloring (which didn't show up well in the photo), this design card can be put together in less than 15 minutes.
And what little fellow wouldn't love to receive one?


I encourage you to use your stamps as they are received and certainly send at least one card on to make someone day!  We all love Happy Mail. 

This posting is being submitted to 
and on my personal selling page Not Just Scraps.

Thank you for stopping by - your comments are welcomed and appreciated.
Serving a Risen Savior ~ Pam 


Tuesday, November 22, 2016

Give Thanks to the Lord for He is Good

Sending you many blessings today for a 
Happy Thanksgiving 
filled with family time, special memories, 
and acknowledgement of the blessings from our Lord and Savior.


To make this card, I used a page from a well worn hymnal  (picked up from the thrift store) applied to a kraft card base.  
The center scripture is a NAPKIN.  There are many Youtube videos
on napkin cards, the most important thing is to be sure you are using 
ONLY ONE PLY of the napkin.  
Carefully pull away all the back layers.  I rough cut around the area I want to use and also grab a scrap of card stock about that same size.  
Apply GLUE STICK to the scrap of card stock, 
then carefully lay the single ply napkin on top of the glue.  
You can let the napkin crinkle or carefully push the wrinkles out for a smooth surface, 
which is what I did.
Then the napkin is strong enough to use your selected die cut.
Apply to the top of the music sheet and then add eyelash yarn.

Inside I used the Heartfelt Creations So Blessed stamp 
and a tiny pumpkin charm from Lori's Lovely Paper Crafts.

Napkin cards are a great resource when you need to make a large quantity of cards 
and certainly come in such a variety of beautiful patterns.  
Be sure to check the selection available for purchase on my site, Not Just Scraps.

This posting is also being submitted to: 

Thank you for stopping by ~ your comments are welcomed and appreciated.
Serving a Risen Savior ~ Pam 


Monday, November 21, 2016

Christmas Tree Shaker ~ Step by Step

Although lots of card makers and crafter are probably through with
their Christmas cards for the upcoming holidays, 
I am one who tries hard to wait until after Thanksgiving to start mine.  

You know... We need to be Grateful before we start Celebrating.

But this past weekend with the Koala T Crafts shaker challenge posting,
 I pulled out my selection of Christmas dies.

A close online friend of mine (another Pam) was having trouble 
earlier this week with the pieces sticking in her beautiful border die.  
When I mentioned 'waxed paper', she couldn't imagine how that could possibly help.  
With her in mind, this posting shows how I do my shaker cards.

 On your magnetic plate, layer your paper, a piece of wax paper that is slightly larger than your die, then your die.  
If you have never tried wax paper with your dies ~ you are about to be amazed!

I then took the open window cut out of the tree and glued my transparency sheet to the back.  I used a small green cat eye ink pad to distress the die cut tree and then carefully taped it to the transparency.  Taking double sided foam tape, I cut small strips and went completely around the edge of the tree.  I did this TWICE so the confetti will have room to move around. 

Knowing that I planned to use a red card base, I needed white confetti.  
Back to the die machine - I cut two more just to use for the confetti. 

Before adding the confetti, I decided the card front needed a border, 
so I used another Memory Box die down the edge.  
After adding the confetti and removing the tape backing, I have found the easiest way to line everything up is to use my grid lined board.  Lining up the top and side edge of the shaker part helps you visualize where to lay the card base.  
A little yellow bling, red twine bow and a simple Merry Christmas stamp finish off the card without pulling away from the tree being the focal point. 


This posting will be shared on the following sites ~ I encourage you to visit them to see other great card designs.

And can be ordered from my site, Not Just Scraps.

Thank you for stopping by ~ your comments are welcomed 
and appreciated.
Serving a Risen Savior ~ Pam 


Saturday, November 19, 2016

Little Get Well Wishes

Today's card creation 
was made to be sent to a sweet little lady 
who continues to battle cancer.

Products used include:
The stamped image 'Amy' by
Gina Marie's Pierced Fancy Nested Label dies. 

This card is also being submitted to the weekend challenge on
and added to the November Long Challenge on 

I hope you will view my other cards on my selling site, Not Just Scraps.
Thank you for stopping by ~ Pam 


Friday, November 18, 2016

ATCM November Tech Challenge ~ Bleach Card

For November on Addicted to Card Making
the technical challenge card challenge was directed to
Fern Bainbridge's youtube video 
Like many of the techniques, there are lots of ways to use bleach on cards, some more successful than others. However our challenge was to follow this method.
I personally found it a bit difficult to get the results shown in the video which I attributed to me just learning a new technique.  
After trashing several attempts, 
I finally got a card worthy of submitting to my partner for the challenge. 
As you will see in the video, you start with a heavy coating of distressed ink on your background card base. 
Then using a small brush, you splatter or drop bleach onto the base.
Then after stamping and embossing your images, you apply the distressing ink to them,
 then let them dry.
After fussy cutting the images out, you again use the bleach on a small brush and pull from the center of the image to remove the ink color, giving your design a unique shading. 
Adding a dry embossed layer of vellum with Thinking of You, helped bring the two patterns together. 
While this is probably not a technique that I will do again, 
it was a challenge and a new learning. Both are important to me and to most crafters.  
It's too easy to get stuck in a rut doing the same style and design over and over.
So step out of the box and try a technique that is different from your style  ~ you might find something you really enjoy!

Your comments are welcomed and appreciated. I thank you for taking the time to visit my blog 
and order cards through Not Just Scraps.

Be sure to visit these sites where this posting will be 
along with many other talented card makers:

May your day be blessed ~ Pam 


Thursday, November 17, 2016

Recycled Calendar Cards ~ Thanksgiving

If you are a card maker, then I'm sure you have previously found
the abundant supply of great calendar images that can be used for your cards.
With Thanksgiving quickly approaching, today I wanted to share three cards that I created from one page of a Lane Calendar.
When doing this type of cards, the images are going to be large.
You need to be open to extra large cards, 
and prepared to make your own envelopes ~ 
which I happen to love to do also!
Which one would you choose? 


I hope you'll consider taking your 'used' calendar images to create a special greeting
and send to someone who needs a little encouragement today.

This posting is also being shared on:
and my personal selling site ~ Not Just Scraps

Thank you for stopping by ~ May your day be blessed! ~ Pam

Friday, November 11, 2016

Good Friends ~ Gina Marie Designs

Testing out my latest Gina Marie Design die from
the Stitched Background Circle Plate Die. 
This designer just rocks and continues to come out with dies
that are reasonably priced and offer so many possibilities
in our card making and other crafts.

I wanted to make a girlfriend themed card for my Anything Goes 
card swap on Addicted to Card Making, so on this card I used
the Stampin Up Steppin Style set.  Using double sided paper for
the template gave me the light pink circles to stamp the shoes
and sentiment on.  I used glittered gel pins to outline and color.
Then I simply glue the frame to your card base, 
and glued (or you could pop dot) the circles back into the holes. 
I finished the card off with a pink and green knotted twine piece
across the top to represent a friendship bracelet.


Endless design possibilities with this card base!

This card design is available for purchase at Not Just Scraps
and is also being submitted to
posted in Pinterest under Gina Marie Designs.

Thank you for stopping by ~ May your day be blessed!
~Pam~


Thursday, November 10, 2016

ATCM Dress Shape Challenge - Die Threading Technique

One of the new challenges for the month of November 
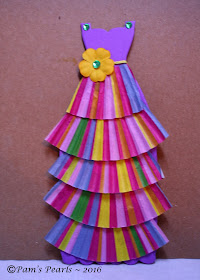
Dress Shaped Card.

For my card I used the Stampin Up Framelits Dress Up
and a new technique for me called 'threading'.
Select your dress die and fold your paper so the shoulders are over 
the fold line, and the neckline is below the fold line.
Pull the rest of the trimmed card up through the die so that only the
top part of the dress die is going to cut on the first pass.


Determine how long your dress will be then reverse the paper 'threading' and run it through your die cutting machine again. 
Ta-Da!  You now have a Long Dress out of a Short Dress Die!
Have you guessed what all those ruffled layers are yet?
Cup cake liners!
I added the layers of liners, a threaded belt and a yellow flower with a little bling to finish off this card.

This card design is available for purchase at Not Just Scraps 
and is also being submitted to:

Thank you for stopping by ~ May your day be blessed!
~Pam~


Wednesday, November 9, 2016

Wishing You Happiness

Today's card is to showing you What's On My Work Desk Wednesday
as I complete the monthly Envelope Challenge provided by

These are the supplies that were sent to 12 ladies to uniquely 
see what they could create using some of each piece included.
We were allowed to add one stamped image and 
two additional embellishments.


The stickers were different in each envelope and as noted we only had to use one.  Mine, unfortunately for me, did not go with any idea that I came up with 
for the remainder of my card supplies.

So I had to 'stretch' the rules a little and hope the ATCM judge would not throw me in jail... 
as the side of the stickers 
became the roadway for my baby stroller!
How's that for out of the box? 

Although this card design is available for purchase at 
Not Just Scraps, the original will be sent to a new mother
as part of the November Long Challenge on the

Be sure to visit these sites for other great card makers 
and where my card has also be submitted.


May your day be blessed ~ thank you for stopping by ~ Pam 


Saturday, November 5, 2016

ATCM Weekend Challenge 11_7_16

While anxiously awaiting the release of the weekend challenges 
on the card making sites...
 I was scratching my head a little with the list of three choice from 
Addicted to Card Making for this weekend came out.
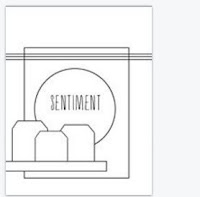
Hmm... King Tut Day, Candy Cord Day, or using this sketch.

Even though I am a visual learner, I stumble when it comes to
creating from a sketch.  But I knew King Tut was out for me and 
Candy Corn wasn't going to happen either.  

So I gathered up a new Stampin up set I received this week, 
called Sew Suite and a new Jar shaker die 
from Jillibean Soup (Hampton Arts).  
I had also purchased the jar shaped shaker inserts, 
which worked well with the larger shaker items. 
And here's what I came up with ~ 
a rather large card by the time 
I got all the pieces on there.  
I think next time I'd make the background spools lighter 
or maybe even a smaller stamp,
 but the button shaker with the sewing accessories 
is one I'd make again for sure. 

If you enjoy making and swapping cards, check out Addicted to Card Making on Facebook - 
Thank you for stopping by ~ Pam 


Friday, November 4, 2016

Stretch Your Ink Challenge

As crafters, we are all about recycling, upcycling, making our products last longer, and using them in unusual ways.
Today's card was inspired by Jenn Evers Youtube


Such an easy technique that truly adds to dimension to your card ~
be sure to watch Jenn's video and try it out. 

And when your card is complete - my challenge to you is to send it to someone you have never met in person.  All of our card maker sites have files for people with needs of encouragement. 
What a blessing your talent will be to the one who receives your special card. 

This card is also being entered in the STAMPloration November 
Challenge ~ be sure to check our the other entries there! 

Thank you for stopping by ~ Pam